The Simple Things

Taking time to live well
  • Home
  • Subscribe
  • SHOP
  • Newsletter
  • About
  • Work with us
  • Home
  • Subscribe
  • SHOP
  • Newsletter
  • About
  • Work with us

Blog

Taking Time to Live Well

  • All
  • Chalkboard
  • Christmas
  • Competition
  • could do
  • Eating
  • Escape
  • Escaping
  • Fresh
  • Fun
  • gardening
  • Gathered
  • Gathering
  • Growing
  • Haikus
  • Interview
  • Living
  • Looking back
  • Magazine
  • magical creatures
  • Making
  • Miscellany
  • My Neighbourhood
  • Nature
  • Nest
  • Nesting
  • outing
  • playlist
  • Reader event
  • Reader offer
  • Shop
  • Sponsored post
  • Sunday Best
  • Think
  • Uncategorized
  • Wellbeing
  • Wisdom

How to | Find Dyes in Nature

Iona Bower May 10, 2022

From onion skins to avocados and much more, you can find colour in the most unexpected places

If you’re making your first foray into natural dyeing (do not miss our May issue if so!) you might like to plan your palette. Here are a few natural products you can use for dyeing fabric all colours of the rainbow…

Red

Beetroot, pomegranate and hibiscus

Orange

Onion skins and carrots

Yellow

Dandelions, sunflowers and marigolds

Green

Spinach, nettles and grass

Blue

Red cabbage, blueberries and red grapes

Indigo

Woad plant and elderberries

Violet

Purple basil leaves and sumac berries


If you’re inspired to give natural dyeing a go, don’t miss our May issue, which has in it all the instructions you’ll need for dyeing cotton and linen napkins, tablecloths and more. The projects are taken from Taken from Natural Dyeing: Learn How to Create Colour and Dye Textiles Naturally by Kathryn Davey (Hardie Grant) with photography by Doreen Kilfeather and Kathryn Davey.

Buy this month's The Simple Things - buy, download or subscribe

More weekend projects…

Featured
Butter Spreader main.jpeg
Oct 25, 2025
Project | Whittle a Butter Spreader
Oct 25, 2025
Oct 25, 2025
LemongrassChickenRedCurryCoconutSauce.jpg
Aug 23, 2023
Recipe | Tandoor Lemon Chicken with Mango & Coriander Salad
Aug 23, 2023
Aug 23, 2023
Folk enamel tumbler.jpg
Aug 5, 2023
Make | Folk art enamelware
Aug 5, 2023
Aug 5, 2023

More from our blog…

Featured
Wellbeing cues pets.jpg
Jan 13, 2026
Wellbeing | Taking Cues from Pets
Jan 13, 2026
Jan 13, 2026
CITRUS PRINT.jpg
Jan 10, 2026
Make | Citrus Print Tablecloth
Jan 10, 2026
Jan 10, 2026
Alamy Tower.jpeg
Jan 6, 2026
Fiction | Top Towers from Books
Jan 6, 2026
Jan 6, 2026
In Making Tags issue 119, dyeing, natural dyes, weekend project
Comment

Make | A Macrame Bottle Holder

Iona Bower March 16, 2022

Knot your way to a knotty, natty carrier for your water bottle, leaving you hands free… perhaps to do some more macrame?

All you need to make this cross-body bottle carrier is to master a few simple knots, and you’re away. Everything you need to know, including the knot techniques are in our instructions and all the equipment you need is the rope, some tape and a little patience. Put aside an afternoon on a long weekend to create your bottle holder, or maybe make it your project for April and do a little every day.

If you’re not too TIED UP (sorry) this month, you might also like to make the macrame bag that’s featured in our April issue. Turn to page 106 to find the instructions.

Download the instructions for the macrame water bottle here.


More weekend projects…

Featured
Butter Spreader main.jpeg
Oct 25, 2025
Project | Whittle a Butter Spreader
Oct 25, 2025
Oct 25, 2025
LemongrassChickenRedCurryCoconutSauce.jpg
Aug 23, 2023
Recipe | Tandoor Lemon Chicken with Mango & Coriander Salad
Aug 23, 2023
Aug 23, 2023
Folk enamel tumbler.jpg
Aug 5, 2023
Make | Folk art enamelware
Aug 5, 2023
Aug 5, 2023

More from our blog…

Featured
Wellbeing cues pets.jpg
Jan 13, 2026
Wellbeing | Taking Cues from Pets
Jan 13, 2026
Jan 13, 2026
CITRUS PRINT.jpg
Jan 10, 2026
Make | Citrus Print Tablecloth
Jan 10, 2026
Jan 10, 2026
Alamy Tower.jpeg
Jan 6, 2026
Fiction | Top Towers from Books
Jan 6, 2026
Jan 6, 2026
In Making Tags issue 118, macrame, weekend project, make, makes, craft
Comment

Photography: Josie George

How to | Make a Thread Journal

Iona Bower February 15, 2022

Keeping a record of your days doesn’t have to mean picking up a pen and paper; you can be as
creative as you like

If we say so ourselves, we loved the weather scarf in our February issue (pictured above by Josie George). It seems like an ingenious way both to keep a small record of each day as well as to keep up a hobby. But if you aren’t a natural knitter, you might like to try a different sort of thread journaling.

Look up ‘thread journaling’ on Pinterest and you’ll see hundreds of examples from people who’ve kept an embroidery record of their year. Here’s how it’s done. 

What you’ll need
An embroidery hoop
Some cloth (a large napkin is good)
A good collection of differently coloured embroidery threads
Needles, thimbles, embroidery pen and other notions

How to do it
* Think about how you want to record your days. You can do a year (you don’t have to start with January, of course) or just a month or a specific period in your life.

* Sketch out a few ideas on paper for how you’d like your design to work. You could set it out like a calendar grid, present it as a wheel or just go completely higgeldy piggeldy and stitch each day or week’s motif wherever you please.

* Pop your cloth in your hoop and get started. You might like to stitch a motif to represent each day or each week. What you stitch is up to you. You could do a castle or a hill to represent a relevant day out, a cake to represent a party you went to, a pair of curtains for a theatre trip, a flower or vegetable for something you’ve grown in the garden. If you prefer, and have the chops, you could get quite specific - perhaps embroidering something to represent every book you read in a year, or everything you grow in your veg patch this summer.

If you’d like to read more about Josie’s Weather Scarf you can find out all about it on page 108 of our February issue. Buy this month's The Simple Things - buy, download or subscribe

More from our February issue…

Featured
Book Club new Emma Croman.jpg
Feb 12, 2022
Food | Fictional Feasts
Feb 12, 2022
Feb 12, 2022
istock brain fog.jpg
Feb 6, 2022
Brain fog | And how to beat it
Feb 6, 2022
Feb 6, 2022
Rachel Lees view from bed.jpg
Feb 5, 2022
How to | Have a Proper Lie-In
Feb 5, 2022
Feb 5, 2022

More journaling inspiration…

Featured
Nature Diary.jpeg
Feb 22, 2025
How To | Keep a Nature Diary
Feb 22, 2025
Feb 22, 2025
Jennie Maizells journal.jpg
Jul 30, 2022
Project | Ideas for a Summer Journal
Jul 30, 2022
Jul 30, 2022
weather scarf.jpeg
Feb 15, 2022
How to | Make a Thread Journal
Feb 15, 2022
Feb 15, 2022
In Making Tags embroidery, journalling, project, make, knitting
Comment

Photography: Kirstie Young

Make | Pine Needle Cough Syrup (and other immune boosters)

Iona Bower January 2, 2022

Pine features in many commercial cough syrups, alongside menthol or eucalyptus to aid breathing. This traditional remedy relies on the high vitamin content of the pine needles and is also heavy on the honey to soothe scratchy throats.

Pine needle cough syrup

Makes 500ml

250ml water
150g pine needles, washed carefully
250ml honey

1 Bring the water to the boil in a small pan and add the pine needles. Cover and simmer for 5 mins, making sure the pine needles stay submerged. 

2 Strain the liquid into a jug and discard the pine needles. Return your strained liquid to the clean pan. 

3 Add the honey, then return to the heat and simmer gently for 5 mins.

4 Decant into a jar or bottle and leave to cool. When cool, fasten the lid.

Maker’s note: Store in the fridge for up to 3 months.

Note: most commercial Christmas trees are sprayed with pesticides so forage your pine instead and give the needles a good bath before use


Oldie-but-goodie immune boosters

If your get up and go has got up and gone, try one of these natural boosters for your immune syste,
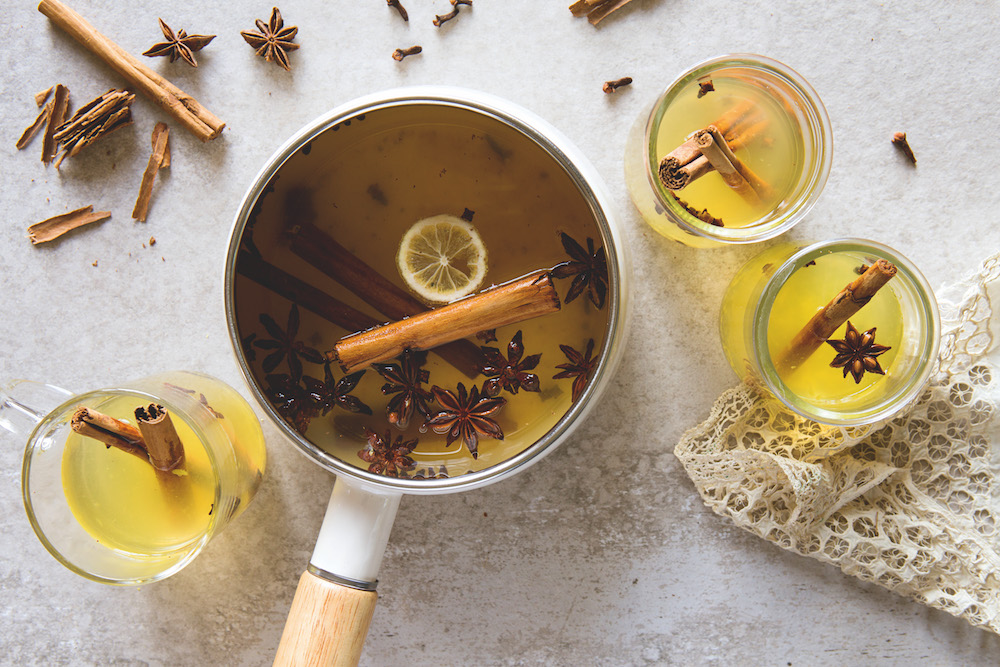
The hot toddy

There’s no science behind the alcohol bit, apart from it might send you off to sleep quicker, but the warm liquid and spices will help to thin mucus and soothe a sore throat and a nice hot toddy can definitely perk up your mood.

Chicken soup 

More than just comfort food, chicken contains an amino acid cysteine which can act as a decongestant. And, as with any homemade soup, it’ll contain lots of nutrients from the bones and veg and water for extra hydration, which you need when suffering.

Garlic milk

This might turn your stomach but the combination of garlic and/or onion with honey and a warm drink can help ease coughs and colds due to the antibacterial properties of the garlic/onion and mucus-dissolving honey. Gently heat a glass of milk, add diced onion and/or a crushed garlic clove, take it off the heat and leave to infuse for 20 mins. Strain and add 1–2 tsp honey (raw if possible) per cup. 

Drinking vinegar 

Fruit vinegar has been used for centuries for its anti-inflammatory and antibacterial properties. You can make your own apple cider or fruit vinegar but you’ll need to leave it to ferment for 4–6 weeks. Or you can buy it ready to use. The Bath Alchemist Apple Cider Vinegar Wellness Tonic comes in three flavours. Add a tablespoon of vinegar daily to water, tonic or mix into a dressing. 

Gargling salt water

Gargling with warm salt water and nasal cleansing with a saline spray from the chemist can both help reduce the length of cold symptoms according to studies. 

Steam inhalation

Dry air can make congestion and sore throats worse, but steam will help to clear your airways. You could have a hot shower, steam your face over a sink with a towel over your head and maybe a few drops of eucalyptus essential oil, or use a cool mist humidifier.


The Pine Needle Cough Syrup is one of the makes from our Heart Body Soul feature by Lottie Storey in our January issue, which also features recipes for Dark Pine Nougat Bars, Pine & Rosemary Ice Cream and Pine Vodka. The immune booster ideas are from our feature, Cold Comforts, by Rebecca Frank, also in our January issue; it’s a one-stop shop for fighting off winter sniffles. 


More natural winter remedies…

Featured
SIM66.EVENTS_TonicsAndTeas.jpeg.png
Dec 27, 2025
Make | A Seasonal Tonic
Dec 27, 2025
Dec 27, 2025
SIM68.EVENTS_ginger shots_.png
Feb 9, 2018
Seasonal winter shots
Feb 9, 2018
Feb 9, 2018
SIM65.EVENTS_Recipe, Elderflower & Ginger Drops a1 .png
Nov 13, 2017
Homemade cough drops
Nov 13, 2017
Nov 13, 2017

More from our blog…

Featured
Wellbeing cues pets.jpg
Jan 13, 2026
Wellbeing | Taking Cues from Pets
Jan 13, 2026
Jan 13, 2026
CITRUS PRINT.jpg
Jan 10, 2026
Make | Citrus Print Tablecloth
Jan 10, 2026
Jan 10, 2026
Alamy Tower.jpeg
Jan 6, 2026
Fiction | Top Towers from Books
Jan 6, 2026
Jan 6, 2026
In Making Tags issue 115, January, coughs, immune boosters, natural remedies, pine
Comment

Make | Winter Herb Salt

Iona Bower November 23, 2021

This easy recipe can be made with whatever fresh herbs you have to hand; you just need roughly the same volume of sea salt as you do chopped herbs

The flavoursome salt is a versatile seasoning for so many winter recipes and is particularly good crumbled over freshly roasted chestnuts. Potted up in little glass jars and tied with a ribbon, it also makes a lovely gift for others to enjoy.

Makes 1 jar

You will need
A mixed bunch of fresh winter herbs of your choice (rosemary, sage, and a few bay leaves is our go-to combination for this)
Coarse sea salt

To make
Remove any tough stems from the herbs and finely chop them. Roughly measure out an equal volume of sea salt to the chopped herbs. Mix the Winter herbs and sea salt together until well combined. Spread the herb salt out in a shallow layer in a dish or bowl, cover with a tea towel, and leave somewhere warm and dry for a few days, or until the salt and herbs are dry to the touch. Scoop into a jar and use as needed.

The Winter Herb Salt was just one of the beautiful makes from our feature Gifts from the Smallholding in our December issue, by Kathy Bishop and with photography by Tom Crowford from The Seasonal Table. We’ve loved following Kathy and Tom’s adventures on their smallholding this year.  You can find the Winter Herb Salt as well as lots more wintry recipes and ideas, including squash and kale lasagne, mash with onions and breadcrumbs, ginger crumble with apple compote and redcurrant, apple and rosemary fizz starting on page 46 of our December issue, which you can preorder now.

Buy this month's The Simple Things - buy, download or subscribe

More things to make with salt…

Featured
Winter Herb Salt.jpg
Nov 23, 2021
Make | Winter Herb Salt
Nov 23, 2021
Nov 23, 2021
Nov 9, 2016
Salt and coriander roast roots with smoky yogurt
Nov 9, 2016
Nov 9, 2016
Nov 8, 2016
Staple foods: 5. Salt
Nov 8, 2016
Nov 8, 2016

More from our blog…

Featured
Wellbeing cues pets.jpg
Jan 13, 2026
Wellbeing | Taking Cues from Pets
Jan 13, 2026
Jan 13, 2026
CITRUS PRINT.jpg
Jan 10, 2026
Make | Citrus Print Tablecloth
Jan 10, 2026
Jan 10, 2026
Alamy Tower.jpeg
Jan 6, 2026
Fiction | Top Towers from Books
Jan 6, 2026
Jan 6, 2026
In Making Tags winter, Winter, winter herbs, salt
Comment

Photography: Kirstie Young

Make | Bay and Lemon Sea Salt Body Scrub

Iona Bower November 13, 2021

Bay and lemon are a happy pairing, both in the kitchen and in the bathroom. This scrub combines astringent lemon zest and juice with the exfoliating power of salt, while the dried bay leaves are anti-fungal.

Makes around 2x 500ml jars
1kg sea salt
750ml olive oil
5 lemons, zest and juice
10 bay leaves
100g thickener such as tapioca flour or arrowroot

1 Pour the salt into a large mixing bowl, then add the olive oil, lemon zest and lemon juice.

2 Stir well, then crumble in the bay leaves. Break them up using your hands and scrunch into the mix (but keep pieces fairly large to avoid clogging up the plughole!).

3 Add the thickener, then stir until the mixture is well combined and it holds together.

4 Transfer to jars with seals. To use, grab handfuls of the scrub, avoiding the bay leaves if you can, and massage onto arms, legs, bums and tums. Rinse off using warm water.

Maker’s note: The scrub will keep for up to 12 months in a sealed jar.

This project, perfect for a weekend afternoon, is from our feature Heart, Body and Soul, which this month focuses on bay leaves. The feature also includes a project to make a bay and chilli ‘swag’, a panna cotta, a salad and a tea.

Buy this month's The Simple Things - buy, download or subscribe

More inspiration for beautiful bathtimes…

Featured
Bay Lemon Salt Scrub Kirstie Young.jpg
Nov 13, 2021
Make | Bay and Lemon Sea Salt Body Scrub
Nov 13, 2021
Nov 13, 2021
bath with dog my place.jpg
Sep 12, 2021
Inspiration | In The Bath
Sep 12, 2021
Sep 12, 2021
Lip Balm Kirstie Young.jpg
Apr 4, 2021
Make | Chocolate & Peppermint Lip Balm
Apr 4, 2021
Apr 4, 2021

More from our November issue…

Featured
Kelpies statue Alamy.jpg
Nov 2, 2021
Visit | Giant Statues
Nov 2, 2021
Nov 2, 2021
Wellbeing Sleep Stocksy.jpg
Oct 31, 2021
How to | Get to Sleep More Easily
Oct 31, 2021
Oct 31, 2021
Black Widow Cocktail 2.JPG
Oct 30, 2021
Tipple | Black Widow Cocktails
Oct 30, 2021
Oct 30, 2021
In Making Tags bay, weekend project, homemade, heart body soul, make, homemade beauty, bathtime
1 Comment
SIM67.MAKES_Step3_5.png

Make | Dip dye stationery

Lottie Storey September 18, 2021

While away a crafternoon learning the art of dip dye and emerge with your very own stationery set

September is all about new stationery for us, so we needed no more excuse than that to dig out this weekend project from our issue 67 for making your very own dip dye stationery.

You will need:
A selection of paper, envelopes and postcards
Hand fabric dye powder (we used Dylon)
Warm water
Measuring jug
Vessel for holding your dye (a washing-up bowl, bucket or Tupperware box works well*) 
Length of twine
Clothes pegs
Scissors

1 Before you start, tie a length of twine, washing line-style, nearby, ready for hanging your paper to dry. Cover any surfaces with newspaper. 
2 Make up your dye solution. Start with pouring 1 litre of warm water into your vessel. Add 4 tsp of dye powder and stir until dissolved: the amount you use will determine the strength of your colour, so use a piece of scrap paper to test.
3 Once you’re happy with your dyeing solution, take your piece of paper and – slowly, carefully – insert it into the dye solution, only immersing the amount of paper you’d like coloured. Hold it in the solution for a few seconds and then, slowly and carefully again, draw it out of the solution. Hold the paper over for a moment to catch any drips of dye. You can dip again for a slightly stronger coverage.
4 Peg your dip-dyed stationery to your length of twine to dry. If, once dry, your stationery is a little curled at the edges, place inside a heavy book and leave for 24 hours
 

Buy this month's The Simple Things - buy, download or subscribe

From our September issue…

Featured
Wellbeing cues pets.jpg
Jan 13, 2026
Wellbeing | Taking Cues from Pets
Jan 13, 2026
Jan 13, 2026
CITRUS PRINT.jpg
Jan 10, 2026
Make | Citrus Print Tablecloth
Jan 10, 2026
Jan 10, 2026
Alamy Tower.jpeg
Jan 6, 2026
Fiction | Top Towers from Books
Jan 6, 2026
Jan 6, 2026

More weekend projects to make:

Featured
CITRUS PRINT.jpg
Jan 10, 2026
Make | Citrus Print Tablecloth
Jan 10, 2026
Jan 10, 2026
Lanyard & Key Fob.jpg
Jun 1, 2025
Project | Make a Scrap fabric Key Fob
Jun 1, 2025
Jun 1, 2025
TEA COSY JUMPER.jpg
Jan 25, 2025
How to | Make a Tea Cosy from an Old Jumper
Jan 25, 2025
Jan 25, 2025
In Making Tags make, weekend project, Make project, january, issue 67
Comment
Photography: Kirstie Young Styling: Lottie Storey

Photography: Kirstie Young Styling: Lottie Storey

Make | a Jasmine Garland for your hair or your wall

Iona Bower July 17, 2021

Whether you’re going to San Francisco or not, now is the time of year to be wearing flowers in your hair for sure.

This easy make is just one of the ideas for things to do with Jasmine from our July Heart, Body and Soul feature. Once you’ve crowned yourself Queen of Summer, you might like to whip up the jasmine body butter and even use the flowers in some cookery to make jasmine tea and honey chicken or tofu skewers, or the dark chocolate and orange tart with jasmine cream. 

But first things first; let’s get that garland made.

Tendrils of jasmine, with their star shaped flowers, lend themselves for use in a garland that you can wear in your hair or hang on your wall.


You will need:

Several strands of flowering jasmine

Scissors or secateurs

Floral wire


1 Snip off any broken leaves or petals from your jasmine strands.

2 Find your most robust strand and wrap it around the crown of your head to get a rough size for your garland. Take it off your head and wrap some wire around the ends
to secure.

3 With the remaining strands, continue to wrap the garland in both directions covering up or tucking in the ends of the strands where you can, using a small twist of wire to fasten. Keep going until you have a garland that pleases you!

Maker’s note: The circle can be whatever size you like, but for a garland to wear it will need to be around 25cm diameter or go large for a jasmine wreath to hang on the wall.

 Buy this month's The Simple Things - buy, download or subscribe

More from our July issue…

Featured
Wellbeing cues pets.jpg
Jan 13, 2026
Wellbeing | Taking Cues from Pets
Jan 13, 2026
Jan 13, 2026
CITRUS PRINT.jpg
Jan 10, 2026
Make | Citrus Print Tablecloth
Jan 10, 2026
Jan 10, 2026
Alamy Tower.jpeg
Jan 6, 2026
Fiction | Top Towers from Books
Jan 6, 2026
Jan 6, 2026

More edible flower ideas…

Featured
Pavlova.jpeg
May 31, 2025
Recipe | Pavlova with Berries and Rose Petal Cream
May 31, 2025
May 31, 2025
Cheesecake2 Emma Croman.jpg
Mar 31, 2024
Recipe | No Bake Cheesecake
Mar 31, 2024
Mar 31, 2024
Ricotta and Basil stuffed Nasturtiums-6694.jpg
Sep 3, 2022
Recipe | Ricotta & basil stuffed nasturtium flowers
Sep 3, 2022
Sep 3, 2022


In Making Tags issue 109, edible flowers, heart body soul, jasmine, summer projects, flowers
Comment
cactus embroidery.jpg

Make | Embroidery Hoop Templates

Iona Bower May 20, 2021
notebook embroidery.jpg

These sweet embroidery projects from Love Embroidery magazine are featured in our June issue. You’ll find all the instructions beginning on page 102 and you can buy the issue from our online store. But first you will need the templates. Download them below and get stitching.
Project: Jen Smith and Miriam Polak

Desert Dunes hoop

Notebook cover

Buy this month's The Simple Things - buy, download or subscribe
For more patterns, ideas and inspiration pick up a copy of Love Embroidery

More makes and things to do…

Featured
Dip Dye Candles.jpg
Oct 27, 2024
Make | Dip Dye Candles
Oct 27, 2024
Oct 27, 2024
LaylasLeash.jpg
Sep 18, 2024
Make | A Macrame Dog Lead
Sep 18, 2024
Sep 18, 2024
EGGShell-tealights-the-simple-things.png
Apr 10, 2023
Eggshell tea lights
Apr 10, 2023
Apr 10, 2023

More from our June issue…

Featured
Wellbeing cues pets.jpg
Jan 13, 2026
Wellbeing | Taking Cues from Pets
Jan 13, 2026
Jan 13, 2026
CITRUS PRINT.jpg
Jan 10, 2026
Make | Citrus Print Tablecloth
Jan 10, 2026
Jan 10, 2026
Alamy Tower.jpeg
Jan 6, 2026
Fiction | Top Towers from Books
Jan 6, 2026
Jan 6, 2026
In Making Tags issue 108, embroidery, craft, crafternoon
1 Comment
Photography: Kirstie Young

Photography: Kirstie Young

Make | Chocolate & Peppermint Lip Balm

Iona Bower April 4, 2021

A simple project for a sweet-smelling Easter gift to make a change from a chocolate egg

Homemade lip balm is easier than you might expect. Once you’ve got the hang of it, you can experiment with different flavour combinations. This version is like mint choc chip ice cream for your lips.

Makes two pots of lip balm

1 tbsp coconut oil
1½ tbsp shea butter
1½ tbsp cocoa butter
1 tbsp cocoa powder
3 drops peppermint essential oil
2 x 30ml jars

1 Put the coconut oil, shea butter, cocoa butter and cocoa powder into a jam jar or bowl.

2 Set the bowl over a pan of boiling water, taking care not to let it touch the water. As soon as they’ve all melted, remove from the heat. Alternatively, heat in the microwave for 60-90 seconds, or until melted.

3 Let the mix cool for a few minutes before adding the essential oil.

4 Stir well before pouring into your jars. Be careful not to spill the mixture around the top of the jar as this’ll make it difficult to open once cooled. To speed up the cooling process, put your jars in the fridge or freezer.

This recipe is just one of the creative projects by Lottie Storey that feature in our Heart, Body and Soul pages, which this issue focuses on chocolate (of course). There are also instructions for making a chocolate and rose petal salami, chocolate tagliatelle and a pain au chocolat miso pudding. Photography by Kirstie Young.

Buy this month's The Simple Things - buy, download or subscribe

More from our April issue…

Featured
Wellbeing cues pets.jpg
Jan 13, 2026
Wellbeing | Taking Cues from Pets
Jan 13, 2026
Jan 13, 2026
CITRUS PRINT.jpg
Jan 10, 2026
Make | Citrus Print Tablecloth
Jan 10, 2026
Jan 10, 2026
Alamy Tower.jpeg
Jan 6, 2026
Fiction | Top Towers from Books
Jan 6, 2026
Jan 6, 2026

More chocolate (because there can’t be too much)…

Featured
20230609_Every_Last_Bite_Rosie_Sykes_Quadrille_Amazing_Chocolate_Coconut_Squares_017_Patricia_Niven.jpeg
Feb 8, 2025
Cake | Chocolate Coconut Squares
Feb 8, 2025
Feb 8, 2025
Spelt cookies.jpg
Jan 18, 2025
Recipe | Chocolate, Bay Leaf and Spelt Oat Cookies
Jan 18, 2025
Jan 18, 2025
Blood orange truffles.jpg
Oct 26, 2024
Wellbeing Recipe | Honeyed Blood Orange & Bay Truffles
Oct 26, 2024
Oct 26, 2024
In Making Tags issue 106, chocolate, project, Homemade peg bag, natural skincare
Comment
Photography: Kirstie Young

Photography: Kirstie Young

Make | Rosemary, Peppermint and Lemon Scalp Rub

Iona Bower February 6, 2021

Clear your head and bring the zing to your shower, too, with this treatment you can make in your kitchen

Rosemary and lemon are a classic combination, made even zingier with the addition of peppermint. Great for fine to medium hair, applying this to the scalp encourages blood flow, while the essential oils clear the head.

Makes one
250ml jar
250ml coconut oil
4 sprigs rosemary
3 drops peppermint essential oil
6 drops lemon essential oil

1 Melt the coconut oil in the microwave until pourable.
2 Finely chop the needles from one sprig of rosemary.
3 Pour the coconut oil into a 250ml re-sealable jar and stir in the chopped rosemary and both essential oils.
4 Push the remaining rosemary sprigs into the sides of the jar before sealing.
5 To use, apply the scalp rub all over the head, getting right into the roots. Leave for 15-30 mins before shampooing and rinsing thoroughly.

This project by Lottie Storey is just one of the ideas on our new potion-making for grown-ups series, Heart, Body and Soul. This month, we focus on rosemary, with an infused oil, and recipes for a bread, a cake and a pasta dish, all using the herb.

Buy this month's The Simple Things - buy, download or subscribe

More from our February issue…

Featured
Back page.JPG
Feb 23, 2021
February | a final thought
Feb 23, 2021
Feb 23, 2021
Prawn Toasts Catherine Frawley.JPG
Feb 9, 2021
Recipe | Sesame Prawn Toasts
Feb 9, 2021
Feb 9, 2021
Bodkincreates.jpg
Feb 3, 2021
Where to buy | espresso cups like the ones on our February cover
Feb 3, 2021
Feb 3, 2021

More lotions and potions to make…

Featured
SIM66.EVENTS_TonicsAndTeas.jpeg.png
Dec 27, 2025
Make | A Seasonal Tonic
Dec 27, 2025
Dec 27, 2025
Wellbeing.jpg
Feb 11, 2024
Make | Kitchen Face Masks
Feb 11, 2024
Feb 11, 2024
Bathsalts make 2.jpg
Oct 30, 2022
Make | Homemade Bath Salts
Oct 30, 2022
Oct 30, 2022
In Making Tags potions, makes, skincare, natural skincare, Rosemary, heart body soul, haircare
Comment
EDIT block printed sweatshirt.jpg

Make | blockprint sweater template

Iona Bower January 21, 2021

Give an old sweatshirt a new look in an afternoon and feel very clever indeed

In our February issue, we have a feature on how to upcycle an old sweater into something a little lovelier. All the items you need and the instructions are on page 42, and you can print out the template you will need for your blockprint below.

Blockprint template

Good luck! And don’t forget to send us pictures of your new jumpers!

More craft projects for cold afternoons…

Featured
Jumper blanket.jpg
Oct 4, 2025
Make | An Upcycled Jumper Blanket
Oct 4, 2025
Oct 4, 2025
Lavender eye pillow.jpg
Jul 22, 2023
Make | A Soothing Lavender Eye Pillow
Jul 22, 2023
Jul 22, 2023
Modern Crochet Style PAGES2.PRESS 60.jpg
Apr 19, 2023
Weekend Project | Crocheted fruit placemats
Apr 19, 2023
Apr 19, 2023

More from our February issue…

Featured
Back page.JPG
Feb 23, 2021
February | a final thought
Feb 23, 2021
Feb 23, 2021
Prawn Toasts Catherine Frawley.JPG
Feb 9, 2021
Recipe | Sesame Prawn Toasts
Feb 9, 2021
Feb 9, 2021
Bodkincreates.jpg
Feb 3, 2021
Where to buy | espresso cups like the ones on our February cover
Feb 3, 2021
Feb 3, 2021
In Making Tags issue 104, Issue 104, makes, make, upcycle, printimaking, crafternoon
Comment
Photography: Joe McIntyre

Photography: Joe McIntyre

Make | Candle Holder

Iona Bower January 9, 2021

Light your way to bed with this easy-to-make, no-kiln-required clay candle holder

This elegant candle holder is really easy to make with just a couple of inexpensive craft purchases. It’s one of three candle holder makes created by our talented Simple Things duo, Karen Dunn and Joe McIntyre. You can find the instructions for the other two in our January issue to add a bit of glow to dark January evenings.

You will need:

Air-drying clay
Rolling pin
Craft knife
Ruler, paper, pencil and scissors
Water
White acrylic paint
Clear matte varnish, optional (we used Mod Podge)

How to make:

1 Roll out your air-drying clay so it’s around 5mm thick. Next, draw a circle on your paper (9cm diameter – you can use a mug or tin to draw around if you don’t have a compass). Then draw a 12 x 1.5cm and a 30 x 1.5cm strip and cut out.Place your templates on top of your clay and cut around them with your craft knife. Cut two of the 12cm strips. If your clay is quite wet, leave it to dry out for around 30 mins.

2 Next, score the outside edge of your circle of clay with a craft knife and add a fingertip of water. Wrap the longest of your clay strips around the outside edge and press firmly against the sides. Next, score across the join and smooth together with your fingertips

3 Take one of your smaller strips and in the middle of the clay base create a smaller circle with the strip (make sure this is bigger than the base of your candle as the clay will shrink as it dries). Once you have made a ring with the strip of clay, score the bottom, add a fingertip of water and press the edge of the strip down gently to attach in the middle of the base.

4 Take your final strip of clay and lay it across the base of the circle – from the central ring to the inside edge of the outer strip of clay. Loop the strip over your finger and, using the same method as before, secure it to the outside edge. Allow the clay to dry for around 24-48 hours.

5 Once dry, paint your holder with acrylic paint. Then, when completely dry, cover with a layer of matte varnish for a protective finish.

Buy this month's The Simple Things - buy, download or subscribe

More from our January issue…

Featured
Back cover.JPG
Jan 27, 2021
January | a final thought
Jan 27, 2021
Jan 27, 2021
Seaweed alamy.jpg
Jan 16, 2021
Nature | Seaweed Weather Forecasting
Jan 16, 2021
Jan 16, 2021
Tinker and Fix_June20_114.jpg
Jan 12, 2021
Organise | an excellent toolbox
Jan 12, 2021
Jan 12, 2021

More things to make on winter afternoons…

Featured
Jumper blanket.jpg
Oct 4, 2025
Make | An Upcycled Jumper Blanket
Oct 4, 2025
Oct 4, 2025
Lavender eye pillow.jpg
Jul 22, 2023
Make | A Soothing Lavender Eye Pillow
Jul 22, 2023
Jul 22, 2023
Modern Crochet Style PAGES2.PRESS 60.jpg
Apr 19, 2023
Weekend Project | Crocheted fruit placemats
Apr 19, 2023
Apr 19, 2023


In Making Tags issue 103, Issue 103, candles, make, makes, craft, crafts, crafternoon
Comment
Cushion quilting.jpg

Make | a patchwork cushion

Iona Bower December 10, 2020

Create your own cushion from a hotchpotch of fabrics with just a few simple quilting techniques

In our January issue, we’ve taken a look at the incredibly rich history of the quilt. Over the centuries, quilts have done so much more than sit prettily on our beds and sofas. They’ve been used as art, as battle dress, as political statements and more besides.

We hope the feature will inspire you to stitch a few squares of fabric yourself, so we’ve included instructions in the issue to help you make this cheery cushion, above. You can find the instructions on page 85 of the January issue, which is on sale now. But before you get started you’ll need a template for your fabric squares. Click on the template below and print out as many copies as you need. You’ll need 39 hexagons in total and there are two on each page.

DOWNLOAD THE TEMPLATE

The project is taken from Craft Your Own Happy by Becci Mai Ford (White Owl). Photography: Jesse Wild and Becci Mai Ford.

More things to make…

Featured
Back cover.JPG
Jan 27, 2021
January | a final thought
Jan 27, 2021
Jan 27, 2021
Seaweed alamy.jpg
Jan 16, 2021
Nature | Seaweed Weather Forecasting
Jan 16, 2021
Jan 16, 2021
Tinker and Fix_June20_114.jpg
Jan 12, 2021
Organise | an excellent toolbox
Jan 12, 2021
Jan 12, 2021

More from our January issue…

Featured
Back cover.JPG
Jan 27, 2021
January | a final thought
Jan 27, 2021
Jan 27, 2021
Seaweed alamy.jpg
Jan 16, 2021
Nature | Seaweed Weather Forecasting
Jan 16, 2021
Jan 16, 2021
Tinker and Fix_June20_114.jpg
Jan 12, 2021
Organise | an excellent toolbox
Jan 12, 2021
Jan 12, 2021
In Making Tags issue 103, quilting
Comment
Photography and recipe: Louise Gorrod

Photography and recipe: Louise Gorrod

Make | Edible baubles

Iona Bower November 21, 2020

Iced gingerbread baubles look beautiful, smell fantastic and taste pretty good, too

Makes 20

175g dark muscovado sugar
85g golden syrup
100g butter
350g plain flour
1 tsp bicarbonate of soda
1 tbsp ground ginger
1 tsp cinnamon
1 egg
Ready-to-use royal icing

1 Preheat the oven to 180C/Fan 160C/ Gas 4. In a medium saucepan, melt the sugar, syrup and butter. Once melted, let it bubble for 1-2 mins, before removing from the heat. Leave to cool for around 10 mins.
2 Place the flour, bicarbonate of soda and spices in a large bowl. Add the egg along with the cooled sugar and butter mixture. Stir with a wooden spoon to form a dough. Wrap the dough in clingfilm and chillfor 30 mins. Meanwhile, line a couple of baking sheets with baking parchment.
3 Once the dough has chilled, allow it to come back to room temperature before rolling out to approximately 5mm thick on a lightly-floured surface. Cut out as many shapes as you can, then, using the end of a paper straw, make a small hole at the top of each biscuit for hanging. Continue rolling and cutting until all the dough has been used.
4 Carefully transfer the biscuits to the lined baking trays, leaving a little space between each one. Bake for 12 mins, or until golden. Remove from the oven and leave to firm before transferring to a cooling rack. If the hole that you made has closed up a little, use a skewer whilst the biscuit is still warm to open it up again.
5 When completely cool, decorate with royal icing using a piping bag and a small round nozzle. Once the icing has hardened, thread your choice of ribbon through the hole and hang on the tree.

Find the rest of the edible bauble recipes, including Stained Glass Orange and Cinnamon Biscuits and Butternut Squash and Peanut Butter Dog Biscuit tree decorations, in our December issue, starting on page 25.

And if you’re inspired to bake more gingerbread, you might like to read First Catch Your Gingerbread by food historian Sam Bilton, which is out this month.

Buy this month's The Simple Things - buy, download or subscribe

More festive makes…

Featured
Dec 24, 2021
Christmas recipe: Mulled white wine
Dec 24, 2021
Dec 24, 2021
meringue mushrooms.jpg
Nov 27, 2021
Recipe | Lucky Meringue Mushrooms (Gluckspilze)
Nov 27, 2021
Nov 27, 2021
Recipe: Fizzy amaretto sours
Dec 18, 2019
Recipe: Fizzy amaretto sours
Dec 18, 2019
Dec 18, 2019

More from our December issue…

Featured
Outdoorsy Xmas James Lampard.jpg
Dec 24, 2020
Think | Christmas Eve magic
Dec 24, 2020
Dec 24, 2020
Jigsaws pieceworkpuzzles.com.jpg
Dec 19, 2020
How to | do a jigsaw properly
Dec 19, 2020
Dec 19, 2020
VEG PEEL_ST Xmas Gin Crisp_CFrawley_01.JPG
Dec 15, 2020
Recipe | Root Veg Peel Crisps with Truffle Oil
Dec 15, 2020
Dec 15, 2020


In Making Tags issue 102, Issue 102, festive makes, Christmas makes, Christmas biscuits, Christmas recipes, Christmas decorations
Comment
Photography: Alamy

Photography: Alamy

Things to make and do at home

Iona Bower November 10, 2020

This time round we’re embracing lockdown from the start and doing it our way. Here’s how you can, too

Back in our October issue we shared some of the hobbies and skills we had learned in the last lockdown, and saw a few of your proudest moments, too. From virgin stitchers who were soon knocking up their own frocks to newbie gardeners overwhelmed by an autumnal glut thanks to their own hard work (and occasionally overenthusiasm).

With another few weeks at home stretching before us, we thought we’d share the feature again in case anyone had missed it.

It might just inspire you to take up sewing, invest in some hens or pen a novel, or perhaps it will spark off a completely different idea. Maybe you’re taking it easy this time and simply making the most of evenings in with a good book, a film you’ve always wanted to watch and a bit of gentle colouring. We all have to find our own way here, after all. While the world may not be your oyster right now, we hope you’ll find plenty of things to do and moments to treasure at home. We’d love to see photos and hear all about whatever you’ve been doing to keep busy.

Make yourself a cuppa, put your feet up and read our feature What I Did This Summer. You can download it to read or print below:

Download What I Did This Summer
 

More things to make and do at home…

Featured
Butter Spreader main.jpeg
Oct 25, 2025
Project | Whittle a Butter Spreader
Oct 25, 2025
Oct 25, 2025
LemongrassChickenRedCurryCoconutSauce.jpg
Aug 23, 2023
Recipe | Tandoor Lemon Chicken with Mango & Coriander Salad
Aug 23, 2023
Aug 23, 2023
Folk enamel tumbler.jpg
Aug 5, 2023
Make | Folk art enamelware
Aug 5, 2023
Aug 5, 2023

More ways to do ‘home’ well this winter…

Featured
Gathering Janssons Temptation.JPG
Jan 11, 2025
Recipe | Jansson's Temptation
Jan 11, 2025
Jan 11, 2025
Cardamom buns Kay Prestney.jpg
Dec 22, 2020
Recipe | Swedish kardemummabullar
Dec 22, 2020
Dec 22, 2020
HowToLagom.png
Oct 6, 2017
How to live lagom
Oct 6, 2017
Oct 6, 2017
In Making Tags lockdown, things to do, things to make
Comment
Seed packets Emma harris.jpg

Make | Personalised Seed Packets

Iona Bower November 1, 2020

A thoughtful gift for a new gardener or anyone you want to share the joy of your garden with

Spend a happy weekend afternoon making gifts inspired by nature. In our November issue we have instructions for making goats’ milk and lavender soap, imprinted clay dishes and also these simple but beautiful personalised seed packets.

You will need:
Seeds
Pressed flowers (to make your own you will need to press them at least 2 weeks in advance of using)
Glue
Pencil
Pretty paper to make the envelopes
Plain paper for flower description
Scissors
An old empty seed packet or small money envelope
A bowl of water
Thin cardboard
Pen

To make:
1 Place the empty seed packet in a bowl of water until the glue eases apart. Be very careful when doing this, as the paper will have become fragile. Leave to dry before using to make a cardboard template, by drawing round the edge on the piece of card.
2 Use the template to trace around on the wrong side of your pretty paper to make the seed packet. Fold, and glue the sides together.
3 Fill the seed packet with seeds (around 10 per packet), before gluing shut. We suggest seeds they will be able to sow in springtime, or seeds for herbs that can be sown straight away.
4 Cut out a plain piece of paper, approximately 1 cm smaller all around than the seed packet. Carefully stick a pressed flower (ideally one of the same type as the seeds) to the front and label it with the flower name. Stick the label to your seed packet with a thin layer of glue.

Maker’s note: Planting advice you’d like to pass on? You could make another small label for the back and list it here, along with the date the seed packets were made.

Buy this month's The Simple Things - buy, download or subscribe


More from our November issue…

Featured
Fire Jonathan Cherry.JPG
Nov 5, 2020
Fun | Games to play around a fire
Nov 5, 2020
Nov 5, 2020
Cattern Cakes Kirstie Young.jpg
Nov 3, 2020
Recipe | Cattern Cakes
Nov 3, 2020
Nov 3, 2020
Seed packets Emma harris.jpg
Nov 1, 2020
Make | Personalised Seed Packets
Nov 1, 2020
Nov 1, 2020

More weekend projects…

Featured
Jumper blanket.jpg
Oct 4, 2025
Make | An Upcycled Jumper Blanket
Oct 4, 2025
Oct 4, 2025
Lavender eye pillow.jpg
Jul 22, 2023
Make | A Soothing Lavender Eye Pillow
Jul 22, 2023
Jul 22, 2023
Modern Crochet Style PAGES2.PRESS 60.jpg
Apr 19, 2023
Weekend Project | Crocheted fruit placemats
Apr 19, 2023
Apr 19, 2023


In Making Tags issue 101, Issue 101, makes, seeds, seed packets, November
Comment
Photography: Tim Smith  Project: Karen Dunn

Photography: Tim Smith Project: Karen Dunn

Make your own espadrilles

Iona Bower June 25, 2020

Put your best foot forward and make your own espadrilles in an afternoon

In our July Unwind issue we have a lovely how-to on making your very own pair of espadrilles. Below are the printables for the patterns you will need to make them and you can find all the instructions starting on page 39 of the July issue.

We only recently learned this nifty trick for drying espadrilles that get caught in a rain shower - stuff them with scrunched up newspaper to help them dry out without shrinking or wrinkling.

The printables

Espadrille heel

Espadrille toe

If you don’t have a copy of the issue, you can buy it from our online shop or in shops now. Here’s a list of the rest of the things you’ll need so you can start gathering them now:

What you will need:

Espadrille soles – we got ours from prym.com
Outer fabric – 1 fat quarter (approx. 55x50cm)
Lining fabric – 1 fat quarter (approx. 55x50cm)
Needle Embroidery thread (or strong thread)
Pins
Fabric
Scissors
Knitting needle
Iron
Sewing machine (optional – can be sewn by hand)
Pattern templates (above)

More makes for summer…

Featured
Belfast sink.jpg
Aug 16, 2025
Project | Make a Belfast Sink Pond
Aug 16, 2025
Aug 16, 2025
Fig goat cheese filo bundles Kym G.jpeg
Aug 10, 2025
Recipe | Fig & Goat's Cheese Filo Bundles
Aug 10, 2025
Aug 10, 2025
citrus slice coasters.jpg
Jul 12, 2025
Make | Citrus Slice Garden Coasters
Jul 12, 2025
Jul 12, 2025

From our July issue…

Featured
Back cover 2.jpg
Jul 22, 2020
July | a final thought
Jul 22, 2020
Jul 22, 2020
tea and cake 2.jpg
Jul 14, 2020
Tea and scent pairings
Jul 14, 2020
Jul 14, 2020
Greengages on toast2.JPG
Jul 11, 2020
Recipe | Greengages on toast with lavender and fennel flowers
Jul 11, 2020
Jul 11, 2020
In Making Tags issue 97, project, make, espadrilles, summer projects
Comment
Photography and project by Nat Mady/Hackney Herbal

Photography and project by Nat Mady/Hackney Herbal

Make | proudly homemade teabags

Iona Bower May 2, 2020

Make a brew your own by creating your own teabags, filled with fresh herbs and flowers from your garden or whichever dried things you fancy

Our special May ‘scrapbook’ issue has the title ‘Inspire’ and you’ll find hundreds of things in it that we hope will inspire you. Among them is our Crafternoons feature showcasing lots of lovely projects skills you might not have tried before but can easily be achieved or learned in an afternoon. 

The homemade teabags pictured above are by Hackney Herbal, and they tell you all about how to make your own in a crafternoon in the issue. Theirs are made using dried herbs but we’re going to have a go at making them with fresh things from our gardens. You might try lavender, mint, lemon balm or rosemary. See what’s looking perky and might perk up a brew in your kitchen.

Here are some simple instructions from Hackney Herbal on how to get started. You can read the rest of the feature in our scrapbook-style Inspire issue in shops now - or buy it direct from us. 

You will need

Unbleached muslin fabric (try  souschef.co.uk or johnlewis.com),  or you could buy readymade self-fill tea bags from dotboutique.co.uk Cotton thread 1 tsp of dried herbs 

1 Cut unbleached muslin fabric into squares roughly measuring 10x10cm. 

2 Choose between 2 to 4 dried herbs to mix and place in the middle of  the square. You will need about a teaspoon of dried herbs in total.  

3 Gather the corners of the square together and tie the teabag up  using cotton thread. 

4 Infuse in hot water for five minutes and drink. You can empty out the spent herbs and re-use the muslin again after rinsing it.

Buy this month's The Simple Things - buy, download or subscribe

More from our May issue…

Featured
Sunshine chalkboard - Catherine Frawley.jpg
May 17, 2020
Learn | to play a little sunshine on the ukulele
May 17, 2020
May 17, 2020
Rosemary Kirstie Young.jpg
May 16, 2020
Food matching | Rosemary
May 16, 2020
May 16, 2020
Crayon Candle.JPG
May 13, 2020
Make | a candle from crayons
May 13, 2020
May 13, 2020

More things to make at home…

Featured
EGGShell-tealights-the-simple-things.png
Apr 10, 2023
Eggshell tea lights
Apr 10, 2023
Apr 10, 2023
Herbal Teabags NAT MADY HACKNEY HERBAL.jpg
May 2, 2020
Make | proudly homemade teabags
May 2, 2020
May 2, 2020
Make: An Ordnance Survey garland
May 15, 2019
Make: An Ordnance Survey garland
May 15, 2019
May 15, 2019
In Making Tags issue 95, May, makes, making, herbs
1 Comment
Illustration: Jennie Maizels

Illustration: Jennie Maizels

Friday Sketchbook Club | Botanicals

Iona Bower April 24, 2020

A pretty project that looks great framed in a kitchen or simply makes a beautiful page in your sketchbook

Welcome again to Friday Sketchbook Club! We’ve teamed up with illustrator Jennie Maizels to bring you a sketchbook project to do every Friday in April. We hope you enjoy them. Today we’re drawing botanicals. 

Jennie started Sketchbook Club because she believes that anyone can draw. Her principle is that if we treat art like any other creative pastime and follow simple instructions, just like a recipe, we would all be drawing as much as we are baking, sewing and knitting.

Each module comes with instructions, a ‘How to’ video, reference material and often, templates which you can ‘transfer’. They have been carefully designed to suit all ages and abilities. A note on materials: the projects were originally designed to introduce a plethora of different paints, collage and methods but all can be altered to use what you have available. Just substitute as you like or need.

Ready to draw the Botanicals ? Then we’ll begin. You can watch the Botanicals video tutorial here and find the references for leeks, passion fruit, and  tomatoes here as well as the transfers you might need. Alternatively, you can just follow the instructions below, using the picture above as inspiration, 

You will need

A sheet of A4 black paper or card
HB pencil
Set of gouache paints
One thin and one larger paintbrush (Jennie used a size 1 and a size 6)
Colouring pencils

How to draw your Botanicals

  1. Have a good look at the reference sheets and choose a fruit or vegetable to paint.
    2. Start by drawing out your composition. Feel free to transfer any of the images rather than copying them if you would prefer. To transfer onto your black paper, turn the chosen image over (it might help to cut them out first) and, using the side of your chalk, rub evenly over the whole of the back of your image, then turning the page over so the plant/flowers are on top, hold your transfer page firmly so it doesn’t move around at all, on top of your black paper. Then, using a Biro, draw over the whole of the plant or flower image.Carefully take the transfer sheet off to reveal the chalky template on your black paper.
    3. Work on your composition, making sure all the chosen illustrations are evenly spaced out, maybe filling any big spaces with some seeds or petal details.
    4. Next,start to paint the botanical illustrations. look at the reference, you may want to use a white pen once the base layers of paint has dried,for some of the detail (or your size 1 paint brush). Adding a little white to colour, especially the reds, yellows and oranges,will make them really jump out. For flowers or seed heads, you could use a sponge, working in darker then lighter colours, dabbing on lightly.
    5. For the lettering, first of all write it in pencil in ‘best’ italics, then paint over with cream or white paint using a fine brush, paint as thin as you can,adding depth to the lettering afterwards. You could write over the pencil using a white gel pen if you are nervous about painting lettering,it looks just as good.
    6. When the page is dry, add detail to the illustrations using coloured pencils. Try white pencil for very thin root strands and dark green for leaf lines.You might prefer to draw in the majority of details in pencil rather than in paint, for example, just painting a green circle for the top of the leek and once the paint is dry, drawing in all the little circles in a dark green pencil and a white gel pen or pencil.

There are many more modules available on Jennie’s website, Sketchbook Club (only £4 each.), where you can also buy art kits and supplies. For more inspiration, you can follow Jennie on Instagram @jenniemaizels or visit the website jenniemaizels.com. Look out for another Friday Sketchbook Club project with Jennie here next week.

Buy this month's The Simple Things - buy, download or subscribe

More meetings of Sketchbook Club…

Featured
Pencils.jpg
Sep 6, 2020
Primer | colouring colours we loved
Sep 6, 2020
Sep 6, 2020
sketchbook club botanicals.JPG
Apr 24, 2020
Friday Sketchbook Club | Botanicals
Apr 24, 2020
Apr 24, 2020
Sketchbook Club Camping.JPG
Apr 17, 2020
Friday Sketchbook Club | Camping
Apr 17, 2020
Apr 17, 2020

From our April issue…

Featured
Picnic Pie Catherine Frawley.JPG
Apr 18, 2020
Recipe | a picnic pie for the garden
Apr 18, 2020
Apr 18, 2020
Ellen's cookbook Kirstie Young.jpg
Apr 15, 2020
Make | a hand-me-down recipe book
Apr 15, 2020
Apr 15, 2020
Newts Zuza Misko.JPG
Apr 7, 2020
Romantic introverts | the newt
Apr 7, 2020
Apr 7, 2020
In Making Tags art, drawing, sketchbook club, sketching
Comment
  • Blog
  • Older
  • Newer
Featured
  Download  or  subscribe   See the sample of our latest issue  here   Order  our new Celebrations Anthology   Order a copy of  Flourish 4 , our new wellbeing bookazine   Listen to  our podcast  – Small Ways to Live Well  Wear our  Slapdash Patc
Aug 29, 2025
Aug 29, 2025

Download or subscribe

See the sample of our latest issue here

Order our new Celebrations Anthology

Order a copy of Flourish 4, our new wellbeing bookazine 

Listen to our podcast – Small Ways to Live Well

Wear our Slapdash Patches and show your support for ‘good enough’

Aug 29, 2025
Join our Newsletter
Name
Email *

We respect your privacy and won't share your data.

email marketing by activecampaign
facebook-unauth pinterest spotify instagram
  • Subscriber Login
  • Stockists
  • Advertise
  • Contact

The Simple Things is published by Iceberg Press

The Simple Things

Taking time to live well

We celebrate slowing down, enjoying what you have, making the most of where you live, enjoying the company of of friends and family, and feeding them well. We like to grow some of our own vegetables, visit local markets, rummage for vintage finds, and decorate our home with the plunder. We love being outdoors and enjoy the satisfaction that comes with a job well done.

facebook-unauth pinterest spotify instagram