

In our January issue, we have the instructions to make this lovely arm-knitted blanket. The pattern is by Woolly Mahoosive where you can also buy chunky yarns for arm knitting. Visit woollymahoosive.com. If you’re having trouble getting started, watch this video from Woolly Mahoosive, which should give you a visual idea of how it arm knitting works and help you make sense of it all. You can buy the January issue of The Simple Things in all good shops and supermarkets or from our online store.

Photography: Jeska Hearne
Make | Homemade Bath Salts
Just a light sprinkling of these soothing salts will turn bathtime into a luxuruious treat
You will need:
120g Epsom salts
120g pink Himalayan salt
¼ tsp bicarbonate of soda
10 drops each of your choice of essential oils (we used Moroccan rose, lavender and chamomile)
1 tbsp dried flower petals (we used rose, lavender and chamomile)
Airtight glass jar (a Mason jar
or apothecary jar look pretty)
Equipment:
Bowl
Spoon
For giving:
Ribbon and gift tag
1 Mix the salts and bicarbonate of soda in a small bowl.
2 Add 10 drops each of your essential oils and mix together, ensuring everything is evenly distributed. Then add the dried flower petals.
3 Decant the bath salts into your jar and decorate with a ribbon and gift tag with your message and the following instructions: “Dissolve a handful of salts in a hot bath. Store in a cool, dry place out of direct sunlight.”
These bath salts are just one of the makes from our feature, The Personal Touch, in our November issue, taken from The Art of Gifting Naturally by Angela Maynard (Hardie Grant).
Buy this month's The Simple Things - buy, download or subscribe
More calming bathtimes…

More from our blog…


Illustration by Kavel Rafferty
Make | Conker Laundry Soap
Gather up your champion conkers and give them a new life as a laundrette
Horse chestnuts contain lots of saponin – an organic chemical with a name that’s a clue as to why they’re useful: sapon is ‘soap’ in Latin. While it won’t zap the toughest of stains, this homemade liquid is an economic and eco way for more everyday washing.
The prep:
• Gather your conkers (about a handful per wash load).
• Remove the outer brown layer, then quarter.
• Blitz into small pieces in a blender or bash with a rolling pin through a tea towel (Wash any kitchen implements very carefully afterwards as conkers are poisonous to humans).
• Leave the mixture to dry somewhere like an airing cupboard or windowsill.
• Once completely dry, store in an airtight jar ready to use. (You can buy ready made ‘washkers’ at watercressqueen.company.site/products)
The wash
• Boil a kettle and add double the quantity of water to the mix used.
• Steep for at least 30 mins.
• Filter the liquid through a muslin. The used bits can go in your food waste/compost.
• Use the liquid as you would a normal laundry liquid (add a couple of drops of essential oil if you like it scented).
• Any leftover liquid can be kept in the fridge for a week.
This Horse Chestnut Laundry Wash is just one of the fascinating ideas from our October Miscellany pages. Turn to page 117 of the October issue to read more miscellaneous things from puzzles and paperweights to turnip carving and foraging for fungi.
Buy this month's The Simple Things - buy, download or subscribe
More autumnal fun…


More from our October issue…


Photography: CHRIS MIDDLETON Project: BECI ORPIN
Make | Outdoor canvas hammock
Have a go at this simple but sturdy hammock project. You should be able to make it in half a day, leaving you plenty of the bank holiday weekend left to lie in it lazily!
Lazing in a hammock is hard to beat: especially in a shady spot on a warm summer’s day, ideally with a book in one hand and a cool drink in the other. And if you’ve managed to make the hammock yourself – well, you can bask in satisfaction, as well as sunshine. This hammock is surprisingly easy to make, and is much sturdier than one of the knotted ones. We’ve added pompoms, too, because who doesn’t love a pompom? Put the labour in now and hopefully you’ll get the payoff in sunny days to come.
Outdoors canvas hammock
Made of weatherproof canvas, and as robust as it is comfortable
YOU WILL NEED
2m of 140cm-wide strong, canvas fabric
Pins
Sewing machine and thread
Tape measure
Pencil or fabric marker
Scissors
22 rivets, 23mm (1 in) in diameter, plus a rivet tool (which should come with the kit)
Mallet or hammer
66m of natural rope (ensure this is good quality and load bearing), plus extra rope for hanging
2 metal hoops or carabiners strong enough to handle appropriate weight
FOR THE POMPOMS
Wool to match the canvas fabric (this uses black and white)
Pompom maker
1 Fold a 4cm hem at each end of the fabric. Pin in place and sew.
2 Mark out where the rivets will go on the seam. This uses 11 at each end, spaced about 11cm apart. Using scissors, make small holes on the marked points. Following the instructions on the
packet, attach the rivets using the rivet tool and the mallet. Placing a wood offcut underneath the canvas will help to protect the work surface.
3 Cut the rope into 22 x 3m lengths. Fold each rope in half and thread it through each rivet using a cow hitch knot
to fasten. To form a cow hitch knot, insert the folded end of the rope through the hole and then pull it through to form a loop. Push the two rope ends through the loop and pull to tighten the knot (there are plenty of YouTube videos around if you get stuck with this bit).
4 Once all the 3m lengths are attached through the rivets, gather all the rope at one end and tie it into one large knot. Repeat for the other end. This might need adjusting once it is attached to the hanging space.
5 Pompoms: wind the wool around the pompom maker and, once full, cut the wool. Place some string or a length of wool around the cut wool, then pull it tight
and tie a knot to keep it in place. Cut this piece of wool, leaving ample length for hanging. This hammock uses two white and two black pompoms.
6 Attach the lengths of wool left on the pompoms to one end of the hammock (or attach two on each end).
7 To hang the hammock, attach the ropes on each end to a metal loop or carabiner with a double knot (make sure the knot is
very tight so that the hammock is secure). Attach extra rope to the other side of both carabiners and then tie that rope around a tree or somewhere else sturdy enough to take the weight.
Taken from Sunshine Spaces: Naturally Beautiful Projects to Make for Your Home and Outdoor Space by Beci Orpin (Hardie Grant).
From our August issue…
Featured


More weekend projects to make…
Featured


Journal by Jennie Maizels
Project | Ideas for a Summer Journal
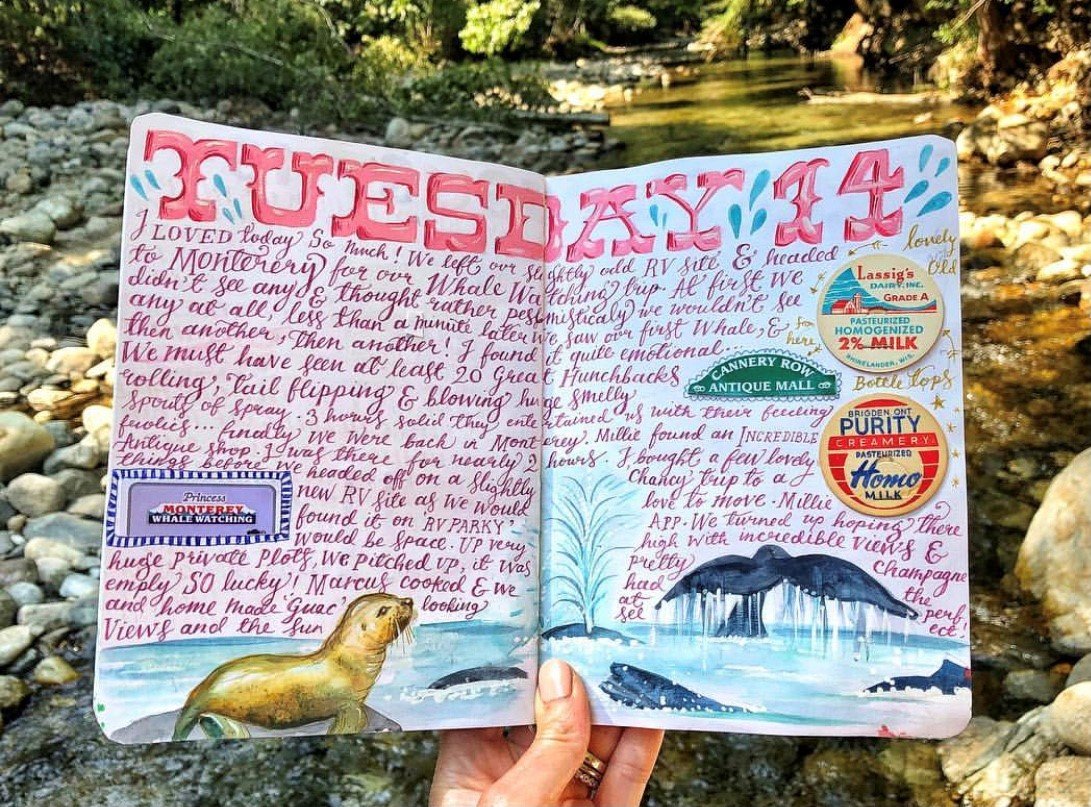
Whether you’re at home, abroad or away in the UK, you can record your adventures in multimedia and create wonderful memories
If you haven’t yet picked up our August issue and seen the beautiful travel journals, in our feature Spotting and Jotting, it is not one to miss. Whether you’re off on the trip of a lifetime abroad, heading to one of the most beautiful corners of the British Isles or simply making the most of what’s on your doorstep this summer, a journal is a mindful and meaningful way to record and remember the summer.
Painting, writing, drawing and jotting is a great start, but there are lots more things you can add to your journal that will make it unique and give it ‘texture’, allowing you to recall the memories for years to come as you turn the pages and run your fingers over the words, pictures and scrapbook bits and pieces. Some will be physical things you stick in, others will be prompts or concepts for things to jot down. Here are a few ideas for ‘nice little extras’ to add to your summer journal…
Ticket stubs, from transport, gardens or museums
Pressed flowers
Local phrases from your holiday location
A tiny envelope or ziplock bag of sand or soil (only take a pinch)
Flat sea shells
Dried seaweed
Recipes or food ideas from your destination
Myths, legends and folklore from your holiday town
Pieces of sweet or biscuit wrappers
Menus, or selected bits of menus
Memorable sections of map
Photographs (leave room for these for when you’ve printed your favourites or invest in a polaroid and capture the moment immediately
Your own drawings of architecture or landscape
A pretty leaf
Rubbings of bark, stone or even a manhole cover
Stickers from sightseeing tours, stately homes or food packaging
A photo or sketch of a skyline
A record of the constellations visible from your destination at that time of year
Reading list of books set there or nearby for when you get home
A playlist of music from the area, or that you enjoyed while there, or that just reminds you of your holiday
The image above is by Jennie Maizels, an illustrator and founder of Sketchbook Club which offers online and in-person courses. If you’re inspired by keeping a summer journal this year and fancy honing your skills, Jennie’s next Holiday Sketchbook course is on 5 October.
Buy this month's The Simple Things - buy, download or subscribe
More journal inspiration…


More from our blog…
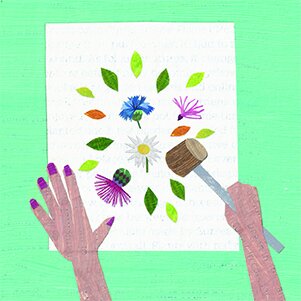
Illustration by Christina Carpenter of Plant Paper Scissors.
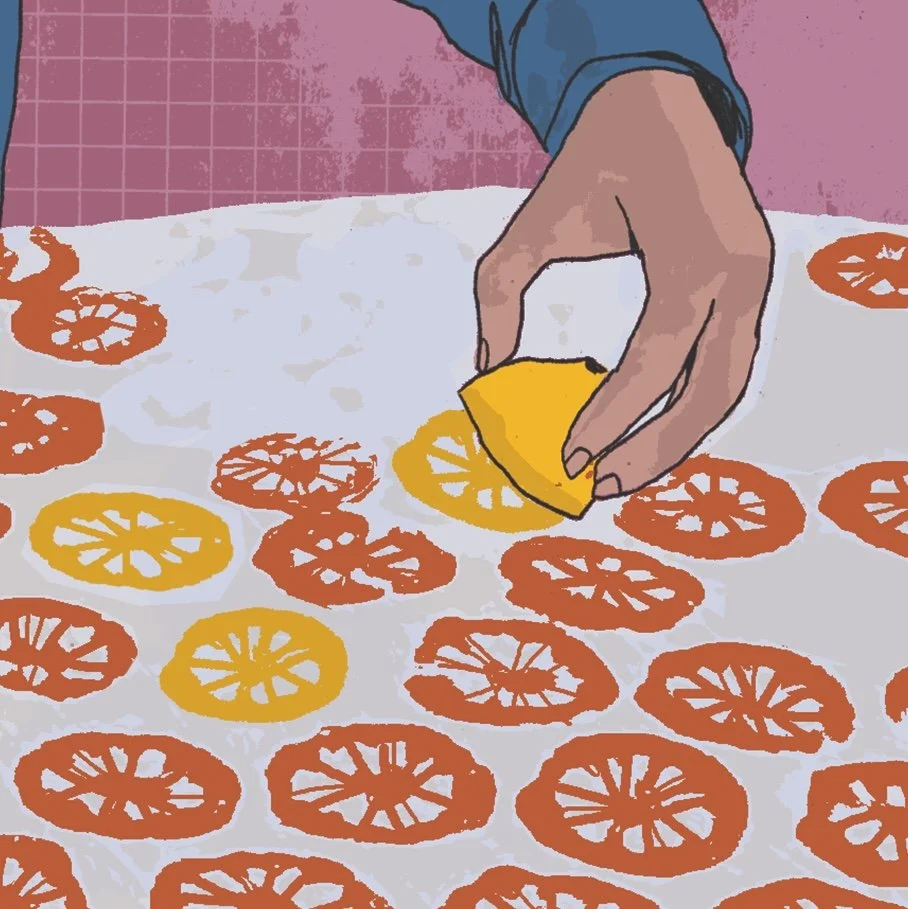
Make | Pounded Flower Art
An edgy twist on the gentler art of flower pressing, pounded flower art is a chance to create something beautiful while also getting a bit of exercise and working off any latent aggression that you’d not realised you were holding on to.
You’ll need a collection of flowers – the more colourful the better. Flowers from your own garden are lovely, but you can always cheat and buy a bunch that you like. You’ll also need a sheet of watercolour paper, a paper towel and a mallet. If it turns out really well, you might want a picture frame, too.
Pick the flower heads from the stems and lay them face down on the watercolour paper, arranged in an attractive pattern. Place the paper towel on top of them, then take your mallet and pound the petals into the paper, beginning at the outside and working inwards, but avoiding the polleny centres, which don’t look so pretty pounded. The colours and shapes of the petals should ‘take’ onto the watercolour paper beneath, leaving a lovely pattern.
Peel off and discard the paper towel and flowers, then admire (or frame) your handiwork.
This project is from our July Almanac pages, which have lots more seasonal things to note and notice, plan and do each month.
Buy this month's The Simple Things - buy, download or subscribe
More from our blog…
More art to inspire and interest you…

Illustration by Christina Carpenter
Make | No-sew Outdoor Bunting
Whether you’re planning a midsummer outdoor supper, or a right Royal knees-up in the garden for the Jubilee, some bunting dangling from branches is sure to set the right atmosphere. Here’s how to make bunting – that won’t go soggy in the rain – without a sewing machine.
You’ll need a few off cuts of oil cloth – an old table cloth is ideal. Cut a paper template for the flags. They can be as big as you like but around 30cm tall is a decent size. Draw around the template with a pencil on the back of your oil cloth to make as many triangles as you need and cut out.
Cut some thick twine to the length you want. Lay it on the floor and space out your bunting triangles along its length to check where they should go. Leave a little length at either end.
Use a hot glue gun to squeeze glue along the base edge of your first triangle on the back of the cloth, about an inch from the top, then fold the edge over the twine, sticking it to the back of the oil cloth beneath. Repeat for other triangles. Once dry, hang at a jaunty angle and pour a Pimms.
This is just one of the ideas for things to note and notice, plan and do this month, from our Almanac pages. Find more seasonal ideas for June starting from page 26.
Buy this month's The Simple Things - buy, download or subscribe
More outdoor projects to make…

More from our blog…
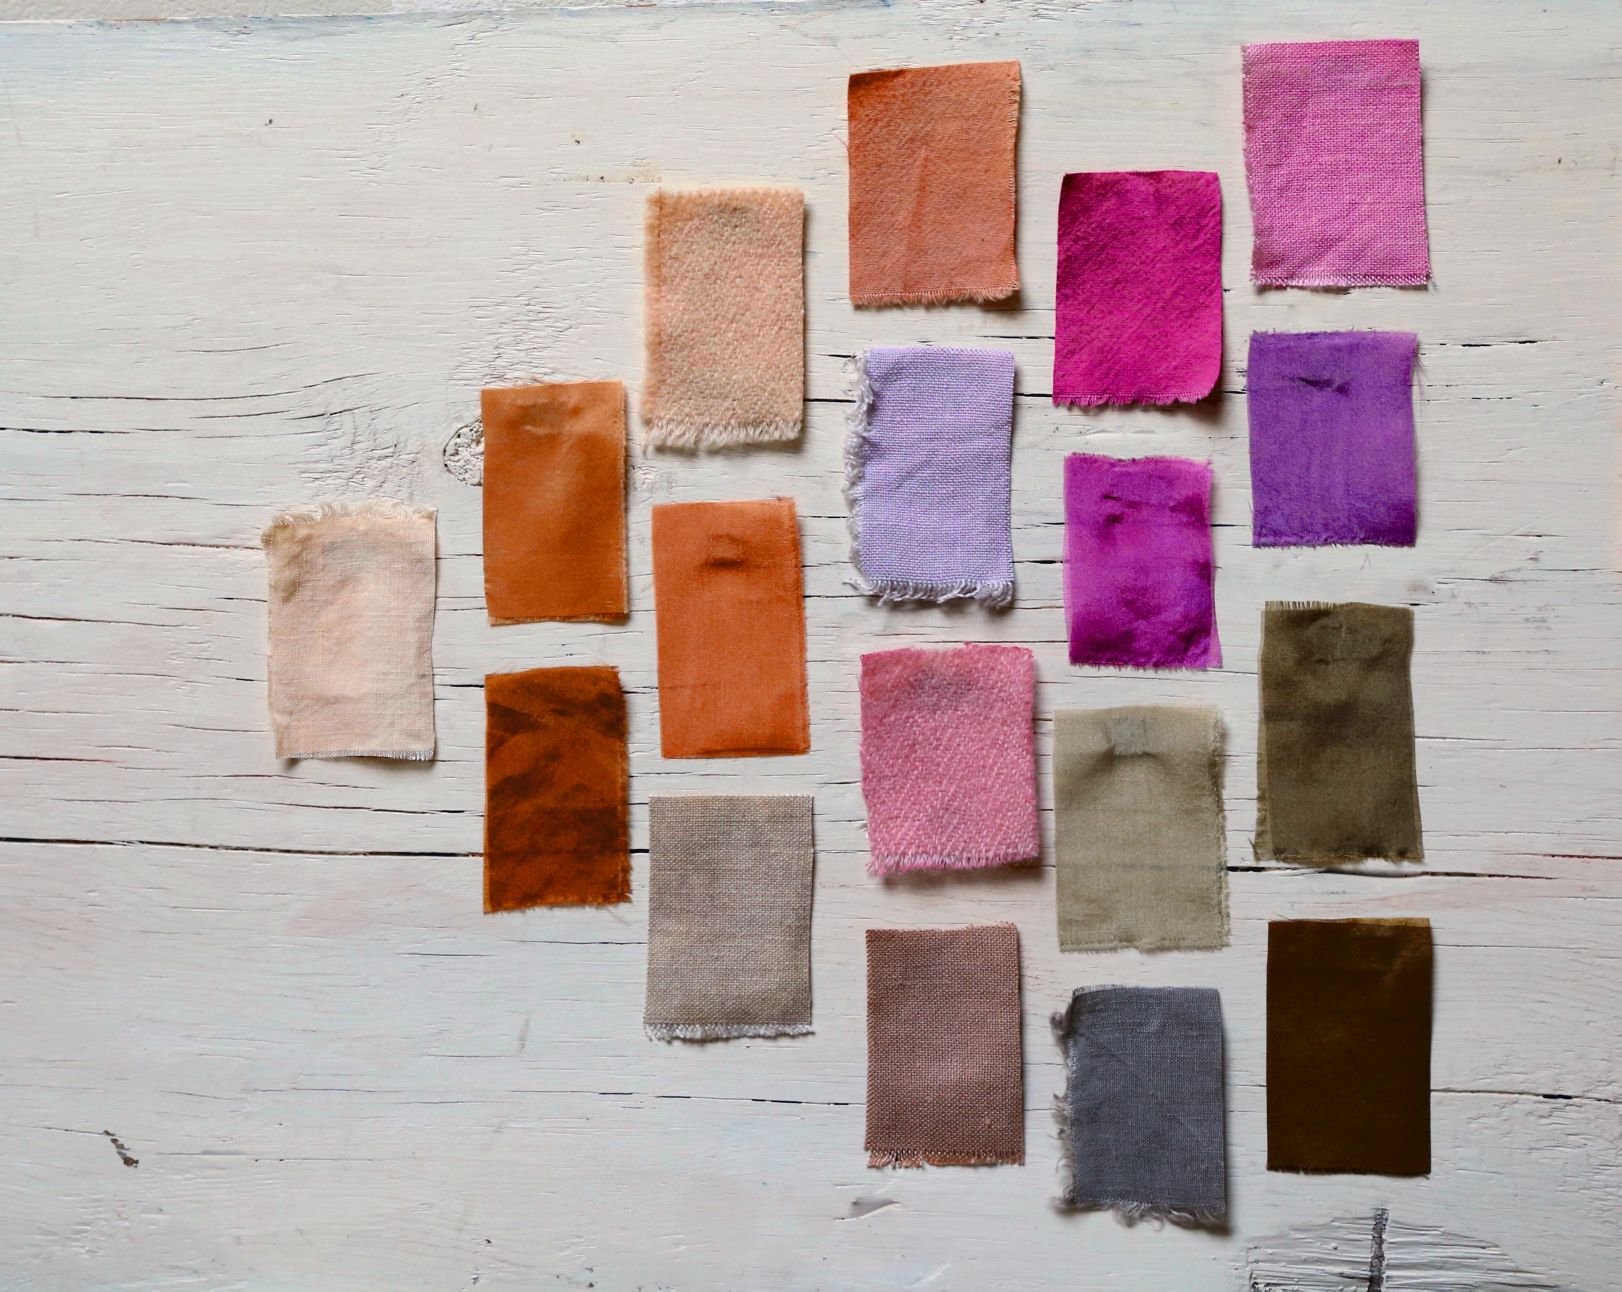
How to | Find Dyes in Nature
From onion skins to avocados and much more, you can find colour in the most unexpected places
If you’re making your first foray into natural dyeing (do not miss our May issue if so!) you might like to plan your palette. Here are a few natural products you can use for dyeing fabric all colours of the rainbow…
Red
Beetroot, pomegranate and hibiscus
Orange
Onion skins and carrots
Yellow
Dandelions, sunflowers and marigolds
Green
Spinach, nettles and grass
Blue
Red cabbage, blueberries and red grapes
Indigo
Woad plant and elderberries
Violet
Purple basil leaves and sumac berries
If you’re inspired to give natural dyeing a go, don’t miss our May issue, which has in it all the instructions you’ll need for dyeing cotton and linen napkins, tablecloths and more. The projects are taken from Taken from Natural Dyeing: Learn How to Create Colour and Dye Textiles Naturally by Kathryn Davey (Hardie Grant) with photography by Doreen Kilfeather and Kathryn Davey.
Buy this month's The Simple Things - buy, download or subscribe
More weekend projects…

More from our blog…
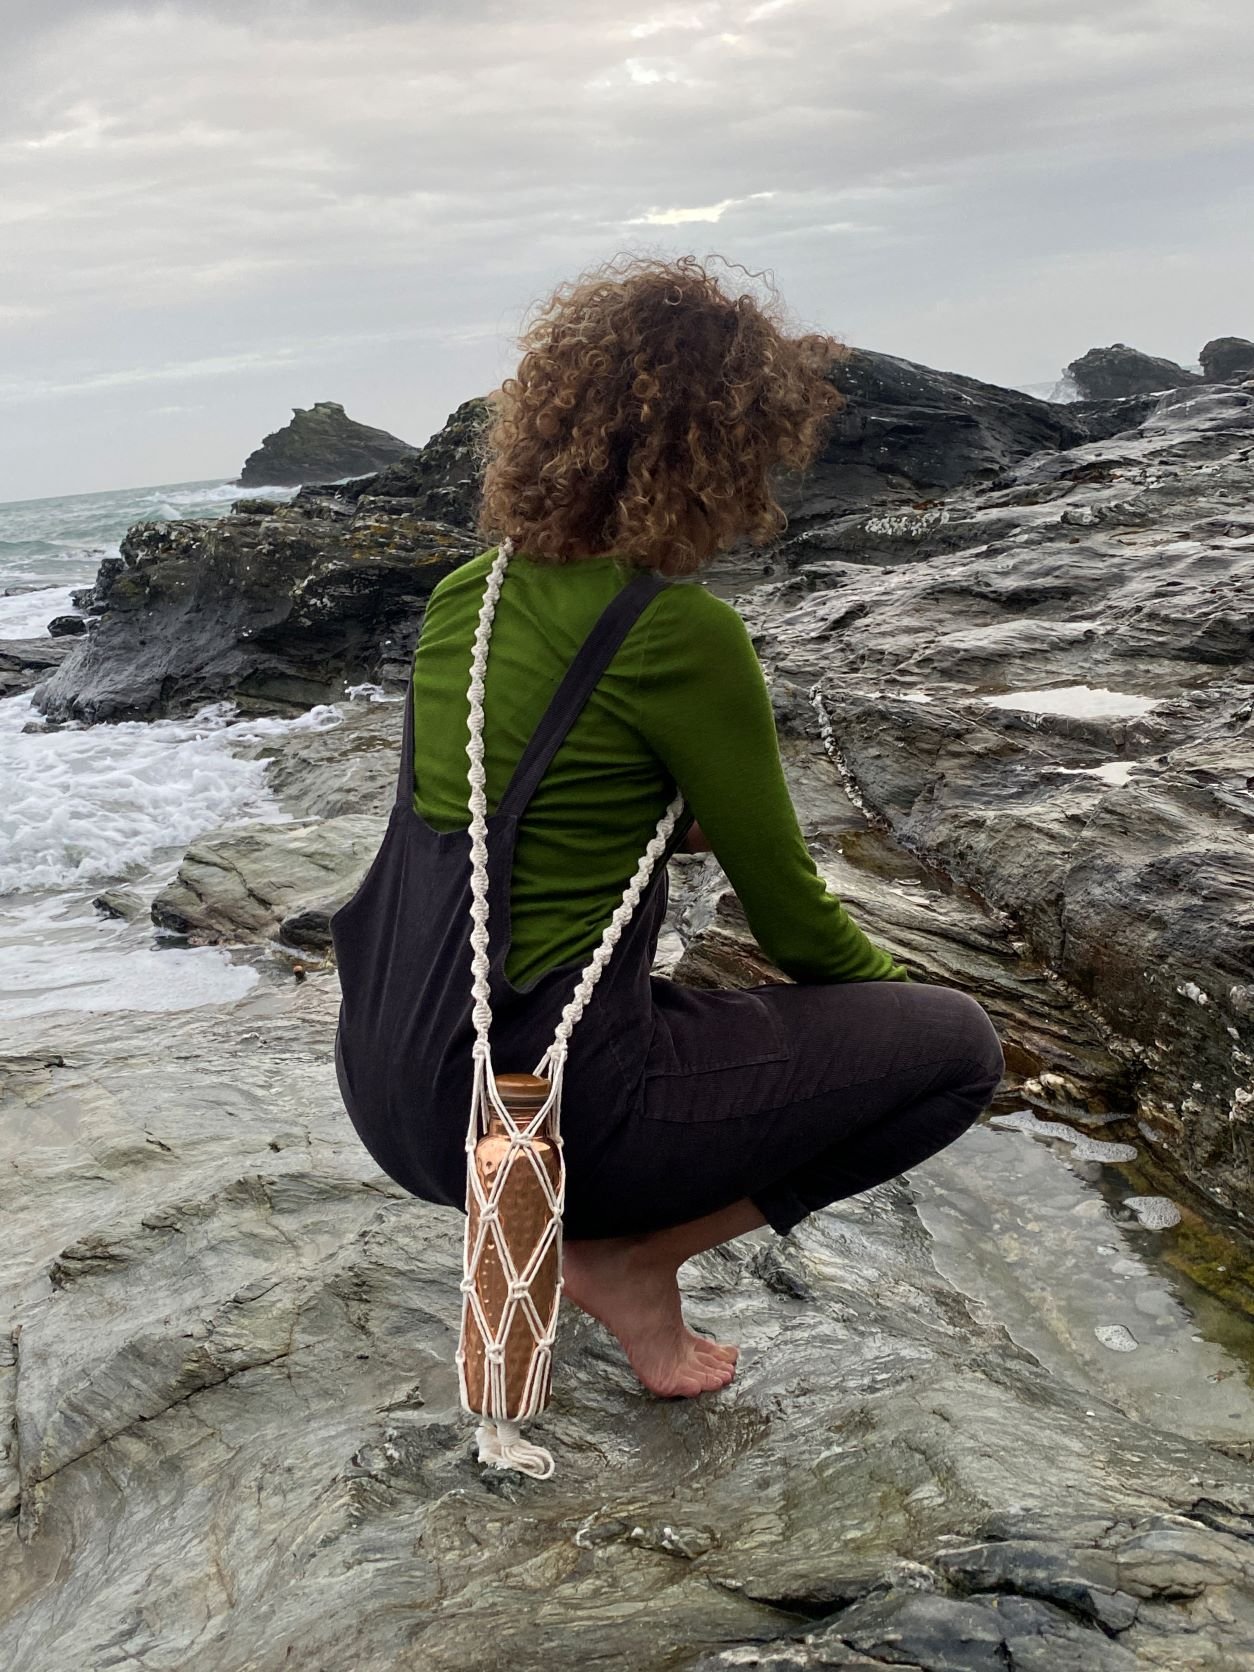
Make | A Macrame Bottle Holder
Knot your way to a knotty, natty carrier for your water bottle, leaving you hands free… perhaps to do some more macrame?
All you need to make this cross-body bottle carrier is to master a few simple knots, and you’re away. Everything you need to know, including the knot techniques are in our instructions and all the equipment you need is the rope, some tape and a little patience. Put aside an afternoon on a long weekend to create your bottle holder, or maybe make it your project for April and do a little every day.
If you’re not too TIED UP (sorry) this month, you might also like to make the macrame bag that’s featured in our April issue. Turn to page 106 to find the instructions.
Download the instructions for the macrame water bottle here.


More weekend projects…
More from our blog…
Photography: Josie George
How to | Make a Thread Journal
Keeping a record of your days doesn’t have to mean picking up a pen and paper; you can be as
creative as you like
If we say so ourselves, we loved the weather scarf in our February issue (pictured above by Josie George). It seems like an ingenious way both to keep a small record of each day as well as to keep up a hobby. But if you aren’t a natural knitter, you might like to try a different sort of thread journaling.
Look up ‘thread journaling’ on Pinterest and you’ll see hundreds of examples from people who’ve kept an embroidery record of their year. Here’s how it’s done.
What you’ll need
An embroidery hoop
Some cloth (a large napkin is good)
A good collection of differently coloured embroidery threads
Needles, thimbles, embroidery pen and other notions
How to do it
* Think about how you want to record your days. You can do a year (you don’t have to start with January, of course) or just a month or a specific period in your life.
* Sketch out a few ideas on paper for how you’d like your design to work. You could set it out like a calendar grid, present it as a wheel or just go completely higgeldy piggeldy and stitch each day or week’s motif wherever you please.
* Pop your cloth in your hoop and get started. You might like to stitch a motif to represent each day or each week. What you stitch is up to you. You could do a castle or a hill to represent a relevant day out, a cake to represent a party you went to, a pair of curtains for a theatre trip, a flower or vegetable for something you’ve grown in the garden. If you prefer, and have the chops, you could get quite specific - perhaps embroidering something to represent every book you read in a year, or everything you grow in your veg patch this summer.
If you’d like to read more about Josie’s Weather Scarf you can find out all about it on page 108 of our February issue. Buy this month's The Simple Things - buy, download or subscribe
More from our February issue…


More journaling inspiration…

Photography: Kirstie Young
Make | Pine Needle Cough Syrup (and other immune boosters)
Pine features in many commercial cough syrups, alongside menthol or eucalyptus to aid breathing. This traditional remedy relies on the high vitamin content of the pine needles and is also heavy on the honey to soothe scratchy throats.
Pine needle cough syrup
Makes 500ml
250ml water
150g pine needles, washed carefully
250ml honey
1 Bring the water to the boil in a small pan and add the pine needles. Cover and simmer for 5 mins, making sure the pine needles stay submerged.
2 Strain the liquid into a jug and discard the pine needles. Return your strained liquid to the clean pan.
3 Add the honey, then return to the heat and simmer gently for 5 mins.
4 Decant into a jar or bottle and leave to cool. When cool, fasten the lid.
Maker’s note: Store in the fridge for up to 3 months.
Note: most commercial Christmas trees are sprayed with pesticides so forage your pine instead and give the needles a good bath before use
Oldie-but-goodie immune boosters
If your get up and go has got up and gone, try one of these natural boosters for your immune syste,
The hot toddy
There’s no science behind the alcohol bit, apart from it might send you off to sleep quicker, but the warm liquid and spices will help to thin mucus and soothe a sore throat and a nice hot toddy can definitely perk up your mood.
Chicken soup
More than just comfort food, chicken contains an amino acid cysteine which can act as a decongestant. And, as with any homemade soup, it’ll contain lots of nutrients from the bones and veg and water for extra hydration, which you need when suffering.
Garlic milk
This might turn your stomach but the combination of garlic and/or onion with honey and a warm drink can help ease coughs and colds due to the antibacterial properties of the garlic/onion and mucus-dissolving honey. Gently heat a glass of milk, add diced onion and/or a crushed garlic clove, take it off the heat and leave to infuse for 20 mins. Strain and add 1–2 tsp honey (raw if possible) per cup.
Drinking vinegar
Fruit vinegar has been used for centuries for its anti-inflammatory and antibacterial properties. You can make your own apple cider or fruit vinegar but you’ll need to leave it to ferment for 4–6 weeks. Or you can buy it ready to use. The Bath Alchemist Apple Cider Vinegar Wellness Tonic comes in three flavours. Add a tablespoon of vinegar daily to water, tonic or mix into a dressing.
Gargling salt water
Gargling with warm salt water and nasal cleansing with a saline spray from the chemist can both help reduce the length of cold symptoms according to studies.
Steam inhalation
Dry air can make congestion and sore throats worse, but steam will help to clear your airways. You could have a hot shower, steam your face over a sink with a towel over your head and maybe a few drops of eucalyptus essential oil, or use a cool mist humidifier.
The Pine Needle Cough Syrup is one of the makes from our Heart Body Soul feature by Lottie Storey in our January issue, which also features recipes for Dark Pine Nougat Bars, Pine & Rosemary Ice Cream and Pine Vodka. The immune booster ideas are from our feature, Cold Comforts, by Rebecca Frank, also in our January issue; it’s a one-stop shop for fighting off winter sniffles.
More natural winter remedies…


More from our blog…

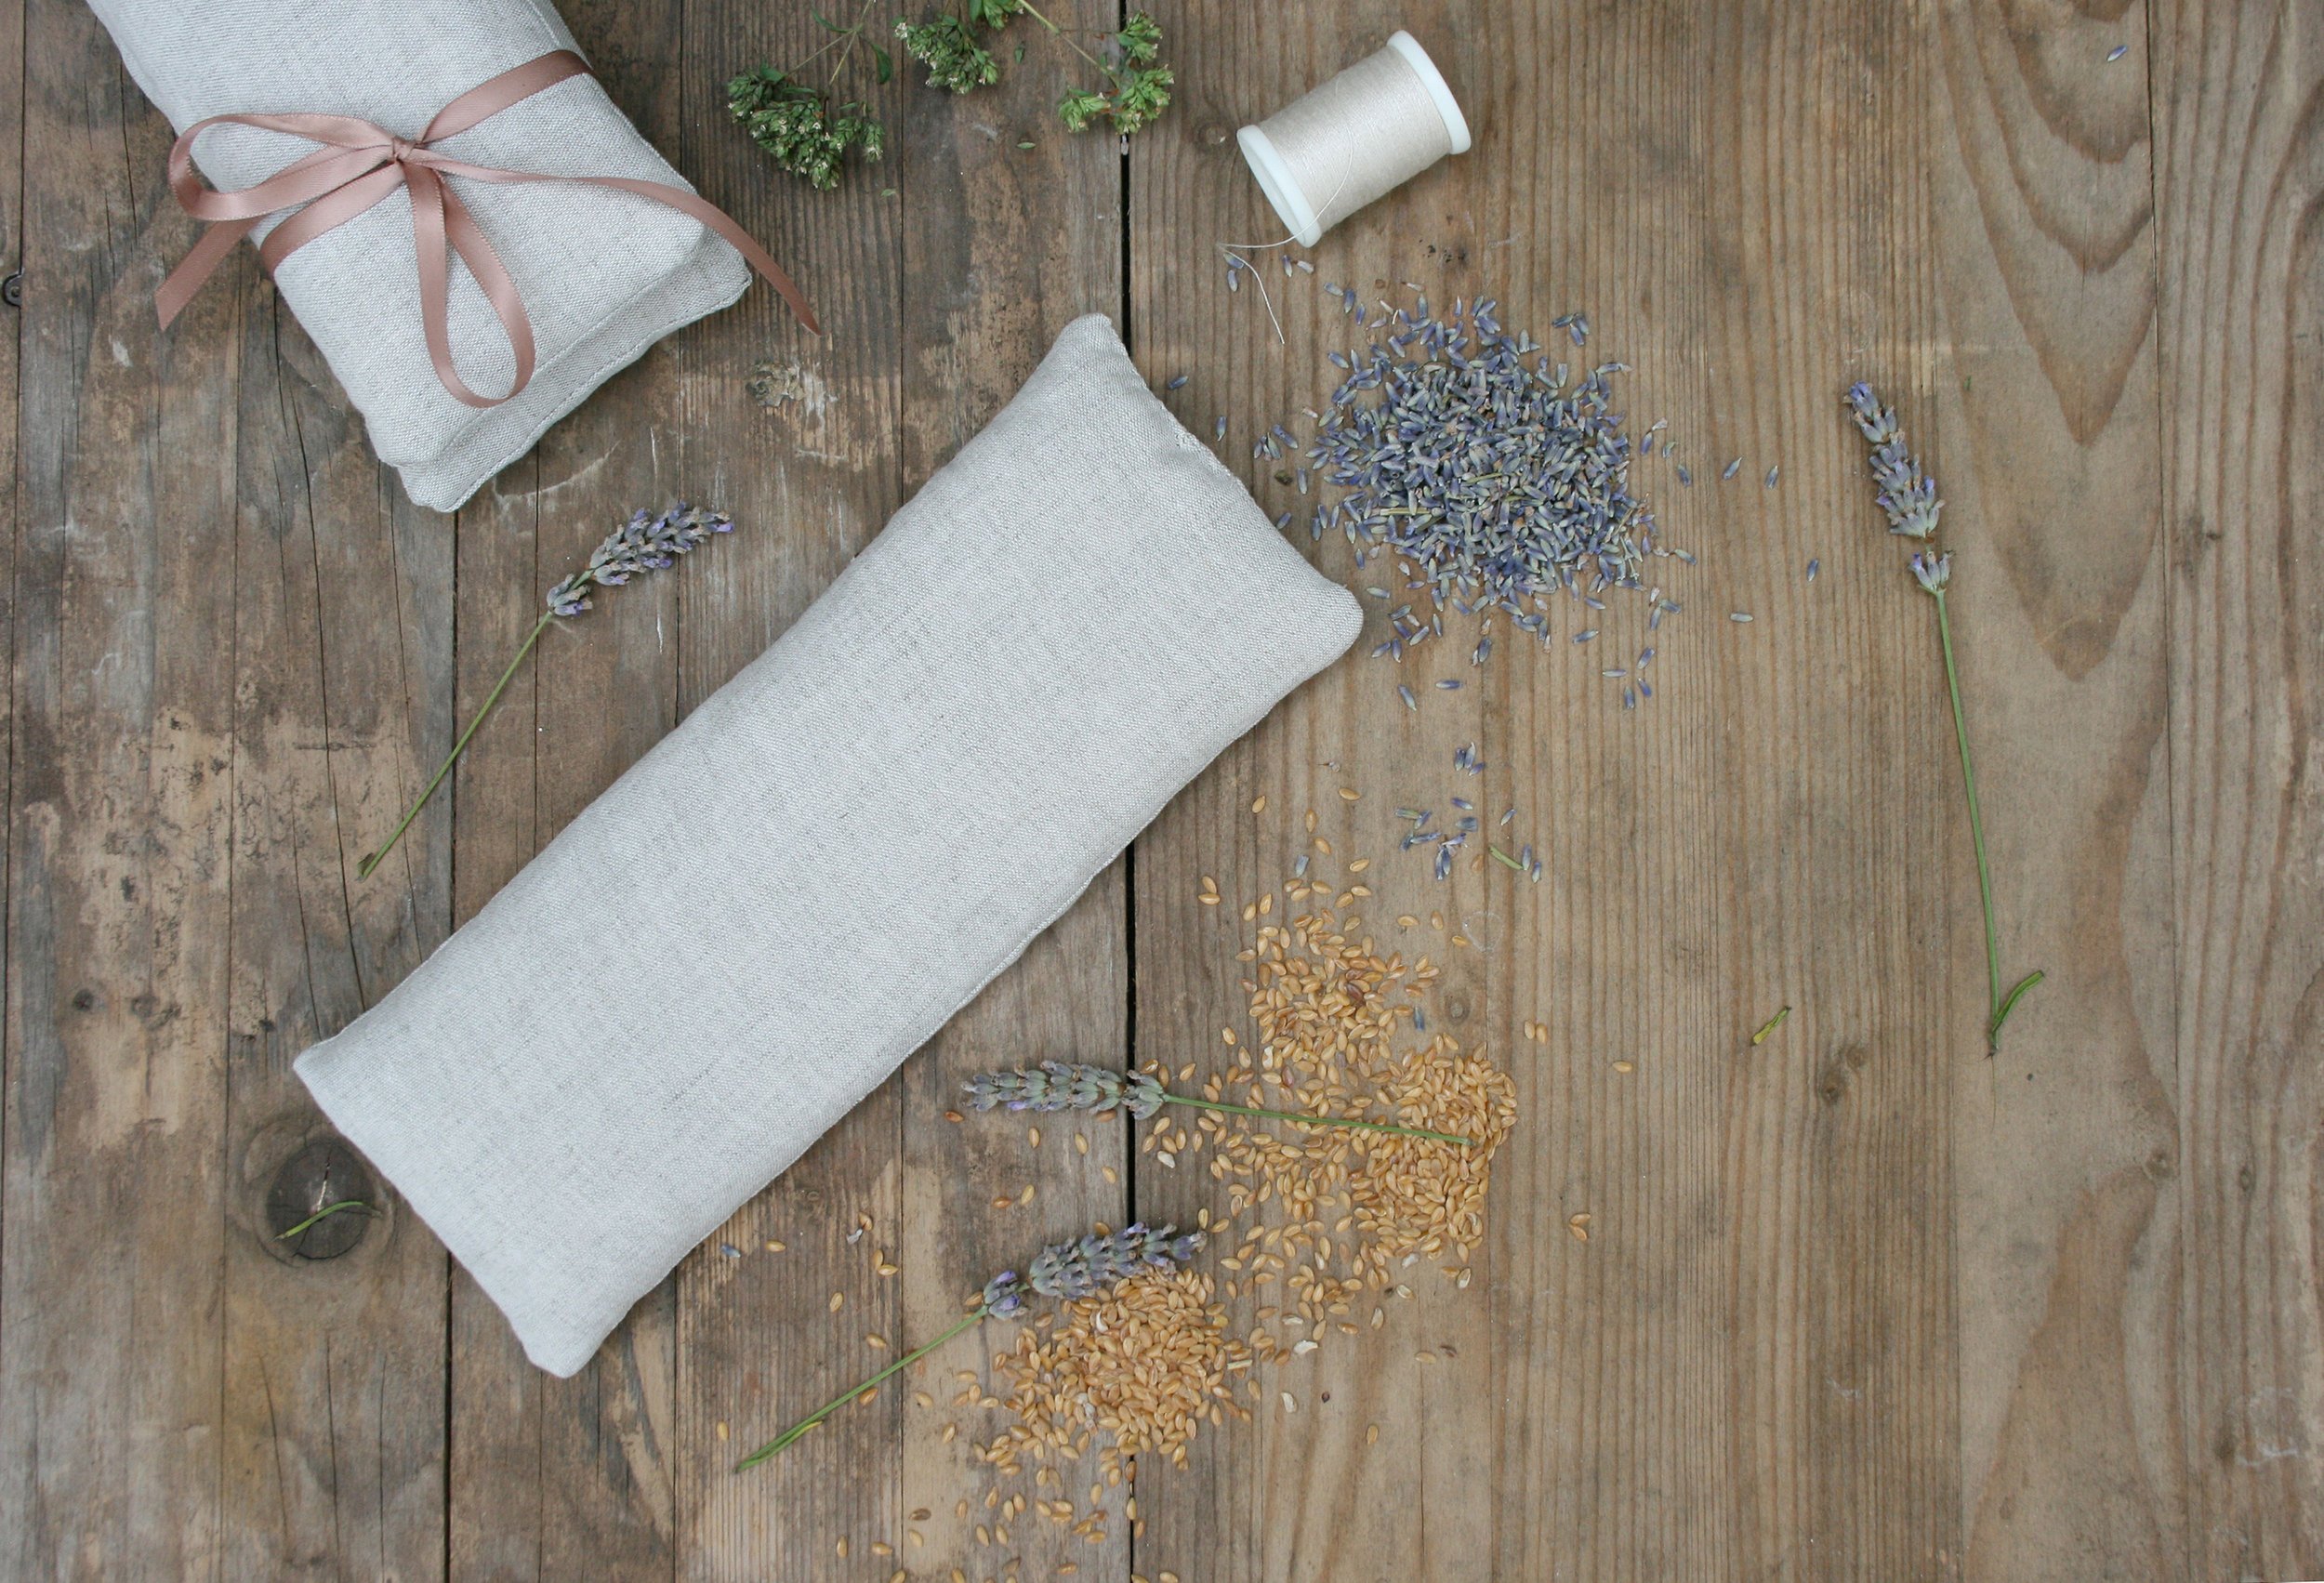
Make | Winter Herb Salt
This easy recipe can be made with whatever fresh herbs you have to hand; you just need roughly the same volume of sea salt as you do chopped herbs
The flavoursome salt is a versatile seasoning for so many winter recipes and is particularly good crumbled over freshly roasted chestnuts. Potted up in little glass jars and tied with a ribbon, it also makes a lovely gift for others to enjoy.
Makes 1 jar
You will need
A mixed bunch of fresh winter herbs of your choice (rosemary, sage, and a few bay leaves is our go-to combination for this)
Coarse sea salt
To make
Remove any tough stems from the herbs and finely chop them. Roughly measure out an equal volume of sea salt to the chopped herbs. Mix the Winter herbs and sea salt together until well combined. Spread the herb salt out in a shallow layer in a dish or bowl, cover with a tea towel, and leave somewhere warm and dry for a few days, or until the salt and herbs are dry to the touch. Scoop into a jar and use as needed.
The Winter Herb Salt was just one of the beautiful makes from our feature Gifts from the Smallholding in our December issue, by Kathy Bishop and with photography by Tom Crowford from The Seasonal Table. We’ve loved following Kathy and Tom’s adventures on their smallholding this year. You can find the Winter Herb Salt as well as lots more wintry recipes and ideas, including squash and kale lasagne, mash with onions and breadcrumbs, ginger crumble with apple compote and redcurrant, apple and rosemary fizz starting on page 46 of our December issue, which you can preorder now.
Buy this month's The Simple Things - buy, download or subscribe
More things to make with salt…


More from our blog…

Photography: Kirstie Young
Make | Bay and Lemon Sea Salt Body Scrub
Bay and lemon are a happy pairing, both in the kitchen and in the bathroom. This scrub combines astringent lemon zest and juice with the exfoliating power of salt, while the dried bay leaves are anti-fungal.
Makes around 2x 500ml jars
1kg sea salt
750ml olive oil
5 lemons, zest and juice
10 bay leaves
100g thickener such as tapioca flour or arrowroot
1 Pour the salt into a large mixing bowl, then add the olive oil, lemon zest and lemon juice.
2 Stir well, then crumble in the bay leaves. Break them up using your hands and scrunch into the mix (but keep pieces fairly large to avoid clogging up the plughole!).
3 Add the thickener, then stir until the mixture is well combined and it holds together.
4 Transfer to jars with seals. To use, grab handfuls of the scrub, avoiding the bay leaves if you can, and massage onto arms, legs, bums and tums. Rinse off using warm water.
Maker’s note: The scrub will keep for up to 12 months in a sealed jar.
This project, perfect for a weekend afternoon, is from our feature Heart, Body and Soul, which this month focuses on bay leaves. The feature also includes a project to make a bay and chilli ‘swag’, a panna cotta, a salad and a tea.
Buy this month's The Simple Things - buy, download or subscribe
More inspiration for beautiful bathtimes…

More from our November issue…


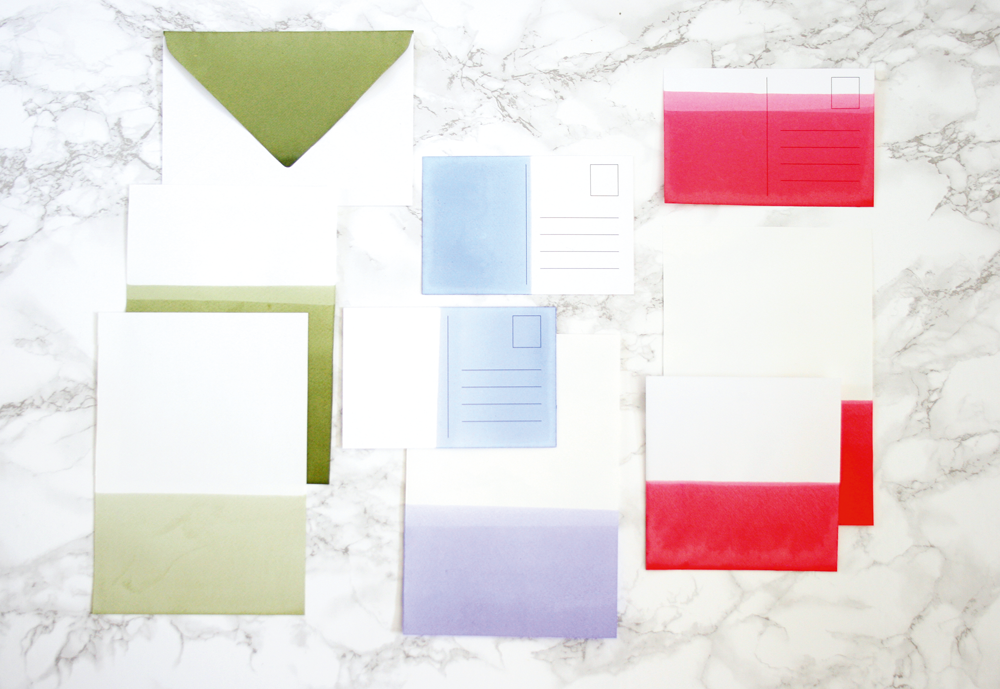
Make | Dip dye stationery
While away a crafternoon learning the art of dip dye and emerge with your very own stationery set
September is all about new stationery for us, so we needed no more excuse than that to dig out this weekend project from our issue 67 for making your very own dip dye stationery.
You will need:
A selection of paper, envelopes and postcards
Hand fabric dye powder (we used Dylon)
Warm water
Measuring jug
Vessel for holding your dye (a washing-up bowl, bucket or Tupperware box works well*)
Length of twine
Clothes pegs
Scissors
1 Before you start, tie a length of twine, washing line-style, nearby, ready for hanging your paper to dry. Cover any surfaces with newspaper.
2 Make up your dye solution. Start with pouring 1 litre of warm water into your vessel. Add 4 tsp of dye powder and stir until dissolved: the amount you use will determine the strength of your colour, so use a piece of scrap paper to test.
3 Once you’re happy with your dyeing solution, take your piece of paper and – slowly, carefully – insert it into the dye solution, only immersing the amount of paper you’d like coloured. Hold it in the solution for a few seconds and then, slowly and carefully again, draw it out of the solution. Hold the paper over for a moment to catch any drips of dye. You can dip again for a slightly stronger coverage.
4 Peg your dip-dyed stationery to your length of twine to dry. If, once dry, your stationery is a little curled at the edges, place inside a heavy book and leave for 24 hours
Buy this month's The Simple Things - buy, download or subscribe
From our September issue…
More weekend projects to make:

Photography: Kirstie Young Styling: Lottie Storey
Make | a Jasmine Garland for your hair or your wall
Whether you’re going to San Francisco or not, now is the time of year to be wearing flowers in your hair for sure.
This easy make is just one of the ideas for things to do with Jasmine from our July Heart, Body and Soul feature. Once you’ve crowned yourself Queen of Summer, you might like to whip up the jasmine body butter and even use the flowers in some cookery to make jasmine tea and honey chicken or tofu skewers, or the dark chocolate and orange tart with jasmine cream.
But first things first; let’s get that garland made.
Tendrils of jasmine, with their star shaped flowers, lend themselves for use in a garland that you can wear in your hair or hang on your wall.
You will need:
Several strands of flowering jasmine
Scissors or secateurs
Floral wire
1 Snip off any broken leaves or petals from your jasmine strands.
2 Find your most robust strand and wrap it around the crown of your head to get a rough size for your garland. Take it off your head and wrap some wire around the ends
to secure.
3 With the remaining strands, continue to wrap the garland in both directions covering up or tucking in the ends of the strands where you can, using a small twist of wire to fasten. Keep going until you have a garland that pleases you!
Maker’s note: The circle can be whatever size you like, but for a garland to wear it will need to be around 25cm diameter or go large for a jasmine wreath to hang on the wall.
Buy this month's The Simple Things - buy, download or subscribe
More from our July issue…
More edible flower ideas…


Make | Embroidery Hoop Templates

These sweet embroidery projects from Love Embroidery magazine are featured in our June issue. You’ll find all the instructions beginning on page 102 and you can buy the issue from our online store. But first you will need the templates. Download them below and get stitching.
Project: Jen Smith and Miriam Polak
Buy this month's The Simple Things - buy, download or subscribe
For more patterns, ideas and inspiration pick up a copy of Love Embroidery
More makes and things to do…


More from our June issue…
Photography: Kirstie Young
Make | Chocolate & Peppermint Lip Balm
A simple project for a sweet-smelling Easter gift to make a change from a chocolate egg
Homemade lip balm is easier than you might expect. Once you’ve got the hang of it, you can experiment with different flavour combinations. This version is like mint choc chip ice cream for your lips.
Makes two pots of lip balm
1 tbsp coconut oil
1½ tbsp shea butter
1½ tbsp cocoa butter
1 tbsp cocoa powder
3 drops peppermint essential oil
2 x 30ml jars
1 Put the coconut oil, shea butter, cocoa butter and cocoa powder into a jam jar or bowl.
2 Set the bowl over a pan of boiling water, taking care not to let it touch the water. As soon as they’ve all melted, remove from the heat. Alternatively, heat in the microwave for 60-90 seconds, or until melted.
3 Let the mix cool for a few minutes before adding the essential oil.
4 Stir well before pouring into your jars. Be careful not to spill the mixture around the top of the jar as this’ll make it difficult to open once cooled. To speed up the cooling process, put your jars in the fridge or freezer.
This recipe is just one of the creative projects by Lottie Storey that feature in our Heart, Body and Soul pages, which this issue focuses on chocolate (of course). There are also instructions for making a chocolate and rose petal salami, chocolate tagliatelle and a pain au chocolat miso pudding. Photography by Kirstie Young.
Buy this month's The Simple Things - buy, download or subscribe
More from our April issue…
More chocolate (because there can’t be too much)…


Photography: Kirstie Young
Make | Rosemary, Peppermint and Lemon Scalp Rub
Clear your head and bring the zing to your shower, too, with this treatment you can make in your kitchen
Rosemary and lemon are a classic combination, made even zingier with the addition of peppermint. Great for fine to medium hair, applying this to the scalp encourages blood flow, while the essential oils clear the head.
Makes one
250ml jar
250ml coconut oil
4 sprigs rosemary
3 drops peppermint essential oil
6 drops lemon essential oil
1 Melt the coconut oil in the microwave until pourable.
2 Finely chop the needles from one sprig of rosemary.
3 Pour the coconut oil into a 250ml re-sealable jar and stir in the chopped rosemary and both essential oils.
4 Push the remaining rosemary sprigs into the sides of the jar before sealing.
5 To use, apply the scalp rub all over the head, getting right into the roots. Leave for 15-30 mins before shampooing and rinsing thoroughly.
This project by Lottie Storey is just one of the ideas on our new potion-making for grown-ups series, Heart, Body and Soul. This month, we focus on rosemary, with an infused oil, and recipes for a bread, a cake and a pasta dish, all using the herb.
Buy this month's The Simple Things - buy, download or subscribe
More from our February issue…


More lotions and potions to make…


Make | blockprint sweater template
Give an old sweatshirt a new look in an afternoon and feel very clever indeed
In our February issue, we have a feature on how to upcycle an old sweater into something a little lovelier. All the items you need and the instructions are on page 42, and you can print out the template you will need for your blockprint below.
Good luck! And don’t forget to send us pictures of your new jumpers!
More craft projects for cold afternoons…
More from our February issue…

Photography: Joe McIntyre
Make | Candle Holder
Light your way to bed with this easy-to-make, no-kiln-required clay candle holder
This elegant candle holder is really easy to make with just a couple of inexpensive craft purchases. It’s one of three candle holder makes created by our talented Simple Things duo, Karen Dunn and Joe McIntyre. You can find the instructions for the other two in our January issue to add a bit of glow to dark January evenings.
You will need:
Air-drying clay
Rolling pin
Craft knife
Ruler, paper, pencil and scissors
Water
White acrylic paint
Clear matte varnish, optional (we used Mod Podge)
How to make:
1 Roll out your air-drying clay so it’s around 5mm thick. Next, draw a circle on your paper (9cm diameter – you can use a mug or tin to draw around if you don’t have a compass). Then draw a 12 x 1.5cm and a 30 x 1.5cm strip and cut out.Place your templates on top of your clay and cut around them with your craft knife. Cut two of the 12cm strips. If your clay is quite wet, leave it to dry out for around 30 mins.
2 Next, score the outside edge of your circle of clay with a craft knife and add a fingertip of water. Wrap the longest of your clay strips around the outside edge and press firmly against the sides. Next, score across the join and smooth together with your fingertips
3 Take one of your smaller strips and in the middle of the clay base create a smaller circle with the strip (make sure this is bigger than the base of your candle as the clay will shrink as it dries). Once you have made a ring with the strip of clay, score the bottom, add a fingertip of water and press the edge of the strip down gently to attach in the middle of the base.
4 Take your final strip of clay and lay it across the base of the circle – from the central ring to the inside edge of the outer strip of clay. Loop the strip over your finger and, using the same method as before, secure it to the outside edge. Allow the clay to dry for around 24-48 hours.
5 Once dry, paint your holder with acrylic paint. Then, when completely dry, cover with a layer of matte varnish for a protective finish.
Buy this month's The Simple Things - buy, download or subscribe


