The Simple Things

Taking time to live well
  • Home
  • Subscribe
  • SHOP
  • Newsletter
  • About
  • Work with us
  • Home
  • Subscribe
  • SHOP
  • Newsletter
  • About
  • Work with us

Blog

Taking Time to Live Well

  • All
  • Chalkboard
  • Christmas
  • Competition
  • could do
  • Eating
  • Escape
  • Escaping
  • Fresh
  • Fun
  • gardening
  • Gathered
  • Gathering
  • Growing
  • Haikus
  • Interview
  • Living
  • Looking back
  • Magazine
  • magical creatures
  • Making
  • Miscellany
  • My Neighbourhood
  • Nature
  • Nest
  • Nesting
  • outing
  • playlist
  • Reader event
  • Reader offer
  • Shop
  • Sponsored post
  • Sunday Best
  • Think
  • Uncategorized
  • Wellbeing
  • Wisdom
Photography: CHRIS MIDDLETON Project: BECI ORPIN

Photography: CHRIS MIDDLETON Project: BECI ORPIN

Make | Outdoor canvas hammock

Lottie Storey August 26, 2022

Have a go at this simple but sturdy hammock project. You should be able to make it in half a day, leaving you plenty of the bank holiday weekend left to lie in it lazily!

Lazing in a hammock is hard to beat: especially in a shady spot on a warm summer’s day, ideally with a book in one hand and a cool drink in the other. And if you’ve managed to make the hammock yourself – well, you can bask in satisfaction, as well as sunshine. This hammock is surprisingly easy to make, and is much sturdier than one of the knotted ones. We’ve added pompoms, too, because who doesn’t love a pompom? Put the labour in now and hopefully you’ll get the payoff in sunny days to come.

Outdoors canvas hammock

Made of weatherproof canvas, and as robust as it is comfortable

YOU WILL NEED
2m of 140cm-wide strong, canvas fabric
Pins
Sewing machine and thread
Tape measure
Pencil or fabric marker
Scissors
22 rivets, 23mm (1 in) in diameter, plus a rivet tool (which should come with the kit) 
Mallet or hammer
66m of natural rope (ensure this is good quality and load bearing), plus extra rope for hanging
2 metal hoops or carabiners strong enough to handle appropriate weight
FOR THE POMPOMS
Wool to match the canvas fabric (this uses black and white)
Pompom maker

1 Fold a 4cm hem at each end of the fabric. Pin in place and sew.
2 Mark out where the rivets will go on the seam. This uses 11 at each end, spaced about 11cm apart. Using scissors, make small holes on the marked points. Following the instructions on the
packet, attach the rivets using the rivet tool and the mallet. Placing a wood offcut underneath the canvas will help to protect the work surface.
3 Cut the rope into 22 x 3m lengths. Fold each rope in half and thread it through each rivet using a cow hitch knot
to fasten. To form a cow hitch knot, insert the folded end of the rope through the hole and then pull it through to form a loop. Push the two rope ends through the loop and pull to tighten the knot (there are plenty of YouTube videos around if you get stuck with this bit).
4 Once all the 3m lengths are attached through the rivets, gather all the rope at one end and tie it into one large knot. Repeat for the other end. This might need adjusting once it is attached to the hanging space.
5 Pompoms: wind the wool around the pompom maker and, once full, cut the wool. Place some string or a length of wool around the cut wool, then pull it tight
and tie a knot to keep it in place. Cut this piece of wool, leaving ample length for hanging. This hammock uses two white and two black pompoms.
6 Attach the lengths of wool left on the pompoms to one end of the hammock (or attach two on each end).
7 To hang the hammock, attach the ropes on each end to a metal loop or carabiner with a double knot (make sure the knot is
very tight so that the hammock is secure). Attach extra rope to the other side of both carabiners and then tie that rope around a tree or somewhere else sturdy enough to take the weight.


Taken from Sunshine Spaces: Naturally Beautiful Projects to Make for Your Home and Outdoor Space by Beci Orpin (Hardie Grant).

  Buy ,  download  or  subscribe   See the sample of our latest issue  here   Buy a copy of our latest anthology:  A Year of Celebrations   Buy a copy of  Flourish 2 , our wellbeing bookazine  Listen to  our podcast  - Small Ways to Live Well

Get hold of your copy of this month's The Simple Things - buy, download or subscribe

View the sampler here


From our August issue…

Featured
house martin copy.jpg
Aug 23, 2022
Bird Watch | House Martins
Aug 23, 2022
Aug 23, 2022
From Gathering for Simple Summer Pleasures.jpg
Aug 16, 2022
Simple Things | Summer's Tiny Pleasures
Aug 16, 2022
Aug 16, 2022
Gathering Coleslaw.jpg
Aug 13, 2022
Recipe | Summer Veg Coleslaw with Coriander
Aug 13, 2022
Aug 13, 2022

More weekend projects to make…

Featured
TEA COSY JUMPER.jpg
Jan 25, 2025
How to | Make a Tea Cosy from an Old Jumper
Jan 25, 2025
Jan 25, 2025
Wellbeing.jpg
Feb 11, 2024
Make | Kitchen Face Masks
Feb 11, 2024
Feb 11, 2024
AdobeStock_276831672_Preview.jpg
Oct 23, 2023
Project | Make Seed Bombs
Oct 23, 2023
Oct 23, 2023
In Making Tags make, weekend project, Make project, issue 73, july
Comment
SIM67.MAKES_Step3_5.png

Make | Dip dye stationery

Lottie Storey September 18, 2021

While away a crafternoon learning the art of dip dye and emerge with your very own stationery set

September is all about new stationery for us, so we needed no more excuse than that to dig out this weekend project from our issue 67 for making your very own dip dye stationery.

You will need:
A selection of paper, envelopes and postcards
Hand fabric dye powder (we used Dylon)
Warm water
Measuring jug
Vessel for holding your dye (a washing-up bowl, bucket or Tupperware box works well*) 
Length of twine
Clothes pegs
Scissors

1 Before you start, tie a length of twine, washing line-style, nearby, ready for hanging your paper to dry. Cover any surfaces with newspaper. 
2 Make up your dye solution. Start with pouring 1 litre of warm water into your vessel. Add 4 tsp of dye powder and stir until dissolved: the amount you use will determine the strength of your colour, so use a piece of scrap paper to test.
3 Once you’re happy with your dyeing solution, take your piece of paper and – slowly, carefully – insert it into the dye solution, only immersing the amount of paper you’d like coloured. Hold it in the solution for a few seconds and then, slowly and carefully again, draw it out of the solution. Hold the paper over for a moment to catch any drips of dye. You can dip again for a slightly stronger coverage.
4 Peg your dip-dyed stationery to your length of twine to dry. If, once dry, your stationery is a little curled at the edges, place inside a heavy book and leave for 24 hours
 

Buy this month's The Simple Things - buy, download or subscribe

From our September issue…

Featured
Water Boatman.jpg
May 24, 2025
Nature | Pond-Dipping for Grown-ups
May 24, 2025
May 24, 2025
RS2832_iStock-1278591330.jpg
May 23, 2025
Sponsored Post | Get your family active with Youth Sport Trust
May 23, 2025
May 23, 2025
Screenshot 2025-05-21 at 08.52.06.png
May 21, 2025
Playlist | Great Heights
May 21, 2025
May 21, 2025

More weekend projects to make:

Featured
TEA COSY JUMPER.jpg
Jan 25, 2025
How to | Make a Tea Cosy from an Old Jumper
Jan 25, 2025
Jan 25, 2025
Wellbeing.jpg
Feb 11, 2024
Make | Kitchen Face Masks
Feb 11, 2024
Feb 11, 2024
AdobeStock_276831672_Preview.jpg
Oct 23, 2023
Project | Make Seed Bombs
Oct 23, 2023
Oct 23, 2023
In Making Tags make, weekend project, Make project, january, issue 67
Comment
Tiny Books Rachel Hazell.jpg

In praise of | teeny, tiny books

Iona Bower September 18, 2019

Find your bi-focals. Who could resist a teeny, tiny, elf-sized book?

Hands up who DIDN’T, at least once in their childhood, try to write a teeny tiny book? We thought not. It’s a rite of passage, like making perfume from rose petals that smelt like drains and building a den from old wood and rusty nails in the garden that collapsed on top of you and gave your mother an attack of the vapours.

We were reminded of the joy of making a tiny book as we put together the Weekend Project, Booksmarts, for our September issue. (Pick up a copy of our ‘Begin’ issue in the shops this week and learn how to make various tiny books yourself.) The project is by The Travelling Book Binder, Rachel Hazell, who has many more similar projects in her book Bound: 15 Beautiful Bookbinding Projects (Kyle Books) and extolls the excitement of making something three-dimensional out of a bundle of old paper. 

Being able to write a story is an amazing talent, but having the ability to create a story from nothing and immediately transform it into a physical thing that can be held and shared by others is simply magical.

It reminded us of seeing the Bronte children’s teeny tiny books years ago at the Bronte Parsonage Museum in Haworth. The elfin-sized novels with stories that looked like they had been penned by fairies are spellbinding to see in the flesh. Particularly, perhaps if you saw them as a child, or through a child’s eyes. These tiny manuscripts, unlinke the later Bronte novels, were never penned to be read, and certainly not by mere grown-ups whose shoddy eyesight and sausage fingers would barely be able to turn the pages and read the words. They were written by the Bronte children for their own, and no one else’s, pleasure. So they’re without pretence, uninhibited by any perceived lack of skill or concern to impress.

Many of the stories follow the rise of two pretend worlds: Angria (penned by Charlotte and Branwell) and Gondal (written by Emily and Anne). Before that, the children wrote about the part-fictional, part-reality-based Glass Town, as well as many miscellaneous stories. Some have been uploaded by Harvard University and they can be read (squinted at) online here. They’re well worth an afternoon’s browsing with a cup of tea when you have a moment. 

And if you’re inspired to pen your own nano-novel, The Bronte Parsonage Museum has kindly made its own printable, which you can download to help you get started. Click here for the printable.

Happy tiny crafting.

Get hold of your copy of this month's The Simple Things - buy, download or subscribe


More from our September issue…

Featured
back cover.JPG
Sep 24, 2019
September | a final thought
Sep 24, 2019
Sep 24, 2019
Coastal Path.jpg
Sep 21, 2019
Walking on the edge of land
Sep 21, 2019
Sep 21, 2019
Tiny Books Rachel Hazell.jpg
Sep 18, 2019
In praise of | teeny, tiny books
Sep 18, 2019
Sep 18, 2019

More lovely things to make…

Featured
Lavender eye pillow.jpg
Jul 22, 2023
Make | A Soothing Lavender Eye Pillow
Jul 22, 2023
Jul 22, 2023
Modern Crochet Style PAGES2.PRESS 60.jpg
Apr 19, 2023
Weekend Project | Crocheted fruit placemats
Apr 19, 2023
Apr 19, 2023
bottle6.jpg
Mar 16, 2022
Make | A Macrame Bottle Holder
Mar 16, 2022
Mar 16, 2022


Tags issue 87, September, books, project, make, Make project
Comment
Illustration: Kavel Rafferty

Illustration: Kavel Rafferty

Make: an upcycled hanging tomato planter

Iona Bower March 31, 2019

Repurpose a plastic bottle and have tomatoes hanging around all summer

This simple project can be done in an hour and you’ll have cherry tomatoes dangling temptingly by the back door ready for salads all summer long. We recommend you make lots and hang them together in bunches. Green plastic bottles look most attractive if you have them but any will do.

You will need:

Used plastic bottles, between two and four litres

Cherry tomato plant seedlings

Masking tape

Hole punch

Knife

Strong twine

Soil

1 Clean your plastic bottles, removing any labels. Carefully cut away the bottom of the bottle.

2 Seal over the jagged edge with masking tape; then, using the hole punch, make four holes in the tape, one on each side of the bottle.

3 With the mouth of the bottle facing down, insert your tomato seedling and carefully work the plant into the mouth. Then spread the root ball out inside the bottle.

4 Fill the bottle three-quarters full with compost.

5 Thread your twine through the holes and tie securely together.

6 Hang somewhere sunny and water really regularly.

Get hold of your copy of this month's The Simple Things - buy, download or subscribe


More from our April issue…

Featured
Back cover.JPG
Apr 26, 2019
April: a final thought
Apr 26, 2019
Apr 26, 2019
Green and clean oven gel pic.jpg
Apr 22, 2019
Make: your own clean, green oven gel
Apr 22, 2019
Apr 22, 2019
Charlie and Cho Factory pic.jpg
Apr 14, 2019
Game: Charlie and the Chocolate Factory Puzzler
Apr 14, 2019
Apr 14, 2019

More garden hacks…

Featured
SIM82.MISCELLANY_Tomatoes.jpg
Mar 31, 2019
Make: an upcycled hanging tomato planter
Mar 31, 2019
Mar 31, 2019
SIM76-home-hacks-heater.jpg
Sep 27, 2018
Home hacks | Make a terracotta heater
Sep 27, 2018
Sep 27, 2018
75Herb-self-watering.png
Aug 30, 2018
Garden hacks | Make a self-watering herb garden
Aug 30, 2018
Aug 30, 2018
In Making Tags issue 82, April, makes, Make project, garden hacks, recycling
Comment
lampshade3.jpg

Try it out: lampshade workshop

Iona Bower February 24, 2019

Become a master of a new art in a few short hours

There’s something so satisfying about learning a new skill. Especially when you get to take home something really cool at the end of it.

We were thrilled to go along to Joanna Corney of Lume Lighting’s lampshade-making workshop at her pretty Hove studio this weekend and learn some of her trade secrets with a group of The Simple Things readers.

lampshade4.jpg

As well as learning the art of ‘rolling the drum’ and how not to get double-sided lamp tape stuch to one’s hair, we also bonded over the pros and cons of slubby fabrics and the divisive nature of pom-pom braid. And we had a very lovely lunch, too.

Everyone created something completely different to take home to delight their families and astound their friends. Here’s Simple Things blog editor Iona Bower’s lampshade in situ.

lampshadehome.jpg

If you’d like to attend one of Joanna’s courses (she also runs a rather lovely looking fairylights workshop, we may have noticed) you can visit her website or to buy one of her own creations visit the shop. We recommend the courses though. Joanna is hiding some serious baking skills under a bushel. We’re going back for more cake, too.

We’ll be running more workshops in conjunction with makers all over the country. Look out for similar upcoming events in the magazine.

Get hold of your copy of this month's The Simple Things - buy, download or subscribe


From our February issue…

Featured
Feb chalkboard.jpg
Feb 27, 2019
February: a final thought
Feb 27, 2019
Feb 27, 2019
feb+cake.jpg
Feb 20, 2019
Cake facts: drizzle me this
Feb 20, 2019
Feb 20, 2019
dressing gown.jpg
Feb 16, 2019
Etiquette: dressing gowns
Feb 16, 2019
Feb 16, 2019

More new skills to learn…

Featured
Hula hoop.JPG
Jun 25, 2020
How to | Hula Hoop
Jun 25, 2020
Jun 25, 2020
Sunshine chalkboard - Catherine Frawley.jpg
May 17, 2020
Learn | to play a little sunshine on the ukulele
May 17, 2020
May 17, 2020
Microphone.jpg
Dec 13, 2018
How to create a podcast
Dec 13, 2018
Dec 13, 2018


In Reader event Tags Make project, lamp, lampshade, learn a new skill
Comment
Project by Roma McLaughlin

Project by Roma McLaughlin

Make | Silhouette portrait

Lottie Storey October 6, 2018

PUT KNIFE TO PAPER FOR A CLEVER VERSION OF THE FAMILY SNAP

You will need:
Cutting mat
1 sheet lightweight A4 black paper, 80–120 gsm
1 sheet lightweight A4 white copy paper, max 80 gsm, for templates
1 sheet mid-weight A4 white craft paper, min 120 gsm, for background
Sticky tape
Craft knife or scalpel, with blades
Metal ruler
Pencil
Eraser
PVA glue
Toothpick or cocktail stick
A4 picture frame
A family photograph
Photocopier or scanner

1 Find a family photograph in which individuals or a group are in silhouette, with their outlines clearly visible (photos taken against a wall or plain background work best) – ideally, individual silhouettes would just join or overlap within a group composition, so they remain recognisable. Photocopy and enlarge the photo if necessary to fit A4 size and then trace the relevant outline onto an A4 sheet of copy paper to make a template.

2 Place the template over your sheet of black paper and attach both to your cutting mat with a piece of sticky tape placed over the corners (take care not to place tape over the image area).

3 Start cutting away the white, negative shapes with a scalpel — begin with the smallest areas, to help prevent your paper from tearing. You’ll be cutting both the template sheet and black paper simultaneously. Anchor the cutting mat with one hand, and work with the blade in your other, holding it vertically, like a pencil, for greater precision. It will help you to keep the blade straight if you move the whole mat around while cutting shapes.

4 Continue to work until all of the white paper is cut away, using a metal ruler with your scalpel for any straight lines.

5 Carefully remove your template and finished papercut from the cutting mat and separate the two.

6 Fixing mistakes is not impossible. If you’ve cut too much or too far, you can mend the area from the back. Simply dot glue onto the papercut surface using a toothpick or cocktail stick, then ‘patch’ the area using a tiny scrap of black paper.

7 Place the finished silhouette centrally onto your A4 white background paper sheet and mark its position lightly with pencil dots (these can be erased later).

8 Turn the silhouette over and, again using PVA glue and a toothpick or cocktail stick, dot glue onto the reverse (you don’t need to cover the surface with glue — this should be enough). Position the silhouette, right side up, in line with your previous pencil marks, and smooth down onto the backing sheet. Leave to dry completely.

9 You can now frame your piece. Use a flat frame and sandwich the silhouette between glass and backing.

Adapted from V&A Paper Crafts: A Maker’s Guide (Thames & Hudson in association with the V&A).

  Buy ,  download  or  subscribe   See the sample of our latest issue  here   Buy a copy of our latest anthology:  A Year of Celebrations   Buy a copy of  Flourish 2 , our wellbeing bookazine  Listen to  our podcast  - Small Ways to Live Well

Get hold of your copy of this month's The Simple Things - buy, download or subscribe

View the sampler here


More from the October issue:

Featured
back cover 76.png
Dec 21, 2020
It's better to light a candle than curse the darkness
Dec 21, 2020
Dec 21, 2020
SIM76.TODAY,TOMORROW,TOKEEP_Hazelnuts-Pesto-7353.jpg
May 9, 2020
Cook | hazelnut pesto and gnocchi with fennel
May 9, 2020
May 9, 2020
the simple things gift subscription.png
Oct 23, 2018
Christmas gift subscription offer
Oct 23, 2018

Christmas gift subscription offer from The Simple Things magazine. Treat friends and family to a gift subscription this Christmas and we'll do the wrapping and sending for you. Just £44 – saving 26%* on the usual cover price.

Oct 23, 2018

More weekend projects to make:

Featured
TEA COSY JUMPER.jpg
Jan 25, 2025
How to | Make a Tea Cosy from an Old Jumper
Jan 25, 2025
Jan 25, 2025
Wellbeing.jpg
Feb 11, 2024
Make | Kitchen Face Masks
Feb 11, 2024
Feb 11, 2024
AdobeStock_276831672_Preview.jpg
Oct 23, 2023
Project | Make Seed Bombs
Oct 23, 2023
Oct 23, 2023
In Making Tags make, weekend project, Make project, issue 76, october
Comment
SIM72.PROCESSIONS_Suffrage banner, 1908 - 1914 © The Women's Library @ LSE (2).png

Make your own pennant or flag

Lottie Storey June 7, 2018

On Sunday 10 June, marches to celebrate 100 years of votes for women will take place across the UK - read more here and on page 33 of June's The Simple Things.

Want to take part? You'll need to make a pennant or flag - here's how. Pennants and flags can have a word, name, image or quotation on them. Make them from one layer of cloth in the lightest of materials, to let them float in the wind.

YOU WILL NEED

18mm diameter pole*
Square or rectangle of fabric of a size of your choice (the bigger it is the harder it will be to carry)
Pencil and paper
Computer printer
Sewing machine
Bondaweb (buy from jaycotts.co.uk)
Iron
Embroidery threads and needle (optional)

1 To make a pennant, cut out a triangle from your fabric of whatever size you like.
2 Create a side channel on the straight edge, 71⁄2cm wide, by folding the edge over. Sew down the edge. Then sew across its top, leaving the bottom edge of the side channel open for the pole to slide into.
3 What do you want to say? Think of a word, message or image to go on your pennant or flag – it should be something to help people to understand your message quickly. Using a computer, draw them up to a scale that fits your cloth.
4 Print off your lettering in the size you need. The lettering should be as big as your cloth allows. Trace your lettering and image(s) onto Bondaweb.
5 Iron the Bondaweb to the back of your chosen fabrics, cut out, peel off the backing paper, iron the lettering and images onto your cloth.
6 If you want, you can embroider on details; ribbon the sides of your cloth to frame it in a contrasting colour; add fringing or tassels to give it movement, and sequins or beads to make it gleam. Or just keep it as a simple cloth with a clear message of what matters to you. The pennant should be secure, but you can glue the material to where it meets the pole if you think it needs further support or to stop it slipping down the pole.

FOR AN EYE-CATCHING BANNER...

Clare’s suggestions to help your creation stand out

  • Your banner will only be seen for a moment as it passes by so keep it simple and bold.

  • Don’t crowd your letters. They need space to be read at distance, so use the largest font you can.

  • You can make it personal with your own handwriting or family photographs.

  • Make it glitter in the sun with gold fabric or sequins.

  • Don’t worry about exquisite stitching; no one will notice. What they will remember is the feel of it, what it says of you.

Project by Clare Hunter, sewingmatters.co.uk

*Your pole can be long enough to enable you to carry a pennant like a flag on a parade, or, if you use one the same width as your triangle, it can be hung on a wall with hooks.


  Buy ,  download  or  subscribe   See the sample of our latest issue  here   Buy a copy of our latest anthology:  A Year of Celebrations   Buy a copy of  Flourish 2 , our wellbeing bookazine  Listen to  our podcast  - Small Ways to Live Well

Get hold of your copy of this month's The Simple Things - buy, download or subscribe

View the sampler here


More from the June issue:

Featured
DSC_1557.png
Jun 26, 2018
Nest | Delphiniums
Jun 26, 2018
Jun 26, 2018
SIM72.STYLE_ulls271438_1.png
Jun 23, 2018
Simple style | Sandals
Jun 23, 2018
Jun 23, 2018
SIM72.HIDDENHUT_THH_Samphire_Frittata_Salad-1290-Edit-Edit.png
Jun 22, 2018
Recipe | Samphire frittata with warm lemony courgette salad
Jun 22, 2018
Jun 22, 2018

More weekend projects to make:

Featured
TEA COSY JUMPER.jpg
Jan 25, 2025
How to | Make a Tea Cosy from an Old Jumper
Jan 25, 2025
Jan 25, 2025
Wellbeing.jpg
Feb 11, 2024
Make | Kitchen Face Masks
Feb 11, 2024
Feb 11, 2024
AdobeStock_276831672_Preview.jpg
Oct 23, 2023
Project | Make Seed Bombs
Oct 23, 2023
Oct 23, 2023
In Making Tags make, weekend project, Make project, issue 72, june
Comment
Photography: CHRIS MIDDLETON Project: BECI ORPIN

Photography: CHRIS MIDDLETON Project: BECI ORPIN

Make | Macramé chair

Lottie Storey May 22, 2018

Crochet and outdoor chairs are not the most obvious combination but put the two together and you have a nifty upcycling opportunity.

Have an old chair lurking in the shed, seat worn from many summers? This project uses a crochet knot to create a new seat and back from paracord. It may sound complicated but is actually relatively simple once you’ve got into the groove (if you need some extra help along the way, find handy video tutorials by searching ‘macramé chair tutorial’ on YouTube). Then sit back and admire your work, hopefully with a refreshing drink in hand.

Macramé chair

Knot your way to a new summer seat

you will need
Scissors
Unloved aluminium camping chair
200m of 4mm rope (such as nylon paracord): 100m white, 50m grey, 25m yellow, 25m pink.
2 x size Q crochet hooks
Macramé chair template
Lighter or box of matches

1 Using scissors, cut and then pull off the existing webbing from the chair.

2 Create a skein from a long, thin piece of card or plastic. Wrap your cord around it and unwind it as you go. Start with the vertical cords. Using the white cord and starting from the bottom left of the chair, tie a double knot around the frame.

3 Pull the cord through the seat of the chair, behind the centre back brace bar and up to the top left side of the frame. Make a loop in the cord at the top bar. Pull the loop behind and then under the bar and over to the left.

4 Insert your first crochet hook in the loop, with the hook pointing towards the right side of the chair and pull the cord tight so the hook rests against the chair frame. Bring the cord back down under the centre back brace bar to the front.

5 Create a loop in the cord on the bottom chair frame, then pull it over the front of the bar and behind to the left.

6 Insert the second crochet hook into the loop and pull the cord taut. The hook will rest on the chair frame.

7 Pull the cord through the seat of the chair, behind the centre back brace bar and up to the top frame. Make a loop in the cord at the top bar. Pull the loop behind and under the bar and to the left of the last vertical cords you created.

8 Hook the new loop over the crochet hook. The existing loop on the hook will overlap the two vertical cords to its right.

9 Pull the loop taut, then pull it through the loop you made in step 3. This will create a chain stitch. Rest the hook in the loop.

10 Pull the loose cord down behind the centre back brace bar and to the front. Create a loop, then pull it over the topof the front bar.

11 Pull the loop around the top bar and to the left of the last vertical cords you created. Hook the new loop with the crochet hook.

12 Pull the new loop through the loop created in step 6, making a chain stitch. Pull the loose cord taut.

13 Repeat these steps until you have 40 knots and have filled the top and bottom bars with taut cord. Cut the cord off the skein, making sure you have about 11⁄4m left. Pull the cord through the last loop and remove the crochet hook. Pull the cord behind the back brace, over the front bar and through the loop on the other hook.

14 Horizontal cords: these are completed using the same method. Follow the template, starting with three knots of white followed by the grey cord to form a semi-circle pattern.

15 Continue with the pink cord to form the second half of the circle.16 Finish with three more knots using white cord. Repeat on the base of the chair, using the yellow and grey cords. To finish, simply tie off the cord. Burn the ends of the cords to ensure they do not fray.


Taken from Sunshine Spaces: Naturally Beautiful Projects to Make for Your Home and Outdoor Space by Beci Orpin (Hardie Grant).

  Buy ,  download  or  subscribe   See the sample of our latest issue  here   Buy a copy of our latest anthology:  A Year of Celebrations   Buy a copy of  Flourish 2 , our wellbeing bookazine  Listen to  our podcast  - Small Ways to Live Well

Get hold of your copy of this month's The Simple Things - buy, download or subscribe

View the sampler here


More from the June issue:

Featured
DSC_1557.png
Jun 26, 2018
Nest | Delphiniums
Jun 26, 2018
Jun 26, 2018
SIM72.STYLE_ulls271438_1.png
Jun 23, 2018
Simple style | Sandals
Jun 23, 2018
Jun 23, 2018
SIM72.HIDDENHUT_THH_Samphire_Frittata_Salad-1290-Edit-Edit.png
Jun 22, 2018
Recipe | Samphire frittata with warm lemony courgette salad
Jun 22, 2018
Jun 22, 2018

More weekend projects to make:

Featured
TEA COSY JUMPER.jpg
Jan 25, 2025
How to | Make a Tea Cosy from an Old Jumper
Jan 25, 2025
Jan 25, 2025
Wellbeing.jpg
Feb 11, 2024
Make | Kitchen Face Masks
Feb 11, 2024
Feb 11, 2024
AdobeStock_276831672_Preview.jpg
Oct 23, 2023
Project | Make Seed Bombs
Oct 23, 2023
Oct 23, 2023
In Making Tags make, weekend project, Make project, issue 72, june
Comment
SIM71.COMFORT_p312m840719f.png

How to make a peg bag

Lottie Storey May 16, 2018

Hanging out the washing is an unusual and surprising thing: a pleasurable household chore. If it’s a fresh morning and the sun is shining, the simple act of pegging clothes on a line before you can lift the spirits and blow away gloominess. As the days extend and there’s more likelihood of sun, it’s also a chance to get outdoors and away from everyone indoors. Doing something methodical provides the opportunity for a moment or two of peaceful reflection – just you, the breeze, a handful of pegs and some billowing sheets. The results are also worth it: the fresh, outdoor smell of line-dried laundry will have you burying your nose in the laundry basket and inhaling deeply. As a method of drying clothes, pegging out is 100% better than piling them in an energy-gobbling, clothes-battering tumble dryer, or heaping them on radiators and leaving them to steam.

71 polo.png

Every washing line needs a bag full of pegs nearby for easy pegging out. How to cunningly create one from a child’s polo shirt.

Here’s a clever thing: peg bags are suspended from a hanger so, rather than create a new bag from scratch, why not use an item that is already the right shape and size? Buy a child’s polo shirt (the one above is £3.99, hm.com), or better still use one they have grown out of or no longer like. Turn it inside out, stitch the bottom of the shirt closed about half way down the length of the body, trim surplus fabric, and turn it the right way round. Insert a child’s hanger and fill with pegs. Job done.

Turn to page 111 of May's The Simple Things for more on pegging out.


  Buy ,  download  or  subscribe   See the sample of our latest issue  here   Buy a copy of our latest anthology:  A Year of Celebrations   Buy a copy of  Flourish 2 , our wellbeing bookazine  Listen to  our podcast  - Small Ways to Live Well

Get hold of your copy of this month's The Simple Things - buy, download or subscribe

View the sampler here


More from the May issue:

Featured
Titanic in dry dock, c. 1911 © Getty Images.jpg
May 27, 2018
The Titanic | A liner to remember
May 27, 2018
May 27, 2018
SIM71.FORAGING_Elderflower Cleanser a1 .png
May 26, 2018
Elderflower toner
May 26, 2018
May 26, 2018
SIM71.OUTING_219A0080 (1).png
May 25, 2018
The bizarre art of vegetable carving
May 25, 2018
May 25, 2018

More weekend projects to make:

Featured
TEA COSY JUMPER.jpg
Jan 25, 2025
How to | Make a Tea Cosy from an Old Jumper
Jan 25, 2025
Jan 25, 2025
Wellbeing.jpg
Feb 11, 2024
Make | Kitchen Face Masks
Feb 11, 2024
Feb 11, 2024
AdobeStock_276831672_Preview.jpg
Oct 23, 2023
Project | Make Seed Bombs
Oct 23, 2023
Oct 23, 2023
In Making Tags make, weekend project, Make project, issue 71, may, Homemade peg bag
1 Comment
Project & photography: NATMADY/HACKNEYHERBAL

Project & photography: NATMADY/HACKNEYHERBAL

Make | Herbal tea bags

Lottie Storey May 6, 2018

A soothing cuppa is in the bag, when you make your own. The appeal of this project goes beyond having something nice to sip: the touch and smell of choosing your herbs, even before the tastebuds kick in, make it a real sensory experience – something to savour.

Herbal tea bags

You will need:
Unbleached muslin fabric (try souschef.co.uk or johnlewis.com), or you could buy readymade self-fill tea bags from dotboutique.store)
Cotton thread
1 tsp of dried herbs

1 Cut unbleached muslin fabric into squares roughly measuring 10x10cm.
2 Choose between 2 to 4 dried herbs to mix and place in the middle of the square. You need about a teaspoon in total.
3 Gather the corners of the square together and tie the teabag up using cotton thread.
4 Infuse in hot water for five minutes and drink. You can empty out the spent herbs and re-use the muslin again after rinsing it.
         

SOME BLENDS TO TRY

  • Rosemary, peppermint & nettle An uplifting blend to aid focus and concentration.

  • Echinacea, yarrow & sage A restorative blend to sip when you have a sore throat or cold.

  • Lemon verbena, rose & skullcap A relaxing combination to enjoy before bed.


  Buy ,  download  or  subscribe   See the sample of our latest issue  here   Buy a copy of our latest anthology:  A Year of Celebrations   Buy a copy of  Flourish 2 , our wellbeing bookazine  Listen to  our podcast  - Small Ways to Live Well

Get hold of your copy of this month's The Simple Things - buy, download or subscribe

View the sampler here


More from the May issue:

Featured
Titanic in dry dock, c. 1911 © Getty Images.jpg
May 27, 2018
The Titanic | A liner to remember
May 27, 2018
May 27, 2018
SIM71.FORAGING_Elderflower Cleanser a1 .png
May 26, 2018
Elderflower toner
May 26, 2018
May 26, 2018
SIM71.OUTING_219A0080 (1).png
May 25, 2018
The bizarre art of vegetable carving
May 25, 2018
May 25, 2018

More weekend projects to make:

Featured
TEA COSY JUMPER.jpg
Jan 25, 2025
How to | Make a Tea Cosy from an Old Jumper
Jan 25, 2025
Jan 25, 2025
Wellbeing.jpg
Feb 11, 2024
Make | Kitchen Face Masks
Feb 11, 2024
Feb 11, 2024
AdobeStock_276831672_Preview.jpg
Oct 23, 2023
Project | Make Seed Bombs
Oct 23, 2023
Oct 23, 2023
In Making Tags make, weekend project, Make project, issue 70, april, tea, herbal tea, herbs, natural new year
1 Comment
Fashion photography: Ellie Smith

Fashion photography: Ellie Smith

Make | Appliquéd top

Lottie Storey April 21, 2018

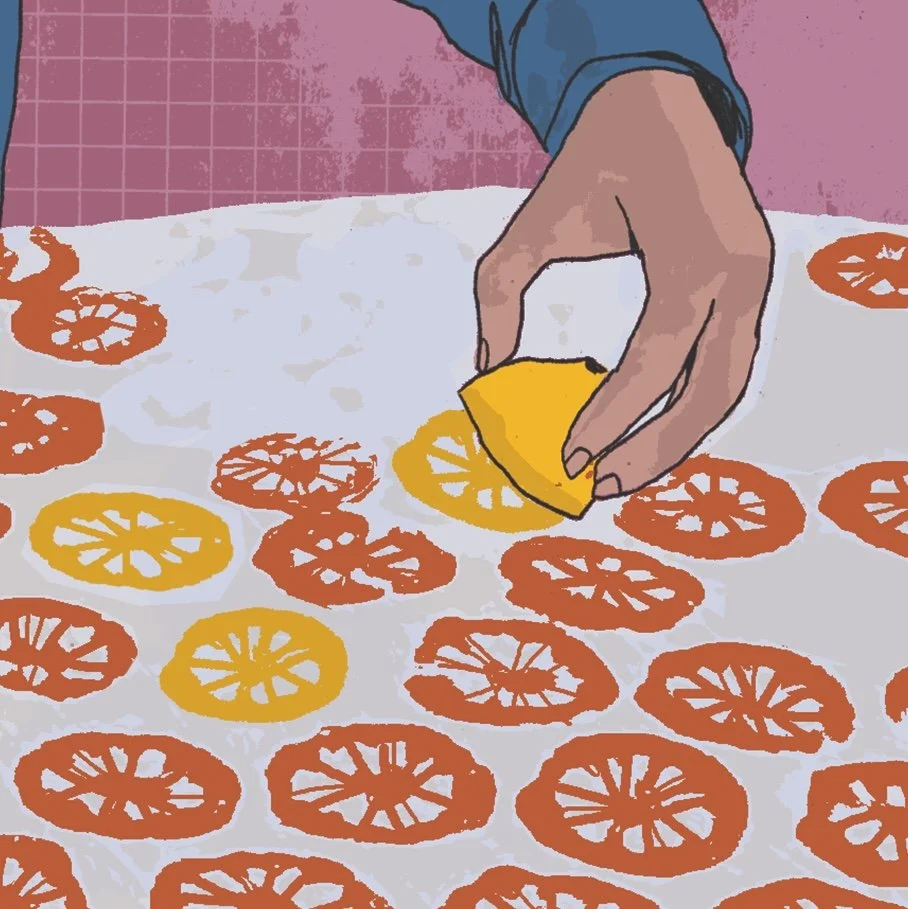
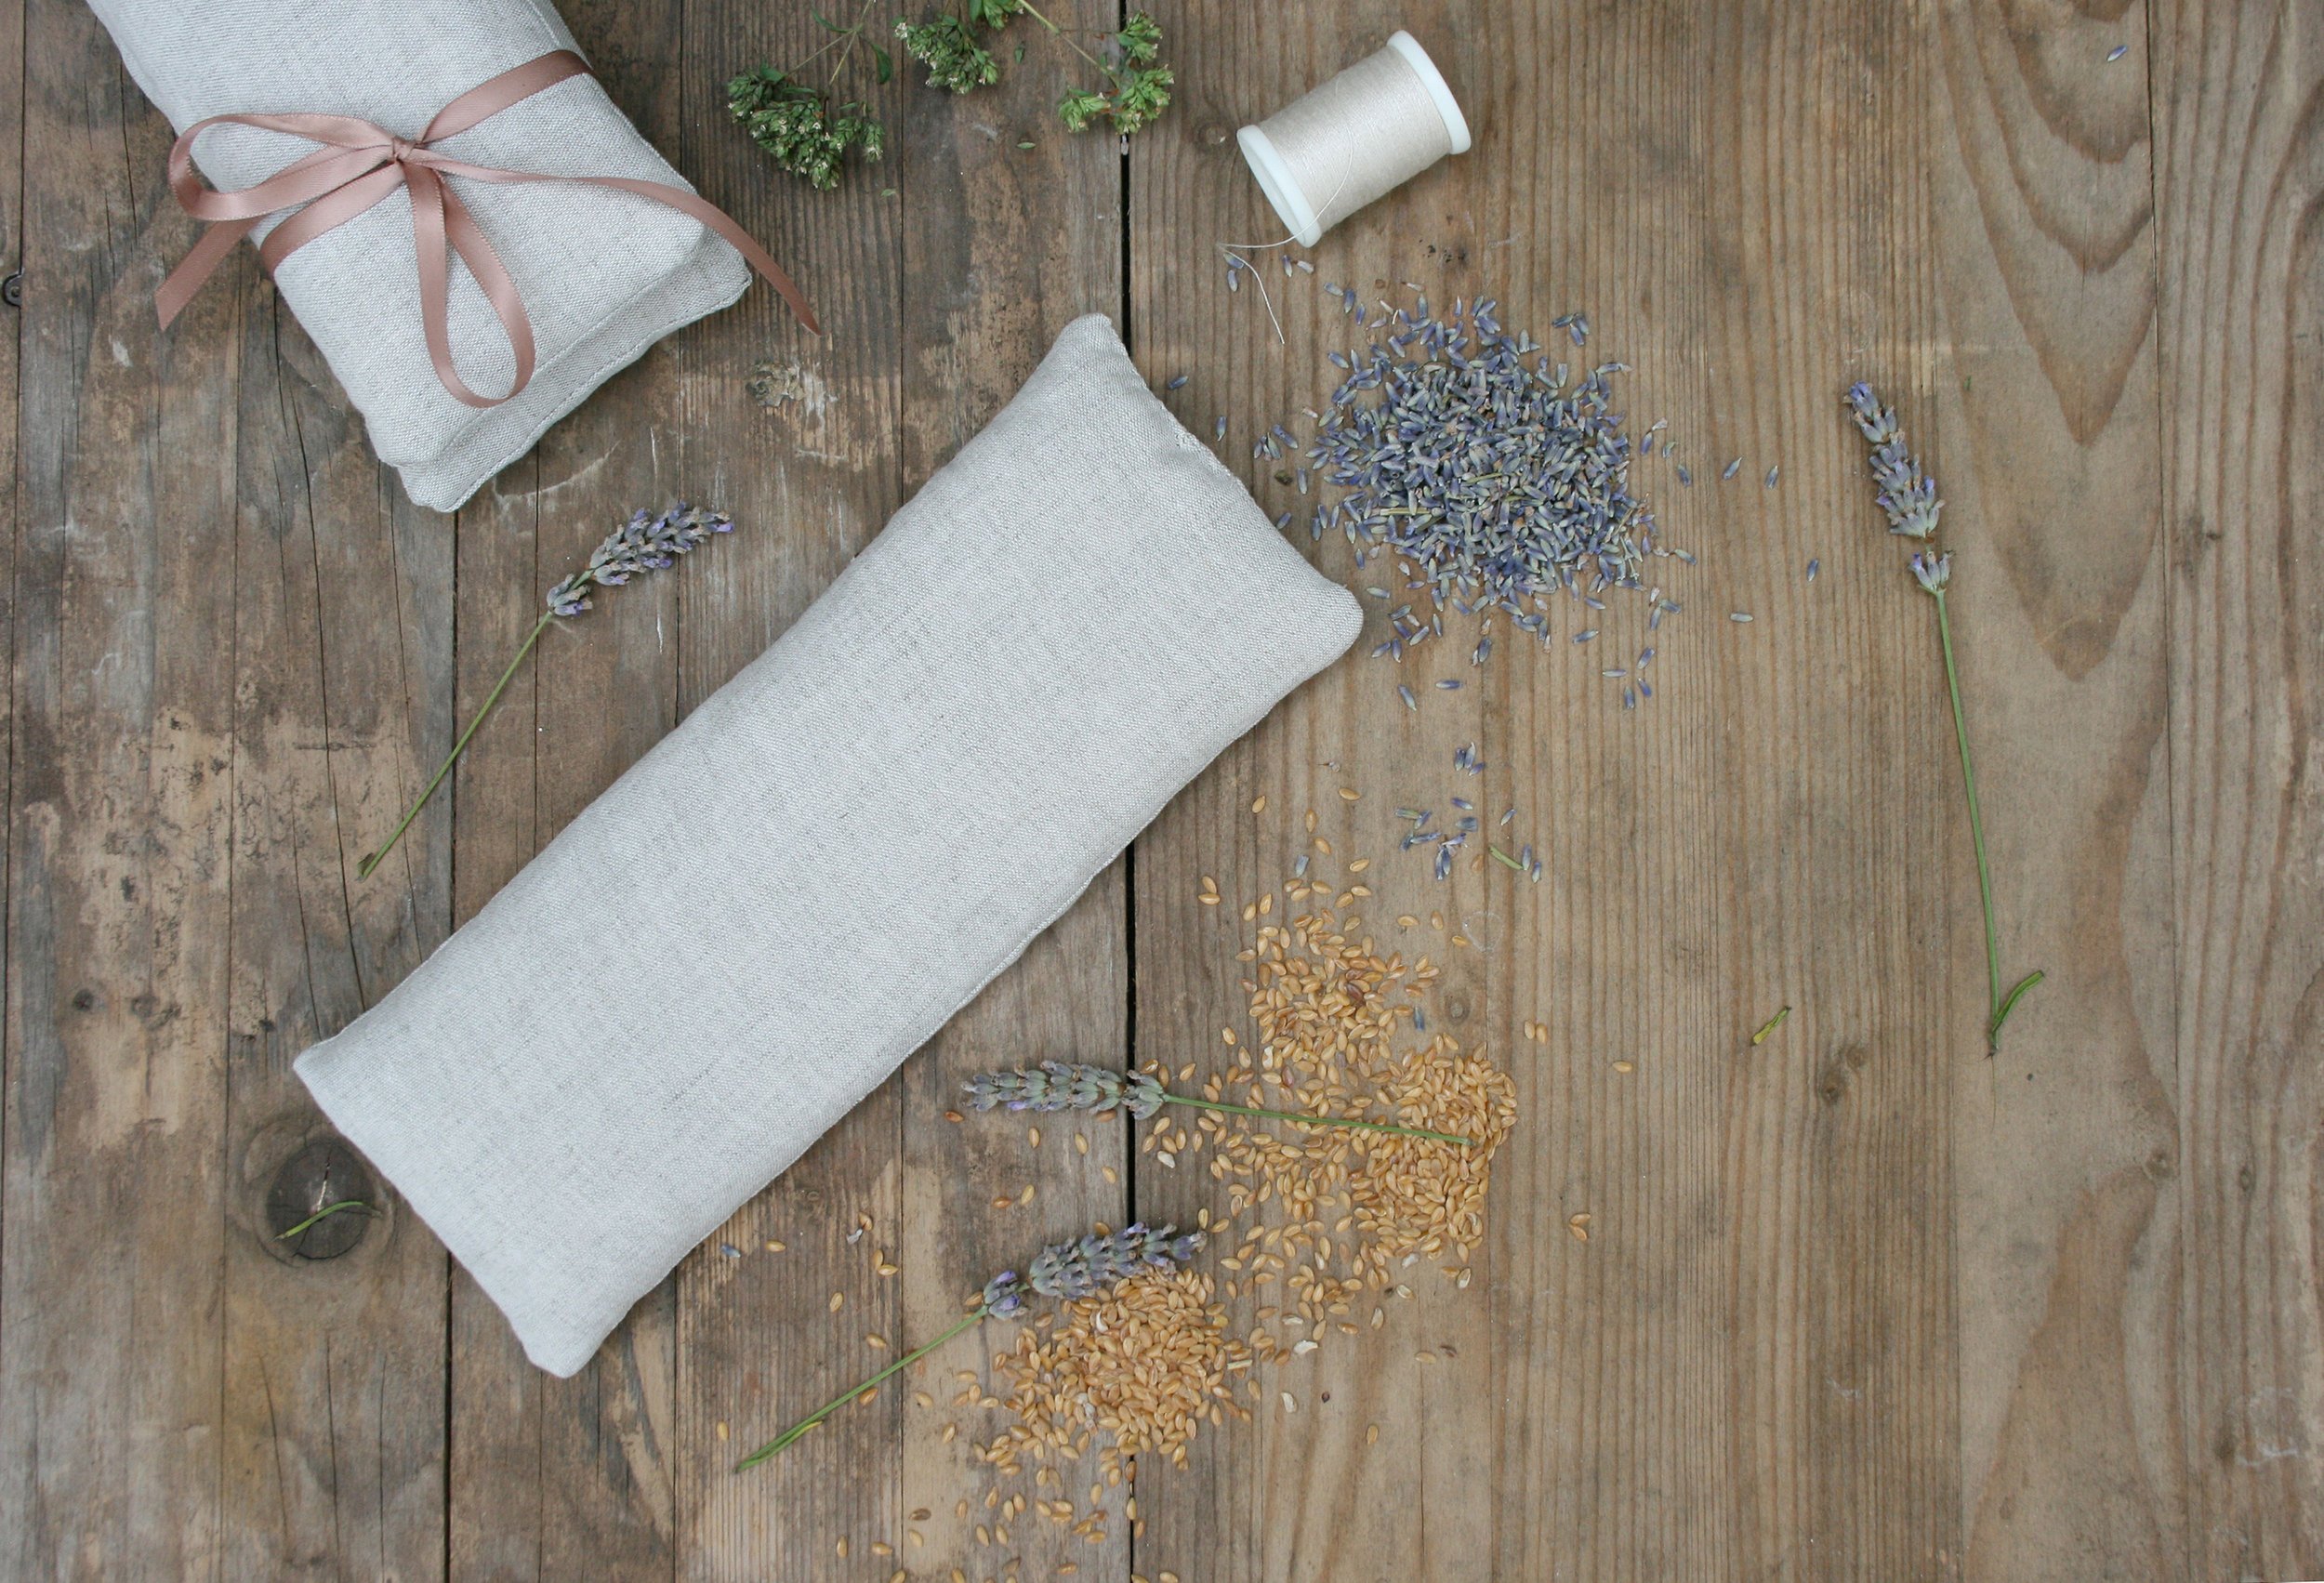
When life gives you lemons, put them to use on a pretty top

YOU WILL NEED
An top in need of a spruce
Appliqué fabric (try a mediumweight woven cotton – this is a good project for using up scraps)
Double-sided iron-on transfer adhesive, such as Bondaweb or a washable fabric Gluestick to hold the motif in place before stitching
Iron
Sewing machine (you can do this by hand, it’ll just take longer)

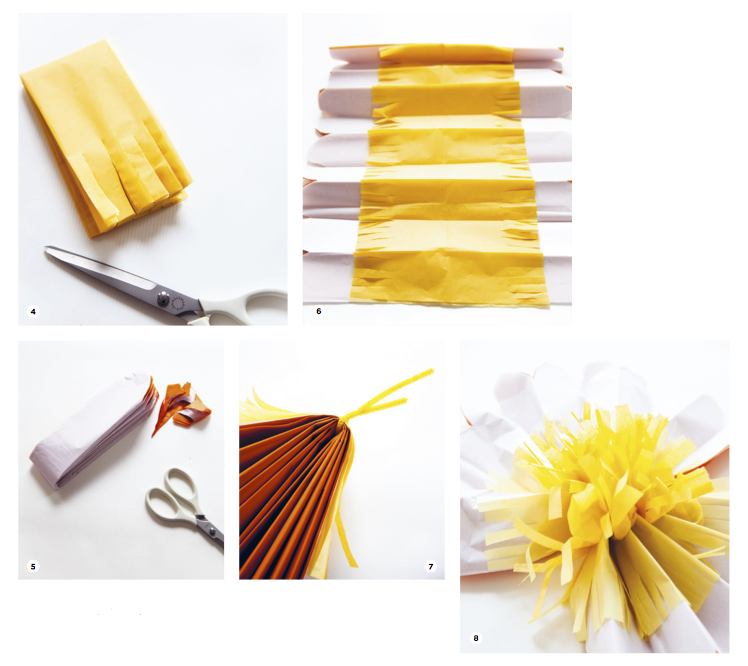
1 Choose the areas of the appliqué fabric that you want to add to your top and cut a large rectangle around them. Give the fabric a press to smooth out any wrinkles.

2 Cut the transfer adhesive to the same shape and size as the appliqué fabric and place the shiny side against the wrong side of the fabric (you may need to peel off a backing sheet, check the packet instructions). Hold a hot, dry iron on top for a few seconds to fuse the adhesive to the fabric. Be careful not to get adhesive on your iron or ironing board – it can leave
a mess! You could place a pressing cloth – a piece of lightweight fabric or even a tea towel – between the motif and your iron to avoid the adhesive sticking to it.

3 Cut around the motifs, leaving a little space around the sides for the stitching allowance. It’ll be easier to stitch around the motifs if you cut them out without too many tight curves.

4 Once you’ve decided where you want the motifs to sit on your top, peel off the backing paper and carefully lay them, adhesive side down, onto the right side of the garment fabric, making sure they sit nice and flat with no bubbles. Hold a hot, dry iron on top for a few seconds to fuse them in place.

5 Now you can stitch the motifs in place. Practise on a scrap first. Try a short and wide zigzag stitch, 1mm long by 4–5mm wide. Position the project so most of the zigzag is falling on the appliqué piece, with one side of the zigzag overlapping the edge just a teeny bit. Take your time to carefully navigate the curves and pivot the fabric with the needle down where needed. When you need to wash your appliquéd top, it’s best to do so by hand.


Adapted from Tilly and the Buttons: Stretch! By Tilly Walnes (Quadrille). 

Turn to page 111 for more clothing customisation ideas. 

  Buy ,  download  or  subscribe   See the sample of our latest issue  here   Buy a copy of our latest anthology:  A Year of Celebrations   Buy a copy of  Flourish 2 , our wellbeing bookazine  Listen to  our podcast  - Small Ways to Live Well

Get hold of your copy of this month's The Simple Things - buy, download or subscribe

View the sampler here


More from the April issue:

Featured
SIM71.MAKES_IMG_2891.png
May 6, 2018
Make | Herbal tea bags
May 6, 2018
May 6, 2018
SIM71.NEST_DSC_1598.png
May 5, 2018
Nest | Lily of the Valley
May 5, 2018
May 5, 2018
shutterstock_93713581 (1).png
Apr 24, 2018
Being boring
Apr 24, 2018
Apr 24, 2018

More weekend projects to make:

Featured
TEA COSY JUMPER.jpg
Jan 25, 2025
How to | Make a Tea Cosy from an Old Jumper
Jan 25, 2025
Jan 25, 2025
Wellbeing.jpg
Feb 11, 2024
Make | Kitchen Face Masks
Feb 11, 2024
Feb 11, 2024
AdobeStock_276831672_Preview.jpg
Oct 23, 2023
Project | Make Seed Bombs
Oct 23, 2023
Oct 23, 2023
In Making Tags make, weekend project, Make project, issue 70, april
Comment
SIM68.MAKES_Panphlets_004.png

Make | A three-hole pamphlet

Lottie Storey February 16, 2018

Give the basics of bookmaking a try by crafting this nifty three-hole pamphlet.

You will need:
2 sheets A2 paper (it should be no thinner than 80gsm and no thicker than 130gsm, short-grain; standard printer paper is 80gsm)
Bone folder (londonbookarts.org)
Shoe knife (or an old butter knife can do the job)
1 sheet colourful or decorative A4 paper thicker than your text paper (no thinner than 100gsm and no thicker than 175gsm, short-grain)
Waste paper
Mechanical pencil
Metal ruler
Scalpel
Cutting mat
Scissors or shears
Awl
Bookbinding needle (ratchford.co.uk)
About 60cm of linen thread, 18/3 or 25/3 thickness (see the selection at londonbookarts.org)

SIM68.MAKES_LCBA_PamphletSBS_005.png
SIM68.MAKES_LCBA_PamphletSBS_020.png
SIM68.MAKES_LCBA_PamphletSBS_026.png
SIM68.MAKES_LCBA_PamphletSBS_034.png
SIM68.MAKES_LCBA_PamphletSBS_038.png
SIM68.MAKES_LCBA_PamphletSBS_042.png
SIM68.MAKES_LCBA_PamphletSBS_063.png
SIM68.MAKES_LCBA_PamphletSBS_079.png
SIM68.MAKES_LCBA_PamphletSBS_128.png
SIM68.MAKES_LCBA_PamphletSBS_005.png SIM68.MAKES_LCBA_PamphletSBS_020.png SIM68.MAKES_LCBA_PamphletSBS_026.png SIM68.MAKES_LCBA_PamphletSBS_034.png SIM68.MAKES_LCBA_PamphletSBS_038.png SIM68.MAKES_LCBA_PamphletSBS_042.png SIM68.MAKES_LCBA_PamphletSBS_063.png SIM68.MAKES_LCBA_PamphletSBS_079.png SIM68.MAKES_LCBA_PamphletSBS_128.png


  • First make two sections from your A2 sheets of paper. Take one sheet and fold in half, short edge to short edge. Make sure the edges are exactly aligned, before making a sharp crease using your bone folder.
  • Slit the paper two-thirds of the length along the fold using a shoe knife. This helps to avoid ‘crow’s feet’ or wrinkles from forming at the corners of the folds.
  • Turn the folded sheet 90 degrees and fold the sheet a second time.
  • As before, slit the sheet two thirds of the way using a shoe knife.
  • Turn the folded sheet 90 degrees and fold the sheet a third time.
  • Do not slit the sheet again. You now have an A5 16-page, or octavo, section.
  • Repeat with second sheet of A2.
  • Take your two octavo sections (16 pages each) and combine the two sections by inserting one inside of the centre fold of the other (step 1). This will give you a 32-page section. 
  • Fold the A4 cover paper in half widthways, or short edge to short edge. Make sure the edges are exactly aligned before making a sharp crease using your bone folder (step 2).
  • Make a sewing station template: take a piece of waste paper and cut to the same height as your pamphlet and roughly 60mm wide (step 3).
  • Make three marks on the edge of the waste paper (step 4): one at the centre (find this by folding the sheet in half lengthwise) and two at either end, around 30mm in from the top and bottom. The sewing stations will be at these points.
  • Place the section inside the folded cover (step 5).
  • Lay the book on the work surface with the spine edge aligned to the edge of the work surface. Open the book to the centre fold and place the sewing station template along the fold. Using an awl or pricker, make holes at each of the sewing stations (step 6).
  • With a needle and about 60cm of linen thread (or a length 2.5 to 3 times the height of the book), begin stitching the section from the centre hole, station B (see step 7).
  • From the outside in, insert needle and thread at station B, leaving a tail end of approximately 3cm.
  • Bring the needle out through the top hole, station C.
  • Go along the spine and in again at station A, then out through central station B.
  • Tie the two ends of thread together with a reef knot and trim any excess thread (step 8). Make sure that the two ends are on either side of the thread running from A to C, so that the knot is firmly in place.
  • Once the book has been bound, close the book, place a sheet of waste paper over the spine and go over the spine with a bone folder. If desired, trim the book.

Extracted from Making Books by Simon Goode and Ira Yonemura (Pavilion).


  Buy ,  download  or  subscribe   See the sample of our latest issue  here   Buy a copy of our latest anthology:  A Year of Celebrations   Buy a copy of  Flourish 2 , our wellbeing bookazine  Listen to  our podcast  - Small Ways to Live Well

Get hold of your copy of this month's The Simple Things - buy, download or subscribe

View the sampler here


More from the February issue:

Featured
SIM68.JOURNAL_113_WordJar_JournalSparks.png
Feb 27, 2018
Journal sparks | Word Jar
Feb 27, 2018
Feb 27, 2018
SIM68.EVENTS_Unknown-1.jpeg.png
Feb 26, 2018
The faces of Fairtrade
Feb 26, 2018
Feb 26, 2018
SIM68.png
Feb 25, 2018
Nest | Cacti
Feb 25, 2018
Feb 25, 2018

More weekend projects to make:

Featured
TEA COSY JUMPER.jpg
Jan 25, 2025
How to | Make a Tea Cosy from an Old Jumper
Jan 25, 2025
Jan 25, 2025
Wellbeing.jpg
Feb 11, 2024
Make | Kitchen Face Masks
Feb 11, 2024
Feb 11, 2024
AdobeStock_276831672_Preview.jpg
Oct 23, 2023
Project | Make Seed Bombs
Oct 23, 2023
Oct 23, 2023
In Making Tags make, weekend project, Make project, issue 68, February
Comment
Photography by Anne Deppe.

Photography by Anne Deppe.

Make | Marbled tree baubles

Lottie Storey December 6, 2017

Give baubles a quick marble makeover courtesy of bright nail varnish 

You will need:
Colourful thread or string
Scissors
White Christmas tree baubles in various sizes (try hobbycraft.co.uk)
Large bowl
Nail varnish in two colours, here orange and lilac

1 Attach a piece of string to a Christmas tree bauble. Fill a large bowl with enough lukewarm water to completely submerge the bauble (leaving room for displacement).
2 Add a few drops from each of the bottles of nail varnish to the water. The nail varnish will form a thin, colourful film on the surface.
3 Now immerse the bauble completely in the bowl, holding the cap and ring to push it underwater.
4 A thin layer of nail varnish will coat the bauble. Hang it up to dry for a couple of hours.

Taken from Supercraft Christmas by Sophie Pester and Catharina Bruns, (Dorling Kindersley).

Turn to page 38 of December's The Simple Things where we celebrate the role of the bauble in Christmases past, present and many more into the future.

  Buy ,  download  or  subscribe   See the sample of our latest issue  here   Buy a copy of our latest anthology:  A Year of Celebrations   Buy a copy of  Flourish 2 , our wellbeing bookazine  Listen to  our podcast  - Small Ways to Live Well

Get hold of your copy of this month's The Simple Things - buy, download or subscribe

View the sampler here


More from the December issue:

Featured
9.new years final.png
Dec 31, 2024
How to | Make a Could-Do List Happen
Dec 31, 2024
Dec 31, 2024
SIM66.GATHERING_IMG_3201.png
Dec 24, 2023
Recipe | Roasted Brussels sprouts with nuts, lemon & pomegranate
Dec 24, 2023
Dec 24, 2023
SIM66.NIBBLES_fruit nut choc disc01.png
Dec 29, 2022
Recipe | Fruit and nut chocolate discs
Dec 29, 2022
Dec 29, 2022

More weekend projects to make:

Featured
TEA COSY JUMPER.jpg
Jan 25, 2025
How to | Make a Tea Cosy from an Old Jumper
Jan 25, 2025
Jan 25, 2025
Wellbeing.jpg
Feb 11, 2024
Make | Kitchen Face Masks
Feb 11, 2024
Feb 11, 2024
AdobeStock_276831672_Preview.jpg
Oct 23, 2023
Project | Make Seed Bombs
Oct 23, 2023
Oct 23, 2023
In Making, Christmas Tags make, weekend project, Make project, christmas, issue 66, december
Comment
SIM66.NEST_xmas wreath Nest image1.png

Make | Foraged Christmas wreath

Lottie Storey November 28, 2017

If you’re short of foliage in your garden, a wintry walk to fetch some is just the thing before getting creative with your finds

You will need:
Bronze medium flat wreath frame, approx 25cm across
Hobby wire
A selection of greenery (we used eucalyptus, ivy, holly, thistle and gypsophila)
Length of narrow ribbon for hanging Ribbon for decoration (we used velvet ribbon)
Scissors
Secateurs

SIM66.NEST_xmas wreath materials_b.png


1 Using secateurs, trim the ivy and eucalyptus to manageable lengths of approx 20–30cm. Secure the foliage to the wreath ring, using wire to hold the sprigs in place at various intervals. Gradually work around the ring. Continue attaching the foliage until the ring is covered and none of the wire ring can be seen.
2 Once you have an initial layer secured to the ring, you can start to add in shorter lengths of foliage among the greenery. You should be able to secure these additional pieces without wire by weaving them into the base coverage.
3 Next take some of the holly, thistles and gypsophila and trim them into lengths of approx 7cm each. Gather two or three together to create small bunches and wrap the stems with a little wire to secure. Make three of these and place them at regular intervals around the wreath. Push each one into the wreath and secure with wire from the back.
4 Add in a few further individual thistles and gypsophila sprigs until your wreath has enough interest and balance.
5 Take a length of ribbon and tie centrally around the base of the ring, securing with a bow. Trim the loose ends to make it neat.
6 Finally, turn the wreath over and, using your fingers, feel to find the top of the wreath ring. Thread a length of narrow ribbon through the ring to create a hanging loop. Your wreath is now ready to hang. To keep it fresh and green, spritz it with water every few days.

SIM66.NEST_xmas wreath step5d.png
  Buy ,  download  or  subscribe   See the sample of our latest issue  here   Buy a copy of our latest anthology:  A Year of Celebrations   Buy a copy of  Flourish 2 , our wellbeing bookazine  Listen to  our podcast  - Small Ways to Live Well

Get hold of your copy of this month's The Simple Things - buy, download or subscribe

View the sampler here


More from the December issue:

Featured
9.new years final.png
Dec 31, 2024
How to | Make a Could-Do List Happen
Dec 31, 2024
Dec 31, 2024
SIM66.GATHERING_IMG_3201.png
Dec 24, 2023
Recipe | Roasted Brussels sprouts with nuts, lemon & pomegranate
Dec 24, 2023
Dec 24, 2023
SIM66.NIBBLES_fruit nut choc disc01.png
Dec 29, 2022
Recipe | Fruit and nut chocolate discs
Dec 29, 2022
Dec 29, 2022

More weekend projects to make:

Featured
TEA COSY JUMPER.jpg
Jan 25, 2025
How to | Make a Tea Cosy from an Old Jumper
Jan 25, 2025
Jan 25, 2025
Wellbeing.jpg
Feb 11, 2024
Make | Kitchen Face Masks
Feb 11, 2024
Feb 11, 2024
AdobeStock_276831672_Preview.jpg
Oct 23, 2023
Project | Make Seed Bombs
Oct 23, 2023
Oct 23, 2023
In Making, Christmas Tags make, weekend project, Make project, christmas, issue 66, december
Comment
SIM65.MAKES_Step 7 Finished 3.png

Make | Craft your own countdown

Lottie Storey November 21, 2017

Channel your excitement about the festive season into making this simple and pretty project

Not that we need bribery, but the pleasure of opening an advent calendar each day is an extra reason to look forward to getting out of bed in December. The first commercially produced advent calendar dates to 1903 but our project harks back to the very first, 18th-century versions, which were handmade. This easy-to-make design combines natural foliage, a bit of festive sparkle and a little treat in each envelope to be opened in the countdown to Christmas. Who could resist? And, on that note, it’s as easy to adapt for grown-ups as children.

Envelope advent calendar

SIM65.MAKES_Step 1 Materials 2.png
 1 Gather two near-identical bunches of foliage and bind them together with wire. Attach the foliage bunches to the wooden hoop, securing at intervals with wire. Allow the two bunches to overlap slightly at the base of the hoop to hide the join. Any

1 Gather two near-identical bunches of foliage and bind them together with wire. Attach the foliage bunches to the wooden hoop, securing at intervals with wire. Allow the two bunches to overlap slightly at the base of the hoop to hide the join. Any visible wire can be hidden with the addition of a leaf or two.

 2 Take three of the mini baubles and string onto a piece of wire, twisting to secure and form a cluster. Repeat with the remaining three. Secure each cluster along the base of the hoop on opposite sides.

2 Take three of the mini baubles and string onto a piece of wire, twisting to secure and form a cluster. Repeat with the remaining three. Secure each cluster along the base of the hoop on opposite sides.

 3 Remove any hanging loops from your tree decoration, then glue it securely to the centre of the hoop base using a glue gun. Leave the whole hoop piece aside to dry.

3 Remove any hanging loops from your tree decoration, then glue it securely to the
centre of the hoop base using a glue gun. Leave the whole hoop piece aside to dry.

 4 Paint the numbers 1 to 24 on the front of the envelopes. Once dried, fill with miniature gifts and treats (see opposite for inspiration) and seal the envelopes. Using a hole punch, create a hole in the top of each envelope.

4 Paint the numbers 1 to 24 on the front of the envelopes. Once dried, fill with miniature gifts and treats (see opposite for inspiration) and seal the envelopes. Using a hole punch, create a hole in the top of each envelope.

 5 Thread a length of twine through each envelope hole and secure with a double knot. Secure the other end to the decorated hoop. It’s best to hang your hoop (using the length of satin ribbon) before attaching the envelopes to avoid tangles. Vary the

5 Thread a length of twine through each envelope hole and secure with a double knot. Secure the other end to the decorated hoop. It’s best to hang your hoop (using
the length of satin ribbon) before attaching the envelopes to avoid tangles. Vary the lengths of twine a little, so that the envelopes don’t all hang at the same length. 

 Carefully hang your advent calendar in its final position and let the countdown begin.

Carefully hang your advent calendar in its final position and let the countdown begin.

Makes 24 days of festive cheer
Wooden embroidery hoop 20cm (inner ring); try hobbycraft.co.uk
Beading/thin jewellery wire (hobbycraft.co.uk)
Foliage – long-lasting and fragrant, such as ivy, eucalyptus and rosemary
6 mini baubles (these are from dobbies.com)
Christmas character tree decoration (search eBay for vintage options)
Twine
24 small brown envelopes approx 6x9cm
60cm satin ribbon for hanging (uk.flyingtiger.com)
24 mini treats (see below for ideas)
Scissors
Ink and brush
Hole punch
Glue gun

1 Gather two near-identical bunches of foliage and bind them together with wire. Attach the foliage bunches to the wooden hoop, securing at intervals with wire. Allow the two bunches to overlap slightly at the base of the hoop to hide the join. Any visible wire can be hidden with the addition of a leaf or two.
2 Take three of the mini baubles and string onto a piece of wire, twisting to secure and form a cluster. Repeat with the remaining three. Secure each cluster along the base of the hoop on opposite sides.
3 Remove any hanging loops from your tree decoration, then glue it securely to the
centre of the hoop base using a glue gun. Leave the whole hoop piece aside to dry.
4 Paint the numbers 1 to 24 on the front of the envelopes. Once dried, fill with miniature gifts and treats (see below for inspiration) and seal the envelopes. Using a hole punch, create a hole in the top of each envelope.
5 Thread a length of twine through each envelope hole and secure with a double knot. Secure the other end to the decorated hoop. It’s best to hang your hoop (using the length of satin ribbon) before attaching the envelopes to avoid tangles. Vary the lengths of twine a little, so that the envelopes don’t all hang at the same length. Carefully hang your advent calendar in its final position and let the countdown begin.

l Chocolate coins l Mini playing cards l Lip balm l Hair slides l Cinema tickets l Badges or patches l Bookmarks l Temporary tattoo l Teabags

  Buy ,  download  or  subscribe   See the sample of our latest issue  here   Buy a copy of our latest anthology:  A Year of Celebrations   Buy a copy of  Flourish 2 , our wellbeing bookazine  Listen to  our podcast  - Small Ways to Live Well

Get hold of your copy of this month's The Simple Things - buy, download or subscribe

View the sampler here


More from the November issue:

Featured
SIM65.MAKES_Step 7 Finished 3.png
Nov 21, 2017
Make | Craft your own countdown
Nov 21, 2017
Nov 21, 2017
SIM65.CAKE_parsnipcake_2.png
Nov 20, 2017
Recipe | Parsnip and maple syrup cake with parsnip crisps
Nov 20, 2017
Nov 20, 2017
nov 65 back cover.png
Nov 19, 2017
You can do anything but not everything
Nov 19, 2017
Nov 19, 2017

More weekend projects to make:

Featured
TEA COSY JUMPER.jpg
Jan 25, 2025
How to | Make a Tea Cosy from an Old Jumper
Jan 25, 2025
Jan 25, 2025
Wellbeing.jpg
Feb 11, 2024
Make | Kitchen Face Masks
Feb 11, 2024
Feb 11, 2024
AdobeStock_276831672_Preview.jpg
Oct 23, 2023
Project | Make Seed Bombs
Oct 23, 2023
Oct 23, 2023
In Making, Christmas Tags make, weekend project, Make project, sewing, issue 65, november, christmas
Comment
Photography: LINDSAY ZIER-VOGEL

Photography: LINDSAY ZIER-VOGEL

Make | I love my city tote bag

Lottie Storey August 15, 2017

Make and decorate totes that celebrate what you love about where you live

You will need

For the bag:
38 x 46cm cotton twill (outer fabric) 
38 x 46cm cotton fabric (liner fabric)
1 spool thread, to match twill
2 pieces of cotton webbing (50 x 4cm), for tote handles
OR, a ready-made blank tote bag

For the decoration:
2 skeins embroidery floss
Size 4 embroidery needle
18cm wooden embroidery hoop (or smaller)
Scissors
Pencil and white eraser
Ruler and straight pins
Iron

Embroider your love letter:
1 Think of something that you love about where you live. Maybe it’s a flower seller or the view from the waterfront, a skyline, or a certain stretch of road.
2 Pre-wash and dry fabric.
3 In pencil, write the letter in the centre of the twill fabric, leaving at least 6cm at the top and at least 10cm at the bottom. If using an existing tote bag, centre text.
4 Using all six strands of embroidery floss, chain stitch around pencilled text. To chain stitch: make a small stitch on your fabric. Bring the needle back up through the fabric a short distance below your stitch. Loop your thread through the first stitch, pull through before re-inserting your needle into the same hole you came up through. Repeat, by passing the needle through the last loop you made.
5 Trim loose threads and iron out any crease marks from the hoop. If you’re using an existing tote, you’re done! If sewing your own tote bag, proceed to the next step.

Make your bag:
1 Start by making the lining: pin together two pieces of liner material with right sides facing. Using a sewing machine with a 1cm seam allowance, stitch along one side, turn onto bag bottom, and turn again, sewing up the other side.
2 Pinch corner and line up the side seams so that corner fabric makes a triangle. Measure 7.5cm from corner and draw a perpendicular line with pencil. Sew along that line, keeping side seams open. Complete both liner corners and cut off extra fabric. Keep tote inside out and pin 4cm seam from open edge of bag.
3 Then make the outer bag: pin together two pieces of twill with right sides facing. Using a sewing machine with a 1cm seam allowance, stitch both sides of the bag and the bottom.
4 Pinch corner and line up side seams so that the corner fabric makes a triangle. Measure 8cm from the corner and draw a perpendicular line with pencil. Sew along that line, keeping the side seams open. Complete both corners and cut off any extra fabric.
5 Flip fabric right-side out and pin a 4cm seam from the open edge of bag.
6 Slide lining inside outer shell and pin corners together. Pin handle fabric to twill 10cm from the edge of the bag, with 10cm between each end of the handles. Pin outer fabric to inner fabric. Be careful to tuck handle tops down into bag. Sew through all layers at the top of the bag, keeping the handles sandwiched between the lining and the outside twill. Trim any loose threads to neaten it up.

Project by Lindsay Zier-Vogel, reprinted with permission from Strange Material: Storytelling through Textiles edited by Leanne Prain (Arsenal Pulp Press).


  Buy ,  download  or  subscribe   See the sample of our latest issue  here   Buy a copy of our latest anthology:  A Year of Celebrations   Buy a copy of  Flourish 2 , our wellbeing bookazine  Listen to  our podcast  - Small Ways to Live Well

Get hold of your copy of this month's The Simple Things - buy, download or subscribe

View the sampler here


More from the August issue:

Featured
Aug 28, 2017
Recipe | Vegetable crisps
Aug 28, 2017
Aug 28, 2017
Aug 26, 2017
Britain's outdoor games
Aug 26, 2017
Aug 26, 2017
Aug 20, 2017
Garden hacks | Reuse cooking water on your plants
Aug 20, 2017
Aug 20, 2017

More weekend projects to make:

Featured
TEA COSY JUMPER.jpg
Jan 25, 2025
How to | Make a Tea Cosy from an Old Jumper
Jan 25, 2025
Jan 25, 2025
Wellbeing.jpg
Feb 11, 2024
Make | Kitchen Face Masks
Feb 11, 2024
Feb 11, 2024
AdobeStock_276831672_Preview.jpg
Oct 23, 2023
Project | Make Seed Bombs
Oct 23, 2023
Oct 23, 2023
In Making Tags make, issue 62, august, weekend project, Make project, tote bag, sewing
Comment

Make: Giant paper flower

Lottie Storey May 3, 2017

This huge, decorative bloom is a sunflower you can enjoy all year

YOU WILL NEED:
Assorted colours of tissue paper
Scissors
Fuzzy pipe cleaners

1 Carefully stack approximately 12 sheets of tissue paper, lining up all the edges carefully. The flower pictured uses four yellow sheets for the centre, these are stacked on top, then two or three white and then six sheets of orange. (To make smaller versions, just omit the inside yellow pieces and use fewer sheets, cut smaller, for the outer petals.)

2 Start to fold all sheets over at the same time in 5cm folds. Now fold back the other way, and repeat accordion-style until you have folded all the paper.

3 Unfold all the paper carefully and take out the yellow paper that will be used for the centre of the flower. Fold the yellow paper back in pleats, then fold the folded paper in half widthways. Trim off half of the unfolded ends.

4 Make 5cm-long cuts into the trimmed edge of the folded yellow paper.

5 Now fold the white and orange sheets back up together and fold in half widthways. Trim the unfolded edges together with a rounded edge for your petals. If you find them too thick to trim all together, do half at a time.

6 Carefully unfold all of your papers, place them back in their original stacked order and then fold them back up all together in the concertina style.

7 Fold this in half and wrap a pipe cleaner through the centre of the folded tissue paper. Twist to secure.

8 Starting with one side of the yellow paper, gently pull out and fluff up one piece of the tissue. Separate each piece as you work through the layers of the tissue paper. Be careful not to pull too hard on the papers as they rip easily.

9 Continue on the other side, gently separating and pulling up each piece of tissue paper and fluffing it until you have a full flower shape.

Adapted from Decorate for a Party by Holly Becker and Leslie Shewring (Jacqui Small) 


More from the May issue:

Featured
May 29, 2017
Recipe | Smoked trout, cucumber and coconut salad with dosa
May 29, 2017
May 29, 2017
May 27, 2017
Garden hacks | Make a colander hanging basket
May 27, 2017
May 27, 2017
May 26, 2017
Recipe | Picnic Pies
May 26, 2017
May 26, 2017

More making projects:

Featured
TEA COSY JUMPER.jpg
Jan 25, 2025
How to | Make a Tea Cosy from an Old Jumper
Jan 25, 2025
Jan 25, 2025
Wellbeing.jpg
Feb 11, 2024
Make | Kitchen Face Masks
Feb 11, 2024
Feb 11, 2024
AdobeStock_276831672_Preview.jpg
Oct 23, 2023
Project | Make Seed Bombs
Oct 23, 2023
Oct 23, 2023
  Buy ,  download  or  subscribe   See the sample of our latest issue  here   Buy a copy of our latest anthology:  A Year of Celebrations   Buy a copy of  Flourish 2 , our wellbeing bookazine  Listen to  our podcast  - Small Ways to Live Well

Get hold of your copy of this month's The Simple Things - buy, download or subscribe

View the sampler here.

In Making Tags issue 59, may, Make project, papercraft, flowers, school holiday ideas
Comment

Weekend project: Brioche tin candles

Lottie Storey January 10, 2017

On a gloomy January day, why not take a bit of comfort from the relaxing glow of a candle? 

These projects offer bright ideas for refashioning bits you may well already have about into candleholders – then strategically place around the home, for instant cheer. We even tell you how to make – and scent – the candles themselves.

A quick word about wax. These projects use soy, which is made from vegetable oil (paraffin candles use petroleum oil). Soy candles have a longer burn time and less black soot than a paraffin equivalent. Using soy also means you can add essential oils to scent them – try vanilla oil for the hint of freshly baked brioches, or mosquito-repelling citronella oil to conjure balmy summer nights (remember those?). To get even fancier, you can buy colour wax flakes or add dyes. For wicks and wax, try Hobbycraft (hobbycraft.co.uk).


Brioche tin candles

Turn your old tins into something as sweet as the bread itself

Makes three candles
You will need:
3 x 10cm pre-waxed wick assembly
3 small brioche tins or metal jelly moulds, roughly 150ml capacity
Glue dots or glue gun
6 wick-supporting sticks (or wooden cooking skewers cut in half)
750g flaked soy wax – about 225g (or roughly twice the volume of your tin) for each candle
6 small elastic bands
Small pan or metal mixing bowl
Large saucepan
Old spoon
Scissors

1 Fix the wick assembly to the centre of the bottom of your tins by using a glue dot or a dab of hot glue from a glue gun. 
2 Take the supporting sticks or skewers in pairs and bind them together by wrapping a small elastic band around them at either end. Use the skewers to hold the wicks vertically by resting them across the rim of each tin, the wicks pinched firmly between the skewers. 
3 Put the wax in a small pan or bowl and set the bowl in a pan of water on the hob over a medium heat. Add about three drops of fragrance oil (if using) to the wax. When melted, the wax will appear completely clear. Use your spoon to stir the oil into the wax.
4 Pour a small amount of the liquid wax 5 into the bottom of your prepared tins to just cover the metal wick assembly in each one. Leave to harden for about ten minutes. This is to make sure that the wicks stay in place for the main pour in the following step.
5 Return the pan to the hob to ensure the wax is fully melted, then pour it into your tins to within about 6mm of the top edges and leave to cool and harden fully. If the wax dries with a small dip around the wick, top it up with more melted wax and thinly cover the surface of the candle evenly.
6 Using scissors, trim the wicks to about 12mm from the top surface of the wax. Leave your candles for at least 24 hours before lighting.

Adapted from Take a Tin by Jemima Schlee (GMC, available from thegmcgroup.com)


Turn to page 113 of January’s The Simple Things for two more candle projects: gold painted hurricanes and a candle in a jar. 

More from the January issue:

Featured
Jan 24, 2017
Recipe: Raspberry biscuits with lemon coriander curd
Jan 24, 2017
Jan 24, 2017
Jan 22, 2017
Winter Skin Tonic
Jan 22, 2017
Jan 22, 2017
Jan 20, 2017
Recipe: DIY tortilla chips
Jan 20, 2017
Jan 20, 2017

More projects:

Featured
Belt Bag pic.jpg
May 21, 2025
Make | Summer Scraps Belt Bag Template
May 21, 2025
May 21, 2025
Mending.jpeg
Mar 20, 2025
Project | Satin Stitch Patching
Mar 20, 2025
Mar 20, 2025
Screenshot 2025-01-18 at 11.57.28.png
Feb 2, 2025
Make | A Jam Jar Garden
Feb 2, 2025
Feb 2, 2025
  Buy ,  download  or  subscribe   See the sample of our latest issue  here   Buy a copy of our latest anthology:  A Year of Celebrations   Buy a copy of  Flourish 2 , our wellbeing bookazine  Listen to  our podcast  - Small Ways to Live Well

Get hold of your copy of this month's The Simple Things - buy, download or subscribe

View the sampler here.

In Nest, Making Tags issue 55, january, candles, hygge, making, project, Make project
Comment
Illustration: Joe Snow

Illustration: Joe Snow

How to make a corn dolly

Lottie Storey October 24, 2016

Turn over a new sheaf with this traditional harvest custom

1 For this basic neck or sheaf dolly, gather some undamaged, hollow straw. Any straw will do (wheat is the most popular) – try practising with paper straws.
2 Dampen straw so it’s easier to work with. 
3 Bundle together some waste stems to make your core: it should be around the size of a biro. Tie into place.
4 Tie five straws of roughly the same width around your core. Tie them near to the wheat heads as you can. Bend each stem at right angles so they’re each pointing in a different direction, like the points on a compass; with the last one pointing just to your left. 
5 Take the fifth stem and bend it up, before bending it right so that it reaches over the next two compass points. 
6 Turn a quarter clockwise and repeat, using what’s become the new ‘South’ straw.
7 Repeat, each time turning a quarter so that the circle builds. With broken straws, just slide a new one over it.
8 Once finished, tie with straw or ribbon.


More from the October issue:

Featured
Oct 25, 2016
The tallest oak was once just a nut that held its ground
Oct 25, 2016
Oct 25, 2016
Oct 24, 2016
How to make a corn dolly
Oct 24, 2016
Oct 24, 2016
Oct 19, 2016
Be a kitchen witch!
Oct 19, 2016
Oct 19, 2016

More makes from The Simple Things:

Featured
EGGShell-tealights-the-simple-things.png
Apr 10, 2023
Eggshell tea lights
Apr 10, 2023
Apr 10, 2023
Herbal Teabags NAT MADY HACKNEY HERBAL.jpg
May 2, 2020
Make | proudly homemade teabags
May 2, 2020
May 2, 2020
Make: An Ordnance Survey garland
May 15, 2019
Make: An Ordnance Survey garland
May 15, 2019
May 15, 2019
  Buy ,  download  or  subscribe   See the sample of our latest issue  here   Buy a copy of our latest anthology:  A Year of Celebrations   Buy a copy of  Flourish 2 , our wellbeing bookazine  Listen to  our podcast  - Small Ways to Live Well

Get hold of your copy of this month's The Simple Things - buy, download or subscribe

View the sampler here

In Making Tags issue 52, october, making, Make project, harvest, autumn
Comment
Illustration: Joe Snow

Illustration: Joe Snow

Make: A nest box for small birds

Lottie Storey January 22, 2016

Why not give our feathered friends a helping hand by making them a nest box? An old boot can create a unique bird box, as well as being a good alternative to a hole found in trees.


1 Cut a length of weatherproof wood, 15mm thick and 400mm long (check your boot fits on the board with room for a roof). Don’t use CCA pressure-treated timber, as the leachates may harm birds.

2 Cut two 150mm lengths of the same wood at right angles to make the roof. Drill and nail the pieces together, then place the roof on the backboard and drill and nail into place.

3 Attach the boot to the backboard with glue, toe facing down, and tilted forward so rain falls off. Fix, two to four metres up a tree, or a wall. Try to face the boot north-east to avoid strong sunlight and wet winds. There should be a clear flight path to the nest.

4 Different species will be attracted to different sizes of hole. Tie the laces tightly, to 25mm for blue, coal and marsh tits; 28mm for great tits, tree sparrows and pied flycatchers; 32mm for house sparrows and nuthatches and 45mm for starlings.

5 Clean the boot with boiling water in August once the birds have stopped using it to get rid of any parasites.
 

Read more:

From the January issue

Making projects

Miscellany posts


January's The Simple Things is out now - buy, download or subscribe.

In Miscellany, Making Tags issue 43, january, miscellany, making, Make project, garden, birds
Comment
  • Blog
  • Older
  • Newer
Featured
  Buy ,  download  or  subscribe   See the sample of our latest issue  here   Buy a copy of our latest anthology:  A Year of Celebrations   Buy a copy of  Flourish 2 , our wellbeing bookazine  Listen to  our podcast  - Small Ways to Live Well
Feb 27, 2025
Feb 27, 2025

Buy, download or subscribe

See the sample of our latest issue here

Buy a copy of our latest anthology: A Year of Celebrations

Buy a copy of Flourish 2, our wellbeing bookazine

Listen to our podcast - Small Ways to Live Well

Feb 27, 2025
Join our Newsletter
Name
Email *

We respect your privacy and won't share your data.

email marketing by activecampaign
facebook-unauth twitter pinterest spotify instagram
  • Subscriber Login
  • Stockists
  • Advertise
  • Contact

The Simple Things is published by Iceberg Press

The Simple Things

Taking time to live well

We celebrate slowing down, enjoying what you have, making the most of where you live, enjoying the company of of friends and family, and feeding them well. We like to grow some of our own vegetables, visit local markets, rummage for vintage finds, and decorate our home with the plunder. We love being outdoors and enjoy the satisfaction that comes with a job well done.

facebook-unauth twitter pinterest spotify instagram