The Simple Things

Taking time to live well
  • Home
  • Subscribe
  • SHOP
  • Newsletter
  • About
  • Work with us
  • Home
  • Subscribe
  • SHOP
  • Newsletter
  • About
  • Work with us

Blog

Taking Time to Live Well

  • All
  • Chalkboard
  • Christmas
  • Competition
  • could do
  • Eating
  • Escape
  • Escaping
  • Fresh
  • Fun
  • gardening
  • Gathered
  • Gathering
  • Growing
  • Haikus
  • Interview
  • Living
  • Looking back
  • Magazine
  • magical creatures
  • Making
  • Miscellany
  • My Neighbourhood
  • Nature
  • Nest
  • Nesting
  • outing
  • playlist
  • Reader event
  • Reader offer
  • Shop
  • Sponsored post
  • Sunday Best
  • Think
  • Uncategorized
  • Wellbeing
  • Wisdom

Weekend project: Brioche tin candles

Lottie Storey January 10, 2017

On a gloomy January day, why not take a bit of comfort from the relaxing glow of a candle? 

These projects offer bright ideas for refashioning bits you may well already have about into candleholders – then strategically place around the home, for instant cheer. We even tell you how to make – and scent – the candles themselves.

A quick word about wax. These projects use soy, which is made from vegetable oil (paraffin candles use petroleum oil). Soy candles have a longer burn time and less black soot than a paraffin equivalent. Using soy also means you can add essential oils to scent them – try vanilla oil for the hint of freshly baked brioches, or mosquito-repelling citronella oil to conjure balmy summer nights (remember those?). To get even fancier, you can buy colour wax flakes or add dyes. For wicks and wax, try Hobbycraft (hobbycraft.co.uk).
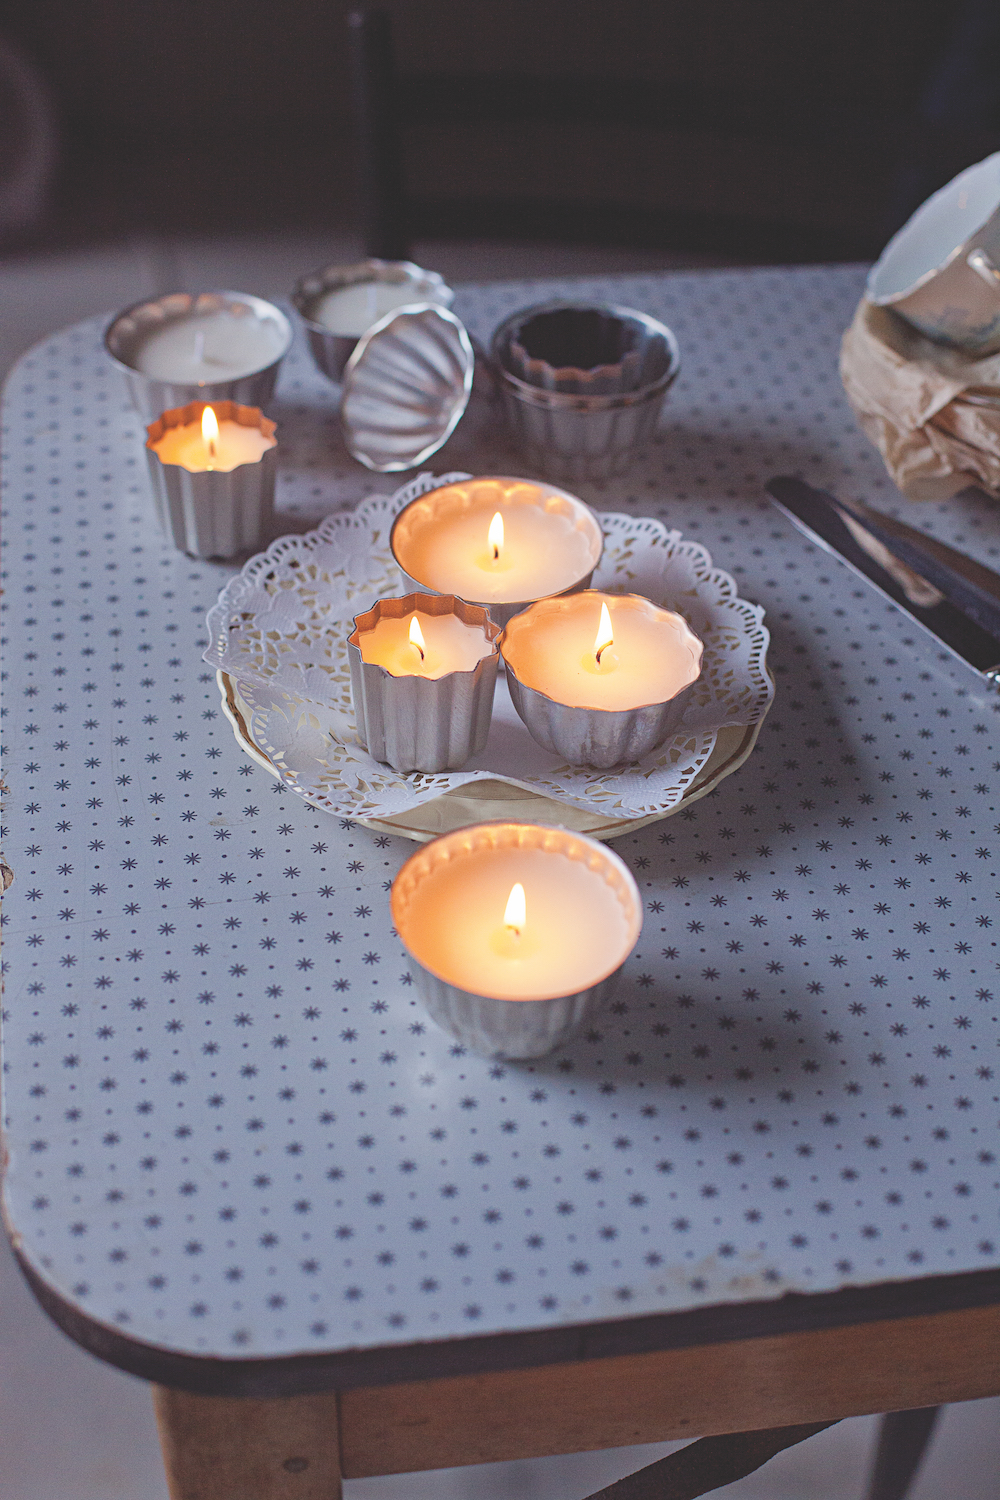

Brioche tin candles

Turn your old tins into something as sweet as the bread itself

Makes three candles
You will need:
3 x 10cm pre-waxed wick assembly
3 small brioche tins or metal jelly moulds, roughly 150ml capacity
Glue dots or glue gun
6 wick-supporting sticks (or wooden cooking skewers cut in half)
750g flaked soy wax – about 225g (or roughly twice the volume of your tin) for each candle
6 small elastic bands
Small pan or metal mixing bowl
Large saucepan
Old spoon
Scissors

1 Fix the wick assembly to the centre of the bottom of your tins by using a glue dot or a dab of hot glue from a glue gun. 
2 Take the supporting sticks or skewers in pairs and bind them together by wrapping a small elastic band around them at either end. Use the skewers to hold the wicks vertically by resting them across the rim of each tin, the wicks pinched firmly between the skewers. 
3 Put the wax in a small pan or bowl and set the bowl in a pan of water on the hob over a medium heat. Add about three drops of fragrance oil (if using) to the wax. When melted, the wax will appear completely clear. Use your spoon to stir the oil into the wax.
4 Pour a small amount of the liquid wax 5 into the bottom of your prepared tins to just cover the metal wick assembly in each one. Leave to harden for about ten minutes. This is to make sure that the wicks stay in place for the main pour in the following step.
5 Return the pan to the hob to ensure the wax is fully melted, then pour it into your tins to within about 6mm of the top edges and leave to cool and harden fully. If the wax dries with a small dip around the wick, top it up with more melted wax and thinly cover the surface of the candle evenly.
6 Using scissors, trim the wicks to about 12mm from the top surface of the wax. Leave your candles for at least 24 hours before lighting.

Adapted from Take a Tin by Jemima Schlee (GMC, available from thegmcgroup.com)


Turn to page 113 of January’s The Simple Things for two more candle projects: gold painted hurricanes and a candle in a jar. 

More from the January issue:

Featured
Jan 24, 2017
Recipe: Raspberry biscuits with lemon coriander curd
Jan 24, 2017
Jan 24, 2017
Jan 22, 2017
Winter Skin Tonic
Jan 22, 2017
Jan 22, 2017
Jan 20, 2017
Recipe: DIY tortilla chips
Jan 20, 2017
Jan 20, 2017

More projects:

Featured
Belt Bag pic.jpg
May 21, 2025
Make | Summer Scraps Belt Bag Template
May 21, 2025
May 21, 2025
Mending.jpeg
Mar 20, 2025
Project | Satin Stitch Patching
Mar 20, 2025
Mar 20, 2025
Screenshot 2025-01-18 at 11.57.28.png
Feb 2, 2025
Make | A Jam Jar Garden
Feb 2, 2025
Feb 2, 2025
  Buy ,  download  or  subscribe   See the sample of our latest issue  here   Buy a copy of our latest anthology:  A Year of Celebrations   Buy a copy of  Flourish 2 , our wellbeing bookazine  Listen to  our podcast  - Small Ways to Live Well

Get hold of your copy of this month's The Simple Things - buy, download or subscribe

View the sampler here.

InNest, Making Tagsissue 55, january, candles, hygge, making, project, Make project
  • Blog
  • Older
  • Newer
Featured
  Buy ,  download  or  subscribe   See the sample of our latest issue  here   Buy a copy of our latest anthology:  A Year of Celebrations   Buy a copy of  Flourish 2 , our wellbeing bookazine  Listen to  our podcast  - Small Ways to Live Well
Feb 27, 2025
Feb 27, 2025

Buy, download or subscribe

See the sample of our latest issue here

Buy a copy of our latest anthology: A Year of Celebrations

Buy a copy of Flourish 2, our wellbeing bookazine

Listen to our podcast - Small Ways to Live Well

Feb 27, 2025
Join our Newsletter
Name
Email *

We respect your privacy and won't share your data.

email marketing by activecampaign
facebook-unauth twitter pinterest spotify instagram
  • Subscriber Login
  • Stockists
  • Advertise
  • Contact

The Simple Things is published by Iceberg Press

The Simple Things

Taking time to live well

We celebrate slowing down, enjoying what you have, making the most of where you live, enjoying the company of of friends and family, and feeding them well. We like to grow some of our own vegetables, visit local markets, rummage for vintage finds, and decorate our home with the plunder. We love being outdoors and enjoy the satisfaction that comes with a job well done.

facebook-unauth twitter pinterest spotify instagram