The Simple Things

Taking time to live well
  • Home
  • Subscribe
  • SHOP
  • Newsletter
  • About
  • Work with us
  • Home
  • Subscribe
  • SHOP
  • Newsletter
  • About
  • Work with us

Blog

Taking Time to Live Well

  • All
  • Chalkboard
  • Christmas
  • Competition
  • could do
  • Eating
  • Escape
  • Escaping
  • Fresh
  • Fun
  • gardening
  • Gathered
  • Gathering
  • Growing
  • Haikus
  • Interview
  • Living
  • Looking back
  • Magazine
  • magical creatures
  • Making
  • Miscellany
  • My Neighbourhood
  • Nature
  • Nest
  • Nesting
  • outing
  • playlist
  • Reader event
  • Reader offer
  • Shop
  • Sponsored post
  • Sunday Best
  • Think
  • Uncategorized
  • Wellbeing
  • Wisdom

Christmas: Make a 100 wishes bay leaf garland

Lottie Storey December 11, 2019

Make a 100 wishes bay leaf garland or wreath this Christmas.

You will need:

A needle and strong thread, in any colour
Lots of bay leaves.

1. Tie a knot at the end of a long piece of thread and run the needle through each leaf until you have gathered a large bunch.

2. Next, pull and tie the two ends together. 

3.The garland can be tied to a door or placed on a table. Use the bay leaves over winter to cook with, write down your wishes, dreams and hopes and share them with your friends. Simple pleasures. 

Taken from The Magpie & The Wardrobe: A Curiosity of Folklore, Magic & Spells by Sam McKechnie and Alexandrine Portelli (Pavilion Books)

 This was originally published in December 2014.. Get hold of your copy of this month's The Simple Things - buy, download or subscribe

From our December issue…

Featured
BrusselsSproutTree Mowie Kay.jpg
Dec 26, 2019
How to | do Christmas leftovers better
Dec 26, 2019
Dec 26, 2019
BoxofDelights.jpg
Dec 24, 2019
Go | Lands of make believe
Dec 24, 2019
Dec 24, 2019
Carolling Getty Images.jpg
Dec 21, 2019
Pedantry | Christmas carols
Dec 21, 2019
Dec 21, 2019

More December inspiration…

Featured
Stocksy Outing Fresh Air.jpg
Dec 14, 2024
Wellbeing | A Breath of Fresh Air
Dec 14, 2024
Dec 14, 2024
Skating Swans Alamy.jpg
Jan 8, 2022
How to | Ice Skate Without Embarrassment
Jan 8, 2022
Jan 8, 2022
Cobwebs Stocksy.jpeg
Jan 3, 2022
Science lesson | How frost is made
Jan 3, 2022
Jan 3, 2022
In Christmas, Making Tags christmas, issue 42, december, make, folklore, tradition
Comment
Photography: Yeshen Venema

Photography: Yeshen Venema

Make your own | Christmas Crackers

Iona Bower November 14, 2019

And help Christmas go with a homemade bang

In our December ‘Cosy’ issue, we have a lovely ‘how-to’ which takes you step by step through making your own Christmas crackers. You can find all the instructions from page 53.

What you’ll need before you start, though, is the templates for the crackers, which you can find below, ready to print out. There are also some jokes to print, cut out and pop inside each cracker, and (in case our jokes are too groansome for you) there’s also a sheet of blank slips to write your own jokes or riddles on. Or why not personalise them for each of your Christmas guests?

The printables

Crackers template

Jokes to cut out

Blank jokes to cut out

We’d love to see pictures of how your crackers turn out. Do tag us on your Facebook or Instagram posts!

Get hold of your copy of this month's The Simple Things - buy, download or subscribe

More Christmas fun…

Featured
9.new years final.png
Dec 31, 2024
How to | Make a Could-Do List Happen
Dec 31, 2024
Dec 31, 2024
Biscuit tin Emma Croman.jpg
Dec 28, 2023
Nostalgia | Christmas Biscuit Tins
Dec 28, 2023
Dec 28, 2023
SIM66.GATHERING_IMG_3201.png
Dec 24, 2023
Recipe | Roasted Brussels sprouts with nuts, lemon & pomegranate
Dec 24, 2023
Dec 24, 2023

More from our December issue…

Featured
BrusselsSproutTree Mowie Kay.jpg
Dec 26, 2019
How to | do Christmas leftovers better
Dec 26, 2019
Dec 26, 2019
BoxofDelights.jpg
Dec 24, 2019
Go | Lands of make believe
Dec 24, 2019
Dec 24, 2019
Carolling Getty Images.jpg
Dec 21, 2019
Pedantry | Christmas carols
Dec 21, 2019
Dec 21, 2019


In Making Tags issue 90, December, Christmas, Christmas makes, Christmas craft, Christmas crackers
Comment
Photography: Yeshen Venema

Photography: Yeshen Venema

Make | homemade eco Christmas crackers

Iona Bower November 14, 2019

Create your own eco-friendly crackers with brown paper or recycled wrapping paper

If you liked the colourful Christmas Crackers make in our December issue, but would like something a little greener, or just a little more understated in design, you might like to make these eco-friendly versions.

You will need:

Cracker template (click to download and print out)

Brown paper

Cutting board

Craft knife

Toilet roll or cardboard tube

Cracker snaps

Double-sided tape

Ruler

String

 How to make:

1.      Cut out your template and draw around it on the card. Cut out the main cracker shape and then cut out all the triangles using your craft knife and ruler.

ecocracker1.jpg


2.      Place your toilet roll in the middle of the brown paper between the cut out diamonds. Take your cracker snap and put it through the cracker then place in the cracker any presents or jokes you wish to fill it with.

ecocracker2.jpg
 

3.      Place sticky tape along the bottom edge of the cracker, leaving a space where the triangles are, then roll and stick the cracker together. (If you don’t want to use tape you could little tabs in one side and slits in the other for them to go through to hold the paper together, although this won’t be as sturdy.)

ecocracker3.jpg
 

4.      Place your string underneath the triangles, pull tight and tie into a bow.

ecocracker4.jpg
 

5.      Cut off any of the cracker snap that may be showing, then personalise as you wish.

ecocrackerfinish.jpg
 

NOTE: If you prefer you don’t have to cut the diamonds out and you can just tie with string although this will not be as neat.


Get hold of your copy of this month's The Simple Things - buy, download or subscribe

More Christmas decoration inspiration…

Featured
caroline rowland xmas tree.jpg
Dec 5, 2020
Science | decorate a Christmas tree using maths
Dec 5, 2020
Dec 5, 2020
Make: Ornament cards
Nov 23, 2018
Make: Ornament cards
Nov 23, 2018
Nov 23, 2018
Dec 30, 2016
Christmas: Share your favourite decorations with The Simple Things
Dec 30, 2016
Dec 30, 2016


More from our December issue…

Featured
BrusselsSproutTree Mowie Kay.jpg
Dec 26, 2019
How to | do Christmas leftovers better
Dec 26, 2019
Dec 26, 2019
BoxofDelights.jpg
Dec 24, 2019
Go | Lands of make believe
Dec 24, 2019
Dec 24, 2019
Carolling Getty Images.jpg
Dec 21, 2019
Pedantry | Christmas carols
Dec 21, 2019
Dec 21, 2019
In Making Tags issue 90, December, Christmas makes, cracker, crackers, eco Christmas, green Christmas
1 Comment
Knitting .jpg

Astounding facts | knitting

Iona Bower October 27, 2019

Tales of woolly wonder that will provide you with a good yarn

We’ve been celebrating all things wool-related in our ‘Cosy’ November issue. It’s got blankets for snuggling (including some with dogs on), a short story about knitting and a retrospective on how wool has shaped British history, from Viking socks to knitted bikinis. And we thought we’d share with you some of the wonderful woolly facts we discovered along the way. 

  1. The record for the longest knitted scarf stands at 4,565.46 metres. That’s nearly three miles. It was knitted by Helge Johansen of Oslo, Norway, and took him 30 years. We’re concerned about how he kept warm for those three decades before the scarf was finished. 

  2. The largest number of people to be knitting together in one room is 3,083 and the record was achieved by the Women’s Institute (naturally) in The Royal Albert Hall in 2012.

  3. The fastest hand-knitted ‘sheep-to-jumper’ item was made in 4 hours 45 minutes and 53 seconds by a team in Swalmen, Netherlands in 2017. We don’t know how this was done and we don’t wish to, as we can’t bear to spoil the mental image of someone clicking their needles, taking wool directly off an ever-decreasing sheep. 

  4. The world’s largest knitting needles were made by an art student in Wiltshire. They measured 4.42m long and had a diameter of 9.01cm. To claim the world record, the needles had to be capable of knitting ten stitches and ten rows of yarn.

  5. Slow TV in Norway once broadcast a knitting marathon lasting 13 hours, which was watched by 1.3 million viewers.

Get hold of your copy of this month's The Simple Things - buy, download or subscribe

More knitting inspiration…

Featured
Woolly Mahoosive.jpg
Dec 15, 2022
Learn something new | Arm Knitting
Dec 15, 2022
Dec 15, 2022
weather scarf.jpeg
Feb 15, 2022
How to | Make a Thread Journal
Feb 15, 2022
Feb 15, 2022
Oct 25, 2020
Yarn Bomber's Toolkit
Oct 25, 2020
Oct 25, 2020

More from our November issue…

Featured
bookshop.jpg
Jun 23, 2020
Four fictional bookshops
Jun 23, 2020
Jun 23, 2020
Inclusive Trade.JPG
May 11, 2020
Competition | Win £100 to shop ethically
May 11, 2020
May 11, 2020
October back cover.JPG
Nov 19, 2019
November | a final thought
Nov 19, 2019
Nov 19, 2019
In Making Tags November, knitting, wool, craft
Comment
Photography: Jonathan Cherry Project: Matt Long

Photography: Jonathan Cherry Project: Matt Long

Make | Beer Can-dles

Iona Bower August 10, 2019

A fun make to entertain you all while camping (and make you look like Bear Grylls, too)

We loved these sweet candles made from beer cans from our August camping feature so much we had to share them here, too.

You will need:

Empty beer cans
Corrugated cardboard
Saved candle stubs and/or bunch of old candles
A barbecue or firepit
Old saucepan
Stirring stick
Chopping board
Knife
Scissors


How to make:

1 Using scissors, carefully cut beer cans to a height of 5cm. Keep the base of the can; recycle the top bit.

2 Cut 5cm strips of corrugated cardboard. Roll up the cardboard strips until they are roughly the same diameter as a can. Wedge the roll as tightly as possible inside the can base. Using scissors, prise a small hole in the centre of the cardboard roll. Poke a small piece of cardboard into the hole to create a ‘wick’.

3 Set a small fire in your firepit or barbecue. Chop your candles into small pieces and add them to an old saucepan. Melt the candles over a small fire until they are liquid wax, stirring regularly with a twig or stick.

4 Very carefully, pour the hot liquid wax over the cardboard rolls. Keep pouring slowly until the wax reaches the top of the beer can. Wait for a few minutes for the cardboard to soak up the hot wax and then top-up each beer can until it’s full to overflowing.

5 Allow the wax to cool completely and go solid before use. When it’s dark, light the ‘wick’ with a match. Beer can-dles burn for up to two hours and should only be used outdoors and attended.

Pick up the August issue for all the other ideas from our Under Canvas feature, from blueberry pancakes to shell garlands.

Get hold of your copy of this month's The Simple Things - buy, download or subscribe

More from our August issue…

Featured
BACK COVER.jpg
Aug 22, 2019
August | a final thought
Aug 22, 2019
Aug 22, 2019
TheWayHome, MarkBoyle.jpg
Aug 17, 2019
Lost arts | writing a nice, newsy letter
Aug 17, 2019
Aug 17, 2019
Earth's Crust Castle douglas Europe’s Best Bakeries by Sarah Gu.jpg
Aug 14, 2019
Nostalgia | Forgotten bakery goods
Aug 14, 2019
Aug 14, 2019

More ingenious camping ideas…

Featured
Camping Alamy.jpeg
May 17, 2025
Outdoors | Camping Truths
May 17, 2025
May 17, 2025
max-hermansson-w5uE11FiAc8-unsplash.jpg
Jun 18, 2024
Adventures | Stay in a Bothy
Jun 18, 2024
Jun 18, 2024
Caravan pic.jpg
Aug 9, 2022
Cooking | Meals for a One-Ring Burner
Aug 9, 2022
Aug 9, 2022


In Making Tags camping, makes, candles, summer projects
Comment
Photography: Brent Darby

Photography: Brent Darby

In praise of potting sheds

Iona Bower June 29, 2019

Because it’s about more than the soil and seedlings

There’s no denying it, a potting shed is endlessly useful. As well as being a spot for bringing on seedlings, it’s a place to work on your own soil, keep all your tools neat and tidy and have your seed packets and catalogues stacked away….

But that’s not really why any of us have a potting shed, as any fool knows. For the uninitiated, and those not yet fully throwing themselves into potting shed life, here’s what they’re really for:

  1. Having a grown-up wendy house. No one truly gets too old to appreciate the joy of a tiny little house of one’s own to pass the time in, play in and arrange ‘just so’. A place no one else will try to invade (because it’s too darn small).

  2. Keeping your most delicious comestibles. If you’ve any kind of sense you’ll kit out your potting shed with a few essentials. Nothing too fancy. You don’t want to arouse interest. Just an old Thermos you can take out full of boiling water, a nice enamel mug, a small box of a few interesting herbal teas, and most importantly, a thoroughly uninteresting looking old biscuit tin in which to secrete cakes, biscuits and other treats. A cup of tea and a slice of fruitcake never taste so good as when they’re secret.

  3. Hiding from your nearest and dearest. Yes, we’re sure they’re lovely but sometimes we all just need to disappear for an hour. The potting shed offers that ideal combination of being outside the four walls of the house (thus putting off potential ‘company’ happening upon you) but not actually off the premises (so you don’t strictly speaking have to tell anyone you’ve gone there. If you slip up the garden like a ninja it could be a good half hour before anyone notices you’ve gone.)

  4. Communing with spiders. Because somehow they count as welcome company rather than unwanted intruders. You might look askance at your other half trying to muscle their way into your potting shed but Gerald?! Well, he came with the bricks. And he’s always there to lend a hand (or eight) when needed. Gerald’s welcome to stay.

  5. Enjoying without distraction. Do you find you only ever really do the whole crossword, get stuck into a book or sit and listen to the afternoon play on Radio 4 when you’re not in your own house? That’s likely because there’s always a job you ‘should’ be doing to take the place of what you want to be doing. Get a potting shed and suddenly all that laundry that needs folding, the drain that needs unblocking and the spuds that need peeling for dinner disappear! Out of sight out of mind, see? Who knows? Perhaps by the time you skulk back indoors someone else will have done the chores for you! We live in hope.

  6. Doing some Proper Pottering. After all where can you truly potter if not in a potting shed, sniffing the unmistakable smell of compost, sweeping up, scrubbing the odd pot and arranging seed packets. There’s no place where it’s easier to be gently useful and relaxedly occupied.

If you’re already yearning for a potting shed of one’s own, pick up our July issue, which has instructions on how to make your own potting shed in a day (like the one pictured above). It’s small but very easy to put together and there’s enough room for you, a newspaper, a comfy stool… and Gerald, too.  

The project is adapted from Upcycling Outdoors by Max McMurdo (Jacqui Small). Photography: Brent Darby.

Get hold of your copy of this month's The Simple Things - buy, download or subscribe

More from our July issue…

Featured
Back cover Michelle Rial from Am I Overthinking this Chronicle Books.jpg
Jul 23, 2019
July | a final thought
Jul 23, 2019
Jul 23, 2019
Lavender Lia Leendertz and Kirstie Young.jpg
Jul 20, 2019
Science | why lavender calms
Jul 20, 2019
Jul 20, 2019
Reader holiday.jpg
Jul 18, 2019
Reader offer | The Simple Things Holiday
Jul 18, 2019
Jul 18, 2019

More makes for your garden…

Featured
SIM82.MISCELLANY_Tomatoes.jpg
Mar 31, 2019
Make: an upcycled hanging tomato planter
Mar 31, 2019
Mar 31, 2019
SIM76-home-hacks-heater.jpg
Sep 27, 2018
Home hacks | Make a terracotta heater
Sep 27, 2018
Sep 27, 2018
75Herb-self-watering.png
Aug 30, 2018
Garden hacks | Make a self-watering herb garden
Aug 30, 2018
Aug 30, 2018


In Making Tags July, issue 85, gardening, potting shed, weekend project
Comment
map-garland.jpeg

Make: An Ordnance Survey garland

lsykes May 15, 2019


Create a nostalgic reminder of a fun weekend

Poring over a map is a sure-fire way to ramp up the anticipation for a long weekend away (and with two in May, there are plenty of opportunities). There’s the road trip to navigate, the B&B to locate, the nearest stretch of beach to find, and day trips to plan. And, even better, when you get back home, that same map will remind you of where you have been: retrace your steps up contours to that spectacular viewpoint or along the dotted lines of a coastal footpath to the beach cafe.

One way to remember a journey is simply to frame a map of the area travelled. Bring it alive with pins marking memorable places visited or by adding snapshots of special meals or locations. Alternatively, scour local charity shops' book sections where there is often a bucket or basket of old maps waiting to be snapped up and recycled, and turn them into this simple but pretty paper garland to hang in your hall, above your bed or whatever spot in your home could do with an injection of bank holiday nostalgia once May is over.

What you’ll need

One or two vintage maps (depending on preferred length of garland)

A craft cutter (we used a 2-inch heart cutter but you could use a similar-size circular cutter)

Glue stick

Sewing machine and thread

A felt ball or bead (to weight the garland at the bottom)

How to make your garland

1. If your map is one-sided, cut it in half and glue the 'wrong' sides together with the glue stick. Make sure that both sides of the map are the right way up. Allow to dry for a couple of minutes.

2. Using your craft cutter, cut out the hearts. You may find it easier to cut the map into strips first.

3. Leave a good length of thread at the top, and sew your hearts together with the sewing machine. To make your garland 3-D, sew the hearts in pairs. A contrasting red thread will bring out the detail in the map. (When lining up the next heart, have the foot and the needle of your machine down so that you can use the needle as a guide to get the heart in the right place each time.)

4. Keep going until the garland is your desired length. Leave a good length of thread at the end and hand-stitch a little felt ball to add weight and help it hang straight. Tie a loop or knot at the top of the garland so that you have something to hang the garland form.

5. Open the hearts to create a 3-D effect. Hang or drape your garland.

Created by Charlie Deighton and first published here in June 2014.

See more of her work at her Etsy shop, or follow her on instagram.

Get hold of your copy of this month's The Simple Things - buy, download or subscribe

More from our May issue…

Featured
Kite Getty.JPG
Feb 28, 2020
How to | make a kite
Feb 28, 2020
Feb 28, 2020
Back cover Mari Andrew.jpg
May 27, 2019
May: a final thought
May 27, 2019
May 27, 2019
Analogue Jonathan Cherry.jpg
May 11, 2019
Etymology: jukebox
May 11, 2019
May 11, 2019

More makes for bank holiday month…

Featured
Lanyard & Key Fob.jpg
Jun 1, 2025
Project | Make a Scrap fabric Key Fob
Jun 1, 2025
Jun 1, 2025
TEA COSY JUMPER.jpg
Jan 25, 2025
How to | Make a Tea Cosy from an Old Jumper
Jan 25, 2025
Jan 25, 2025
Wellbeing.jpg
Feb 11, 2024
Make | Kitchen Face Masks
Feb 11, 2024
Feb 11, 2024


In Making Tags making, maps, papercraft, remember the moment
Comment
Photography: Rachel Whiting

Photography: Rachel Whiting

Make: your own clean, green oven gel

Iona Bower April 22, 2019

Oven looking a little tired and emotional after a big Easter gathering of friends or family? This oven cleaning gel tackles your least favourite job without the caustic fumes of conventional cleaners

Makes 1-oven’s worth

1 tsp xanthan gum

2 tsp glycerine

2 tsp washing-up liquid

300ml just-boiled water

1 tsp salt

5 tbsp soda crystals

1 Put the xanthan gum and glycerine in a large bowl and stir well to combine. Add washing-up liquid and stir again. 2 Put the just-boiled water in a jug and add the salt and soda crystals. Stir until the crystals dissolve. 3 Pour the warm solution into the bowl with the gum mixture and use a hand-held blender to pulse for 1 min, until fully combined. Use immediately.

How to use

1 Switch off your oven at the socket and remove the racks from the inside. Wearing rubber gloves, use a sponge or scrubbing brush to apply the gel liberally to the surfaces of your oven, including the door.

2 Leave the gel on overnight. In the morning, again wearing rubber gloves, use a scrubbing brush to give your oven a thorough clean. If burnt-on spots remain, sprinkle over some bicarbonate of soda to give you extra scouring power.

3 When you’re satisfied, wipe the oven down with a clean, damp cloth, rinsing the cloth in fresh water as necessary. You can use this solution on the oven racks and trays, too, but avoid use on aluminium surfaces.

Recipes taken from Fresh Clean Home by Wendy Graham (Pavilion). Photography: Rachel Whiting.

 Get hold of your copy of this month's The Simple Things - buy, download or subscribe


More from our April issue…

Featured
Back cover.JPG
Apr 26, 2019
April: a final thought
Apr 26, 2019
Apr 26, 2019
Green and clean oven gel pic.jpg
Apr 22, 2019
Make: your own clean, green oven gel
Apr 22, 2019
Apr 22, 2019
Charlie and Cho Factory pic.jpg
Apr 14, 2019
Game: Charlie and the Chocolate Factory Puzzler
Apr 14, 2019
Apr 14, 2019

More kind cleaning ideas…

Featured
All purpose cleaner and wipes.jpg
Feb 18, 2023
Make | Homemade Cleaning Wonders
Feb 18, 2023
Feb 18, 2023
HOME-CreamCleanser.jpg
Mar 7, 2021
Make | Homemade Cream Cleanser
Mar 7, 2021
Mar 7, 2021
Green and clean oven gel pic.jpg
Apr 22, 2019
Make: your own clean, green oven gel
Apr 22, 2019
Apr 22, 2019


In Making Tags issue 82, April, cleaning, greencleaning, makes, eco
Comment
Illustration: Kavel Rafferty

Illustration: Kavel Rafferty

Make: an upcycled hanging tomato planter

Iona Bower March 31, 2019

Repurpose a plastic bottle and have tomatoes hanging around all summer

This simple project can be done in an hour and you’ll have cherry tomatoes dangling temptingly by the back door ready for salads all summer long. We recommend you make lots and hang them together in bunches. Green plastic bottles look most attractive if you have them but any will do.

You will need:

Used plastic bottles, between two and four litres

Cherry tomato plant seedlings

Masking tape

Hole punch

Knife

Strong twine

Soil

1 Clean your plastic bottles, removing any labels. Carefully cut away the bottom of the bottle.

2 Seal over the jagged edge with masking tape; then, using the hole punch, make four holes in the tape, one on each side of the bottle.

3 With the mouth of the bottle facing down, insert your tomato seedling and carefully work the plant into the mouth. Then spread the root ball out inside the bottle.

4 Fill the bottle three-quarters full with compost.

5 Thread your twine through the holes and tie securely together.

6 Hang somewhere sunny and water really regularly.

Get hold of your copy of this month's The Simple Things - buy, download or subscribe


More from our April issue…

Featured
Back cover.JPG
Apr 26, 2019
April: a final thought
Apr 26, 2019
Apr 26, 2019
Green and clean oven gel pic.jpg
Apr 22, 2019
Make: your own clean, green oven gel
Apr 22, 2019
Apr 22, 2019
Charlie and Cho Factory pic.jpg
Apr 14, 2019
Game: Charlie and the Chocolate Factory Puzzler
Apr 14, 2019
Apr 14, 2019

More garden hacks…

Featured
SIM82.MISCELLANY_Tomatoes.jpg
Mar 31, 2019
Make: an upcycled hanging tomato planter
Mar 31, 2019
Mar 31, 2019
SIM76-home-hacks-heater.jpg
Sep 27, 2018
Home hacks | Make a terracotta heater
Sep 27, 2018
Sep 27, 2018
75Herb-self-watering.png
Aug 30, 2018
Garden hacks | Make a self-watering herb garden
Aug 30, 2018
Aug 30, 2018
In Making Tags issue 82, April, makes, Make project, garden hacks, recycling
Comment
mandala.jpeg

Interview: on the couch with Carl Jung

Iona Bower March 3, 2019

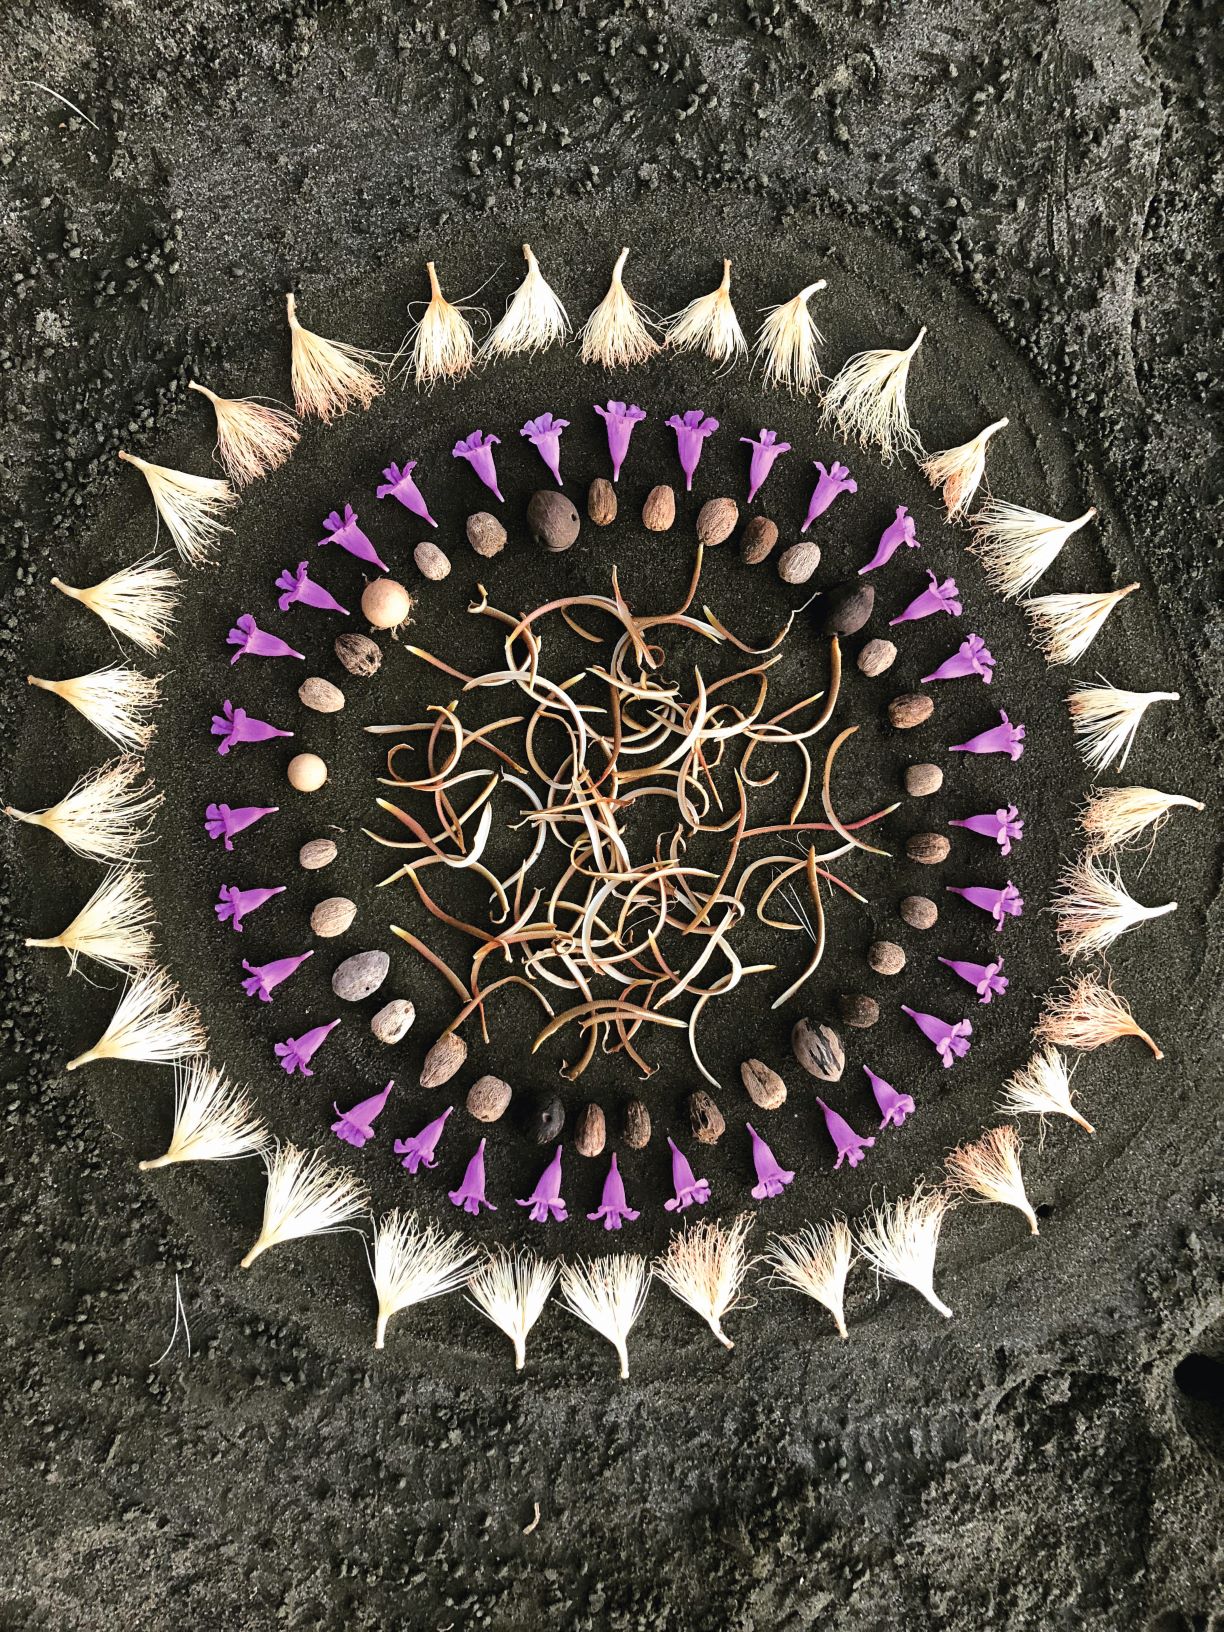
Photography by @coloursofmyday

In our March issue, we’ve looked at mandalas so we thought we’d get to know a little more about one of their most famous fans


TST: Hi Carl <pats couch>. Take a seat and make yourself comfortable. We’ve a few questions for you that might help you achieve a sense of selfhood (more on that later). Let’s get started. Tell us about your childhood.

CJ: I was born on 26 July 1875 in Kesswill in Switzerland. My father, Paul, was a Protestant clergyman but was lapsing by the moment. My mother, Emilie, suffered from very poor mental health, and when I was three, had to leave us to live temporarily in a psychiatric hospital. Now that I mention this, I wonder if perhaps this had some influence on my career as an adult. Ha! Funny the things that come out in therapy, eh? I was alone a lot as a child, having no brothers or sisters, but I wouldn’t say I was lonely. I enjoyed observing the many adults around me and learning from them. In fact, I believe I was always happiest when alone with my own thoughts. I say ‘alone’. Obviously, I always had my sense of self to chat to, as well...


TST: Well, quite. What was your education like?

CJ: I attended my local village school but my father also taught me Latin at home. The village school wasn’t all that if I’m honest. I was a keen student and interested in many aspects of science and the arts. It was expected that I would follow my father into a career in religion. But that hadn’t worked out so well for the old man himself, it seemed pretty clear. So I decided to study medicine and went to Basel University to study in 1895 and in 1902 I received my medical degree from the University of Zurich. Later, I decided to specialise in psychology and went off to study in Paris… Is this all strictly relevant?


TST: No, but it’s nice to have some context. Let’s move on to affairs of the heart…

CJ: I met the great love of my life, Emma Rauschenbach in 1903. We married and had five children together. As well as being my wife, and bringing up my children, she was my scientific co-worker for many years. You could say I kept her pretty busy. We were together until her death in 1955…


TST: Do help yourself to a tissue. They’re on the table. Let’s talk more about your work life. How did you come to be a psychologist?

CJ: While studying in Zurich I worked as an assistant to Eugen Bleuler, who you may now know as one of the pioneers in the study of mental illness. During this time, I and a few others, worked on the ‘association experiment’ which looked at groups of subconscious ideas in the mind (I tend to call the mind ‘the psyche’. It sounds much posher don’t you think?). I digress… The unconscious associations or ‘complexes’ can bring about anxiety or other inappropriate emotions. Around this time, I read Sigmund Freud’s Interpretation of Dreams which confirmed all my beliefs on complexes. Sigmund, it must be said, had a filthy mind and thought everyone was subconsciously thinking about sex most of the time. Lord! You could barely peel a banana without the man having something to say about it. I was more interested in mysticism and ‘higher things’. But that didn’t stop us becoming firm friends. For a while.


TST: So the friendship ended badly?

CJ: It did. One of my greatest sadnesses. Things were so rosy when we met in 1907. It was widely thought that I would continue Siggy’s work when he died (he was older than me, as well as more filthy-minded, you know). But it was not to be. Our temperaments and beliefs were too different. When I published Psychology of the Unconscious in 1912, Siggy took the right hump. I had deigned to disagree with some of his dearest beliefs and principles. The friendship limped on for a while but he shut me out of his in-crowd. It was no real loss to me, professionally. I’ve always worked better alone. And anyway, I was sick of his disgusting double-entendres. It was like living with Benny Hill.


TST: So where did life take you after Freud?

I launched myself into some deep self-analysis, hoping to discover my ‘true self’. I lived for a while among primitive tribes, everywhere from Mexico to Kenya, and travelled the world, studying various belief systems in hopes of discovering more about the archetypal patterns that inform the self. I brought back with me many fine ideas, one of which was that of using the mandala to discover one’s selfhood. If I’d known the darn things would be all over Instagram one day, I might have left them where they were. Still, I’m pleased to see their popularity has brought so many people a little peace in a busy world.


If you’re interested in mandalas, and would perhaps like to create one of your own, pick up a copy of our March issue, in shops now.

Get hold of your copy of this month's The Simple Things - buy, download or subscribe

More things to make you think…

Featured
Tiny things Alamy.jpg
Jul 12, 2022
Think | Why we Love Tiny Stuff
Jul 12, 2022
Jul 12, 2022
@nicguymer japanese doll collection.JPG
Feb 20, 2021
Why collecting is self caring
Feb 20, 2021
Feb 20, 2021
Clocks.JPG
Mar 25, 2019
British Summer Time: a brief history
Mar 25, 2019
Mar 25, 2019

More from our March issue…

Featured
March chalkboard.JPG
Mar 27, 2019
March: a final thought
Mar 27, 2019
Mar 27, 2019
Clocks.JPG
Mar 25, 2019
British Summer Time: a brief history
Mar 25, 2019
Mar 25, 2019
allotmentbooze.jpg
Mar 24, 2019
Five plants for making allotment booze
Mar 24, 2019
Mar 24, 2019


In Making Tags issue 81, March, mandalas, psychology
Comment
Photography: Anna Batchelor

Photography: Anna Batchelor

Makes: templates for paper flowers

Iona Bower January 24, 2019

Give spring a little nudge and add colour to your home with a bit of simple paper floristry

If spring flowers can’t come soon enough for you, why not lead the way with some pretty paper versions? In our February issue, we have some easy-to-follow instructions on how to make paper bluebells and cherry blossoms taken from The Paper Florist: Create and Display Stunning Paper Flowers by Suzi McLaughlin (Kyle Books, out 25 February). They’re really simple; all you need are a few basic craft bits and the templates here. Just click to download the PDF templates, print them off and you’ll soon be adept at paper floristry yourself. And not an oasis in sight!

Cherry blossom template

Bluebell template

You can find all the instructions on p118 of our February ‘Soothe’ issue. But if you’re itching to get started now, why not try our project for paper lily of the valley on our blog?

Lily of the valley template

More things to make…

Featured
SIM73.MAKES_HG_Sunshine Spaces_28391.png
Aug 26, 2022
Make | Outdoor canvas hammock
Aug 26, 2022
Aug 26, 2022
SIM67.MAKES_Step3_5.png
Sep 18, 2021
Make | Dip dye stationery
Sep 18, 2021
Sep 18, 2021
Tiny Books Rachel Hazell.jpg
Sep 18, 2019
In praise of | teeny, tiny books
Sep 18, 2019
Sep 18, 2019

More from our February issue…

Featured
Feb chalkboard.jpg
Feb 27, 2019
February: a final thought
Feb 27, 2019
Feb 27, 2019
feb+cake.jpg
Feb 20, 2019
Cake facts: drizzle me this
Feb 20, 2019
Feb 20, 2019
dressing gown.jpg
Feb 16, 2019
Etiquette: dressing gowns
Feb 16, 2019
Feb 16, 2019
In Making Tags issue 80, February, papercraft, paper flowers, crafts, makes
Comment
Photography: Ben Nason

Photography: Ben Nason

Make: paper lily of the valley blooms

Iona Bower January 24, 2019

Pretty white paper flowers that are pretty simple to shape

 You will need:

Template (click to print out the PDF from our blog)

Crepe paper in different shades of cream and white

Thin wire

Green floral tape

Green paper

Small sharp scissors

1 Cut crepe paper in the shape of the template.

2 Roll it, using a finger to roll the paper around into the shape of a bell, twist the paper at the top and wrap a piece of wire around it to give it a stem.

3 Make 5 or 6 bells before you attach them all to one long piece of wire, one after the other. Wrap floral tape around the wire.

4 Cut leaves out of green paper and attach them to the wire, then once again cover the wire with the floral tape.

5 Keep on going until you have a whole bouquet.

Adapted from Paper Poetry by Helene and Simone Bendix (Kyle Books). Photography: Ben Nason.

Get hold of your copy of this month's The Simple Things - buy, download or subscribe

More craft projects for February…

Featured
Dip Dye Candles.jpg
Oct 27, 2024
Make | Dip Dye Candles
Oct 27, 2024
Oct 27, 2024
LaylasLeash.jpg
Sep 18, 2024
Make | A Macrame Dog Lead
Sep 18, 2024
Sep 18, 2024
EGGShell-tealights-the-simple-things.png
Apr 10, 2023
Eggshell tea lights
Apr 10, 2023
Apr 10, 2023

More from our February issue…

Featured
Feb chalkboard.jpg
Feb 27, 2019
February: a final thought
Feb 27, 2019
Feb 27, 2019
feb+cake.jpg
Feb 20, 2019
Cake facts: drizzle me this
Feb 20, 2019
Feb 20, 2019
dressing gown.jpg
Feb 16, 2019
Etiquette: dressing gowns
Feb 16, 2019
Feb 16, 2019


In Making Tags issue 80, February, Papercraft, paper, makes
Comment
Image and recipe: Kirstie Young

Image and recipe: Kirstie Young

Recipe: Seville and Blood Orange Marmalade

David Parker January 12, 2019

With Seville oranges in season, it's marmalade time. And this blood orange recipe celebrates all that's flavoursome about the citrus classic.

Seville and blood orange marmalade

Preparation time: 30 minutes 
Cooking time: 90 minutes

500g Seville oranges 
500g blood oranges 
1kg granulated sugar 

You will need:
Muslin cloth
Kitchen string
3 large jam jars (or 6 small ones)
Jam thermometer

1 Clean the oranges well and place whole into a large pan. Cover with 4 pints of water (2.25l) and bring to the boil. Reduce to simmer for 1 hour or until the fruit is soft.
2 Remove the oranges from the pan, without discarding any of the cooking liquid, and set aside to cool. Measure out 3 pints of the cooking liquid, topping up if needed with more water.
3 Halve the cooled oranges and scoop out the flesh and pips into a muslin cloth (or white tea-towel); tie with food-safe string. 
4 Place the muslin package into the pan with the 3 pints of cooking liquid.
5 Slice the orange peel as preferred. Add to the pan. Add the sugar and stir over a low heat until dissolved. Bring to a rolling boil for 15 mins. After this time, keep boiling at a lower temp until the liquid reaches 105C. Take off the heat and let sit for a moment before skimming off any scum from the top of the liquid. Pour into hot, sterilised jam jars and seal. 

This blog was first published in January 2012. Pick up our January 2020 for lots more delicious things to do with oranges and lemons.

From our January issue…

Featured
back cover.JPG
Jan 22, 2020
January | a final thought
Jan 22, 2020
Jan 22, 2020
No more sick days bath soak Shutterstock.jpg
Jan 18, 2020
Make | No More Sick Days bath soak
Jan 18, 2020
Jan 18, 2020
Snow day pic Alamy.jpg
Jan 15, 2020
Winter | a suggested snow day timetable
Jan 15, 2020
Jan 15, 2020

More preserves to make…

Featured
jammie dodgers Louise Gorrod.jpg
Nov 6, 2021
Recipe | Homemade Jammie Dodgers
Nov 6, 2021
Nov 6, 2021
Mar 14, 2021
Recipe: Goose egg lemon curd
Mar 14, 2021
Mar 14, 2021
seville-and-blood-orange-marmalade-recipe.png
Jan 12, 2019
Recipe: Seville and Blood Orange Marmalade
Jan 12, 2019
Jan 12, 2019


In Living, Making, Eating Tags jam, preserving, marmalade, january, issue 31, recipe
Comment
Photography: Heather Birnie

Photography: Heather Birnie

How to: get started with knitting

Iona Bower January 9, 2019

If you’ve never picked up the needles, here’s how to click-clack your way to knitting knowhow

Knitting is one of those skills that looks terrifying until you’ve tried it. We’ve put together a brief guide on how to get started. If you’re inspired to try more, buy our January issue (in shops now) in which knitting guru Helen Hickman of Nellie and Eve has devised two chunky wool projects to knit on big needles (including the chunky cushion, pictured), ideal for knitting novices or stitching queens who fancy a quick and simple project.

How to cast on

1 Create a slip knot on your left needle and insert the point of the right needle through the knot from front to back (so needles are crossed).

2 Take the end of the yarn and wrap it clockwise over the top of the right needle (behind the left). Keeping the end of the wrapped yarn in your right hand, pull the right needle towards you, bringing the needle tip in front of and above the left needle: this creates a loop on the right needle.

3 Move the right needle to the tip of the left one and transfer the new loop across to the left needle (as you do this, the needle tips should be pointing at each other, not parallel).

4 Adjust the loop size by pulling the end of the yarn. You should now have two loops on the left needle.

5 Inserting your right needle into the new loop, repeat the process until you have the number of stitches required.

Knit stitch

Garter stitch is when all rows are in knit stitch, rather than alternated with rows of purl. The needle with the cast- on stitches should be in your left hand and the yarn at the back of the work.

1 Insert the right needle through the first stitch on the left needle, from front to back (so the two needles are crossed).

2 Take the end of the yarn and wrap it clockwise over the top of the right needle (behind the left needle). Keeping the end of the wrapped yarn in your right hand, pull the right needle towards you, bringing the needle tip in front of and above the left needle: this creates a loop on the right needle.

3 Release the old stitch off the left needle.

4 Repeat steps 1 to 3, until all stitches are on the right needle.

5 Next, swap the needles around and repeat steps above.

This will all make sense if you visit nellieandeve.co.uk/events/videos

Get hold of your copy of this month's The Simple Things - buy, download or subscribe

More simple makes for craft beginners…

Featured
Jumper blanket.jpg
Oct 4, 2025
Make | An Upcycled Jumper Blanket
Oct 4, 2025
Oct 4, 2025
Lavender eye pillow.jpg
Jul 22, 2023
Make | A Soothing Lavender Eye Pillow
Jul 22, 2023
Jul 22, 2023
Modern Crochet Style PAGES2.PRESS 60.jpg
Apr 19, 2023
Weekend Project | Crocheted fruit placemats
Apr 19, 2023
Apr 19, 2023

More from our January issue…

Featured
SIM79.CHALKBOARD_ST Back Jan19_01.JPG
Jan 29, 2019
January: a final thought
Jan 29, 2019
Jan 29, 2019
Up Helly Aa.jpg
Jan 28, 2019
How to: Party like a Viking
Jan 28, 2019
Jan 28, 2019
cabbage.jpg
Jan 26, 2019
Cabbage: a prince among brassica
Jan 26, 2019
Jan 26, 2019
In Making Tags issue 79, January, knitting, knits, makes, craft, how to make
Comment
Jelly Mould pendant shades by Re-Found Objects

Jelly Mould pendant shades by Re-Found Objects

Bringing light to dark days

Iona Bower January 8, 2019

How to love your lighting - and perhaps design your very own shade…

Long, january evenings provide us with good reason to celebrate lighting up the dark. Whether it’s spending a quiet hour with a scented candle, or rethinking your entire lighting scheme in your home.

In our January issue’s The Comfort of Things feature, Clare Gogerty waxes lyrical on the positive vibes good lighting can bring to your home: “Coming home and switching on the lights banishes the darkness, replacing it not just with visibility but with emotional reassurance.”

There’s more on why lighting is so important to our homes in the January issue. However, if you’re inspired to really throw yourself at a lighting project you will also not want to miss The Simple Things’ Lampshade Making Workshop on Saturday 23 February in Hove, East Sussex.

The course is run with Lume Lighting’s Joanna Corney, a maker and designer who has run her homeware business for several years and will take place at her lovely working studio by the sea, in Hove.

The workshop is exclusively for The Simple Things readers and is ideal for beginners who want to learn the craft of contemporary lampshade making. You’ll be given all the skills you need to make your very own custom shade, meeting like-minded people and eating some delicious food along the way. You’ll make either a 20cm or 30cm diameter fabric drum lampshade, which can be used on a lamp base or ceiling pendant. At the end of the workshop you will go home with your very own bespoke lampshade – perhaps just the first of many more beautiful customised designs.

COURSE DETAILS

The Simple Things’ Lampshade Making Workshop, which has seven places available, will be held at Joanna’s studio in Hove, East Sussex, on Saturday 23 Feburary 2019. Time: 10.30am–3.30pm. Ticket price: £60, including all tools and materials for the class, plus tea, coffee, cake and lunch. You’ll need to make your own way there and home. The only thing you need to bring is the fabric of your choice to cover your lampshade.  

HOW TO BOOK

Email hello@lumelighting.co.uk. Joanna’s website is lumelighting.co.uk.

Get hold of your copy of this month's The Simple Things - buy, download or subscribe


More from the January issue…

Featured
SIM79.CHALKBOARD_ST Back Jan19_01.JPG
Jan 29, 2019
January: a final thought
Jan 29, 2019
Jan 29, 2019
Up Helly Aa.jpg
Jan 28, 2019
How to: Party like a Viking
Jan 28, 2019
Jan 28, 2019
cabbage.jpg
Jan 26, 2019
Cabbage: a prince among brassica
Jan 26, 2019
Jan 26, 2019

More ways to bring light to your home…

Featured
jelly light shades.jpg
Jan 8, 2019
Bringing light to dark days
Jan 8, 2019
Jan 8, 2019
SIM73.COMFORTOFTHINGS_Lights 4 funMovie Night Glamping Lifestyle.png
Jul 14, 2018
The Comfort of Things | A guide to outdoor lighting
Jul 14, 2018
Jul 14, 2018
the stuff of life shop
Feb 26, 2016
Create the perfect workspace with The Stuff of Life
Feb 26, 2016
Feb 26, 2016


In Living, Making Tags issue 79, january, the comfort of things, lighting, homes, interiors
Comment
Microphone.jpg

How to create a podcast

Iona Bower December 13, 2018

In our January issue, podcaster Kat Brown introduces some of her favourite podcasts out there. Fancy making your own? Follow Kat’s steps to give it a go:

  • Find a theme you’re passionate about, and make a plan for how each episode will run. Will you have a co-host? When can you record? How many episodes will you aim for?

  • Record in a small, quiet space that won’t echo or have eg trains running through it.

  • Allow a mic per person, ideally – Blue Yeti Snowballs aren’t too pricy – or get a table mic. Keep it on a mat so it doesn’t knock over, and use a good pair of headphones to keep an ear on sound levels.

  • If your interviewee is remote, programmes like Zencastr allow you to record each end of the interview and save the files. Make sure to plug a mic into your computer.

  • Audacity is a good, free tool for editing audio – it looks tricky, but there are plenty of sensible YouTube tutorials.

  • Choose a podcast server – there are plenty, and opinions are divided on which ones are best. Libsyn and Podbean are popular choices.

  • Record and publish a ‘zero episode’, a trailer that will make people aware of your and give listeners something to subscribe to before launch day!

  • Get the word out there – create a social media profile, send out a press release, get people in your community talking about it. Be passionate and proud – it’s catching.

  • Make sure any guests you have agree to publicise their episode. Send them a piece of artwork and/or the link afterwards to make it easier.

  • If you’re on Facebook, Helen Zaltzman’s incredibly useful Podcasters’ Support Group is a haven of advice, from good free music, to logo design.

More new year inspiration…

Featured
9.new years final.png
Dec 31, 2024
How to | Make a Could-Do List Happen
Dec 31, 2024
Dec 31, 2024
Back cover.JPG
Dec 31, 2022
Think | Fresh, slow starts
Dec 31, 2022
Dec 31, 2022
Could do list.JPG
Dec 31, 2021
January | Could-do lists
Dec 31, 2021
Dec 31, 2021

More from our January issue…

Featured
SIM79.CHALKBOARD_ST Back Jan19_01.JPG
Jan 29, 2019
January: a final thought
Jan 29, 2019
Jan 29, 2019
Up Helly Aa.jpg
Jan 28, 2019
How to: Party like a Viking
Jan 28, 2019
Jan 28, 2019
cabbage.jpg
Jan 26, 2019
Cabbage: a prince among brassica
Jan 26, 2019
Jan 26, 2019
In Making Tags issue 79, podcasts, hobbies, learn something new, learn a new skill
Comment

Make: Ornament cards

David Parker November 23, 2018

During the build-up to Christmas, spare a thought for the postie with his bag full of cards. The British send more per person than any other country, so it’s not surprising that we were the originators of the first commercial Christmas card, in 1843. We have a fine tradition of making cards, too – even Queen Victoria had her kids at it.

And the Queen was spot on: making your own cards is a satisfyingly easy way to add personality and sparkle (depending on how liberal you are with the glitter) to your Christmas. It will even save you some money, too. These clever cards can be adjusted to size to allow for any desired festive greeting, whether it’s a to- the-point ‘Merry Christmas’ or a lengthier salutation. They can also double as gift tags or ornaments.

You will need:
Colourful card
9–10cm bowl or other circular shape to use as a template
Pencil
Washi tape (Japanese masking tape: there’s a colourful selection available from www.papermash.co.uk)
Glitter tape
Scissors
Hole punch
Ribbon, twine or string
Glue (optional)


Step one

Fold a piece of card in half. Trace around the bowl carefully, leaving approximately 1.25cm of space by the fold. Apply a strip of metallic washi tape to fill the space between the fold and the top of the circle shape.

STEP TWO

Cut out your ornament shape, keeping inside the pencil outline all the way round – you don’t want any lines to be visible on your finished card. Cut a straight line down each side of the metallic tape to shape the top of the ornament.

STEP THREE

Decorate the card with strips of glitter and washi tape. To make small glitter dots, use a hole punch. You can decorate both sides of the card if you like.

STEP FOUR

To create a slightly different look, get inspired by the swirls of peppermint lollipops. Mark the centre on your circle, then position triangular-shaped strips of glitter tape so that the points meet in the middle. Trim tape ends.

STEP FIVE

Open up the card and punch a small hole in the centre of the tab. Cut a piece of twine or ribbon approximately 25cm long. Fold the length in half, tie the loose ends together, then feed the looped end through the hole at the fold of the card. The knotted end will be hidden neatly inside the card when it’s closed.

STEP SIX

To make them into ornaments, decorate both sides, add the string, then dab a bit of glue in the centre to fix the two sides together. Allow to dry before hanging on your tree.

Make it mini

Handmade gift tags are a sweet finishing touch. Punch or cut circles out of card before decorating them with glitter tape.

This craft idea was first published in our December 2014 issue. MARISA EDGHILL is a Canadian craft designer and lover of pretty tapes. Her book Washi Style: Make It With Paper Tape (Search Press) is available in bookshops and online. Marisa can be found blogging at www.omiyageblogs.ca and shares crafty inspiration on Instagram @omiyage_ca.

Get hold of your copy of this month's The Simple Things - buy, download or subscribe

From our December issue…

Featured
sun bread.jpg
Dec 21, 2021
Bake: sun bread for Yule
Dec 21, 2021
Dec 21, 2021
xmas cover.jpg
Dec 25, 2018
December: a final thought
Dec 25, 2018
Dec 25, 2018
donkey pic.jpg
Dec 15, 2018
Meet the donkeys of the New Forest
Dec 15, 2018
Dec 15, 2018

More things to make…

Featured
Jumper blanket.jpg
Oct 4, 2025
Make | An Upcycled Jumper Blanket
Oct 4, 2025
Oct 4, 2025
Lavender eye pillow.jpg
Jul 22, 2023
Make | A Soothing Lavender Eye Pillow
Jul 22, 2023
Jul 22, 2023
Modern Crochet Style PAGES2.PRESS 60.jpg
Apr 19, 2023
Weekend Project | Crocheted fruit placemats
Apr 19, 2023
Apr 19, 2023
In Making, Nest Tags christmas, issue 30, december, christmas card, christmas decorations
1 Comment
Project by Roma McLaughlin

Project by Roma McLaughlin

Make | Silhouette portrait

Lottie Storey October 6, 2018

PUT KNIFE TO PAPER FOR A CLEVER VERSION OF THE FAMILY SNAP

You will need:
Cutting mat
1 sheet lightweight A4 black paper, 80–120 gsm
1 sheet lightweight A4 white copy paper, max 80 gsm, for templates
1 sheet mid-weight A4 white craft paper, min 120 gsm, for background
Sticky tape
Craft knife or scalpel, with blades
Metal ruler
Pencil
Eraser
PVA glue
Toothpick or cocktail stick
A4 picture frame
A family photograph
Photocopier or scanner

1 Find a family photograph in which individuals or a group are in silhouette, with their outlines clearly visible (photos taken against a wall or plain background work best) – ideally, individual silhouettes would just join or overlap within a group composition, so they remain recognisable. Photocopy and enlarge the photo if necessary to fit A4 size and then trace the relevant outline onto an A4 sheet of copy paper to make a template.

2 Place the template over your sheet of black paper and attach both to your cutting mat with a piece of sticky tape placed over the corners (take care not to place tape over the image area).

3 Start cutting away the white, negative shapes with a scalpel — begin with the smallest areas, to help prevent your paper from tearing. You’ll be cutting both the template sheet and black paper simultaneously. Anchor the cutting mat with one hand, and work with the blade in your other, holding it vertically, like a pencil, for greater precision. It will help you to keep the blade straight if you move the whole mat around while cutting shapes.

4 Continue to work until all of the white paper is cut away, using a metal ruler with your scalpel for any straight lines.

5 Carefully remove your template and finished papercut from the cutting mat and separate the two.

6 Fixing mistakes is not impossible. If you’ve cut too much or too far, you can mend the area from the back. Simply dot glue onto the papercut surface using a toothpick or cocktail stick, then ‘patch’ the area using a tiny scrap of black paper.

7 Place the finished silhouette centrally onto your A4 white background paper sheet and mark its position lightly with pencil dots (these can be erased later).

8 Turn the silhouette over and, again using PVA glue and a toothpick or cocktail stick, dot glue onto the reverse (you don’t need to cover the surface with glue — this should be enough). Position the silhouette, right side up, in line with your previous pencil marks, and smooth down onto the backing sheet. Leave to dry completely.

9 You can now frame your piece. Use a flat frame and sandwich the silhouette between glass and backing.

Adapted from V&A Paper Crafts: A Maker’s Guide (Thames & Hudson in association with the V&A).

  Buy ,  download  or  subscribe   See the sample of our latest issue  here   Order  our new Celebrations Anthology   Pre-order a copy of  Flourish 4 , our new wellbeing bookazine&nbsp;  Listen to  our podcast  – Small Ways to Live Well

Get hold of your copy of this month's The Simple Things - buy, download or subscribe

View the sampler here


More from the October issue:

Featured
back cover 76.png
Dec 21, 2020
It's better to light a candle than curse the darkness
Dec 21, 2020
Dec 21, 2020
SIM76.TODAY,TOMORROW,TOKEEP_Hazelnuts-Pesto-7353.jpg
May 9, 2020
Cook | hazelnut pesto and gnocchi with fennel
May 9, 2020
May 9, 2020
the simple things gift subscription.png
Oct 23, 2018
Christmas gift subscription offer
Oct 23, 2018

Christmas gift subscription offer from The Simple Things magazine. Treat friends and family to a gift subscription this Christmas and we'll do the wrapping and sending for you. Just £44 – saving 26%* on the usual cover price.

Oct 23, 2018

More weekend projects to make:

Featured
Lanyard & Key Fob.jpg
Jun 1, 2025
Project | Make a Scrap fabric Key Fob
Jun 1, 2025
Jun 1, 2025
TEA COSY JUMPER.jpg
Jan 25, 2025
How to | Make a Tea Cosy from an Old Jumper
Jan 25, 2025
Jan 25, 2025
Wellbeing.jpg
Feb 11, 2024
Make | Kitchen Face Masks
Feb 11, 2024
Feb 11, 2024
In Making Tags make, weekend project, Make project, issue 76, october
Comment
chickweed aloe aftersun ice cubes.jpeg

Ice cube aftersun

Lottie Storey August 8, 2018

Not for your G&T but to apply to sunburnt skin, these clever DIY cubes are natural coolers

The soothing anti-inflammatory properties of chickweed and aloe mean these cubes are also good for easing the symptoms of rashes or bites, too.

Chickweed & aloe cooling cubes

100g fresh aloe vera gel (see method) or pre-mixed aloe vera gel
2 handfuls of fresh chickweed (see below)

1 If you’re making fresh, slice the gel from the inner aloe leaves, taking care to discard the inner green and yellow leaf lining. Measure the gel (you need 100g).

2 Put the gel into a blender with the chickweed and blitz until combined.

3 Spoon into ice cube trays and freeze until solid (the cubes will keep for up to a year in
the freezer).

4 To use, apply a frozen cube to the affected area as and when required.

Notes about chickweed: The plant has numerous tiny white flowers and is recognisable by a single line of hairs that grows up the stem between each leaf node and swaps over to a different side after each leaf. Chickweed works wonders for itchy or inflamed skin. Simply squeeze the fresh juice from the plant directly onto the skin to soothe nettle stings, skin rashes and eczema.

Recipe from Handmade Apothecary by Vicky Chown & Kim Walker (Kyle Books).


  Buy ,  download  or  subscribe   See the sample of our latest issue  here   Order  our new Celebrations Anthology   Pre-order a copy of  Flourish 4 , our new wellbeing bookazine&nbsp;  Listen to  our podcast  – Small Ways to Live Well

Get hold of your copy of this month's The Simple Things - buy, download or subscribe

View the sampler here.


More from the August issue:

Featured
SIM74.MYPLOT_IMG_0730.png
Aug 28, 2018
Six medicinal herbs worth growing
Aug 28, 2018
Read More →
Aug 28, 2018
SIM74.COMFORT_MINI MODERNS Pavilion Reed Diffuser - Gin Fizz 200ml.png
Aug 26, 2018
The Comfort of Things | A guide to home fragrance
Aug 26, 2018
Read More →
Aug 26, 2018
SIM74.HOMETOUR_Bureaux_House_Pod_Idladla_17.png
Aug 24, 2018
The tiny house movement
Aug 24, 2018
Read More →
Aug 24, 2018

More home remedies:

Featured
chickweed aloe aftersun ice cubes.jpeg
Aug 8, 2018
Ice cube aftersun
Aug 8, 2018
Aug 8, 2018
Jelly Fish.png
Jul 6, 2018
Natural first aid | Jellyfish stings
Jul 6, 2018
Jul 6, 2018
SIM71.FORAGING_Elderflower Cleanser a1 .png
May 26, 2018
Elderflower toner
May 26, 2018
May 26, 2018
In Making Tags issue 74, august, home remedies, summer, sun, aftersun
Comment
SIM72.PROCESSIONS_Suffrage banner, 1908 - 1914 © The Women's Library @ LSE (2).png

Make your own pennant or flag

Lottie Storey June 7, 2018

On Sunday 10 June, marches to celebrate 100 years of votes for women will take place across the UK - read more here and on page 33 of June's The Simple Things.

Want to take part? You'll need to make a pennant or flag - here's how. Pennants and flags can have a word, name, image or quotation on them. Make them from one layer of cloth in the lightest of materials, to let them float in the wind.

YOU WILL NEED

18mm diameter pole*
Square or rectangle of fabric of a size of your choice (the bigger it is the harder it will be to carry)
Pencil and paper
Computer printer
Sewing machine
Bondaweb (buy from jaycotts.co.uk)
Iron
Embroidery threads and needle (optional)

1 To make a pennant, cut out a triangle from your fabric of whatever size you like.
2 Create a side channel on the straight edge, 71⁄2cm wide, by folding the edge over. Sew down the edge. Then sew across its top, leaving the bottom edge of the side channel open for the pole to slide into.
3 What do you want to say? Think of a word, message or image to go on your pennant or flag – it should be something to help people to understand your message quickly. Using a computer, draw them up to a scale that fits your cloth.
4 Print off your lettering in the size you need. The lettering should be as big as your cloth allows. Trace your lettering and image(s) onto Bondaweb.
5 Iron the Bondaweb to the back of your chosen fabrics, cut out, peel off the backing paper, iron the lettering and images onto your cloth.
6 If you want, you can embroider on details; ribbon the sides of your cloth to frame it in a contrasting colour; add fringing or tassels to give it movement, and sequins or beads to make it gleam. Or just keep it as a simple cloth with a clear message of what matters to you. The pennant should be secure, but you can glue the material to where it meets the pole if you think it needs further support or to stop it slipping down the pole.

FOR AN EYE-CATCHING BANNER...

Clare’s suggestions to help your creation stand out

  • Your banner will only be seen for a moment as it passes by so keep it simple and bold.

  • Don’t crowd your letters. They need space to be read at distance, so use the largest font you can.

  • You can make it personal with your own handwriting or family photographs.

  • Make it glitter in the sun with gold fabric or sequins.

  • Don’t worry about exquisite stitching; no one will notice. What they will remember is the feel of it, what it says of you.

Project by Clare Hunter, sewingmatters.co.uk

*Your pole can be long enough to enable you to carry a pennant like a flag on a parade, or, if you use one the same width as your triangle, it can be hung on a wall with hooks.


  Buy ,  download  or  subscribe   See the sample of our latest issue  here   Order  our new Celebrations Anthology   Pre-order a copy of  Flourish 4 , our new wellbeing bookazine&nbsp;  Listen to  our podcast  – Small Ways to Live Well

Get hold of your copy of this month's The Simple Things - buy, download or subscribe

View the sampler here


More from the June issue:

Featured
DSC_1557.png
Jun 26, 2018
Nest | Delphiniums
Jun 26, 2018
Jun 26, 2018
SIM72.STYLE_ulls271438_1.png
Jun 23, 2018
Simple style | Sandals
Jun 23, 2018
Jun 23, 2018
SIM72.HIDDENHUT_THH_Samphire_Frittata_Salad-1290-Edit-Edit.png
Jun 22, 2018
Recipe | Samphire frittata with warm lemony courgette salad
Jun 22, 2018
Jun 22, 2018

More weekend projects to make:

Featured
Lanyard & Key Fob.jpg
Jun 1, 2025
Project | Make a Scrap fabric Key Fob
Jun 1, 2025
Jun 1, 2025
TEA COSY JUMPER.jpg
Jan 25, 2025
How to | Make a Tea Cosy from an Old Jumper
Jan 25, 2025
Jan 25, 2025
Wellbeing.jpg
Feb 11, 2024
Make | Kitchen Face Masks
Feb 11, 2024
Feb 11, 2024
In Making Tags make, weekend project, Make project, issue 72, june
Comment
  • Blog
  • Older
  • Newer
Featured
  Buy ,  download  or  subscribe   See the sample of our latest issue  here   Order  our new Celebrations Anthology   Pre-order a copy of  Flourish 4 , our new wellbeing bookazine&nbsp;  Listen to  our podcast  – Small Ways to Live Well
Aug 29, 2025
Aug 29, 2025

Buy, download or subscribe

See the sample of our latest issue here

Order our new Celebrations Anthology

Pre-order a copy of Flourish 4, our new wellbeing bookazine 

Listen to our podcast – Small Ways to Live Well

Aug 29, 2025
Join our Newsletter
Name
Email *

We respect your privacy and won't share your data.

email marketing by activecampaign
facebook-unauth twitter pinterest spotify instagram
  • Subscriber Login
  • Stockists
  • Advertise
  • Contact

The Simple Things is published by Iceberg Press

The Simple Things

Taking time to live well

We celebrate slowing down, enjoying what you have, making the most of where you live, enjoying the company of of friends and family, and feeding them well. We like to grow some of our own vegetables, visit local markets, rummage for vintage finds, and decorate our home with the plunder. We love being outdoors and enjoy the satisfaction that comes with a job well done.

facebook-unauth twitter pinterest spotify instagram