The Simple Things

Taking time to live well
  • Home
  • Subscribe
  • SHOP
  • Newsletter
  • About
  • Work with us
  • Home
  • Subscribe
  • SHOP
  • Newsletter
  • About
  • Work with us

Blog

Taking Time to Live Well

  • All
  • Chalkboard
  • Christmas
  • Competition
  • could do
  • Eating
  • Escape
  • Escaping
  • Fresh
  • Fun
  • gardening
  • Gathered
  • Gathering
  • Growing
  • Haikus
  • Interview
  • Living
  • Looking back
  • Magazine
  • magical creatures
  • Making
  • Miscellany
  • My Neighbourhood
  • Nature
  • Nest
  • Nesting
  • outing
  • playlist
  • Reader event
  • Reader offer
  • Shop
  • Sponsored post
  • Sunday Best
  • Think
  • Uncategorized
  • Wellbeing
  • Wisdom
Illustration: Kavel Rafferty

Illustration: Kavel Rafferty

Make: an upcycled hanging tomato planter

Iona Bower March 31, 2019

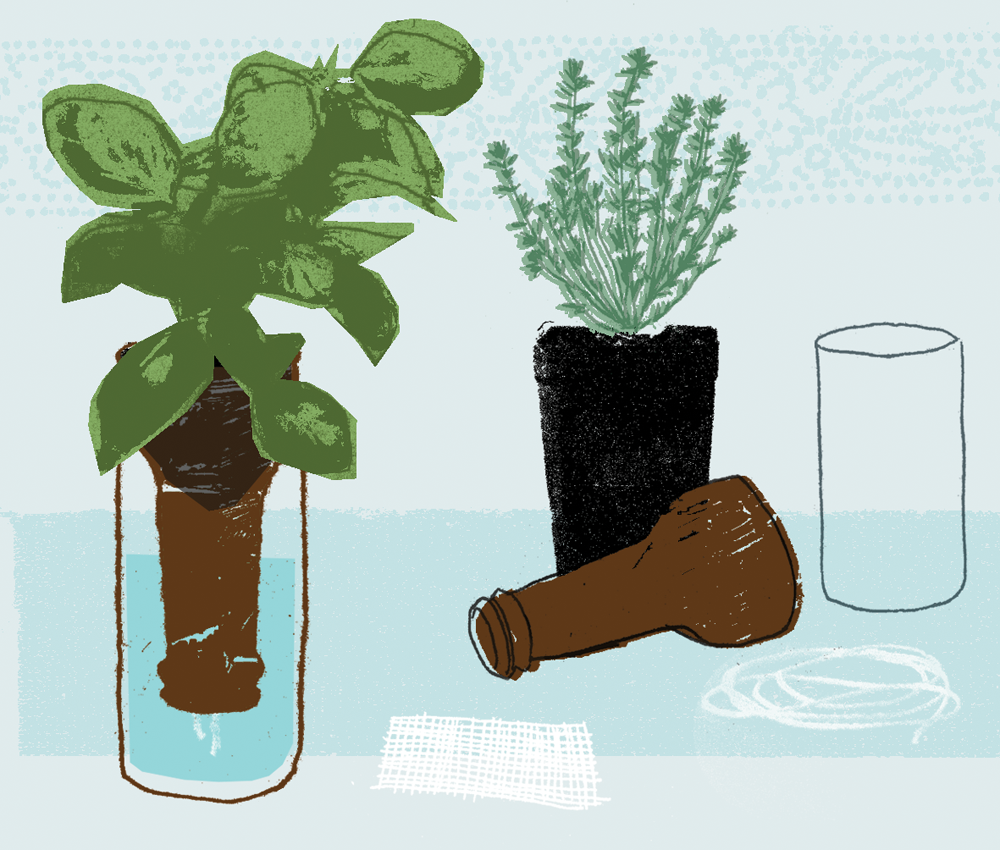
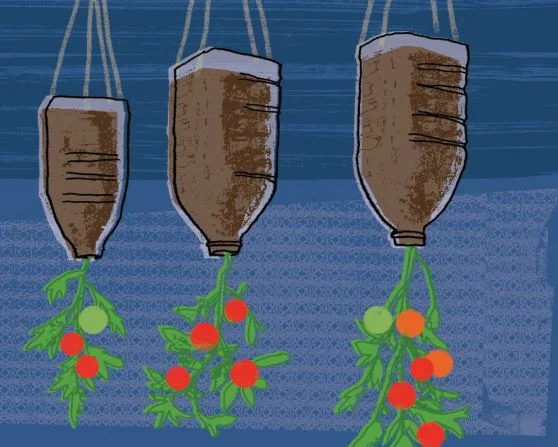
Repurpose a plastic bottle and have tomatoes hanging around all summer

This simple project can be done in an hour and you’ll have cherry tomatoes dangling temptingly by the back door ready for salads all summer long. We recommend you make lots and hang them together in bunches. Green plastic bottles look most attractive if you have them but any will do.

You will need:

Used plastic bottles, between two and four litres

Cherry tomato plant seedlings

Masking tape

Hole punch

Knife

Strong twine

Soil

1 Clean your plastic bottles, removing any labels. Carefully cut away the bottom of the bottle.

2 Seal over the jagged edge with masking tape; then, using the hole punch, make four holes in the tape, one on each side of the bottle.

3 With the mouth of the bottle facing down, insert your tomato seedling and carefully work the plant into the mouth. Then spread the root ball out inside the bottle.

4 Fill the bottle three-quarters full with compost.

5 Thread your twine through the holes and tie securely together.

6 Hang somewhere sunny and water really regularly.

Get hold of your copy of this month's The Simple Things - buy, download or subscribe


More from our April issue…

Featured
Back cover.JPG
Apr 26, 2019
April: a final thought
Apr 26, 2019
Apr 26, 2019
Green and clean oven gel pic.jpg
Apr 22, 2019
Make: your own clean, green oven gel
Apr 22, 2019
Apr 22, 2019
Charlie and Cho Factory pic.jpg
Apr 14, 2019
Game: Charlie and the Chocolate Factory Puzzler
Apr 14, 2019
Apr 14, 2019

More garden hacks…

Featured
SIM82.MISCELLANY_Tomatoes.jpg
Mar 31, 2019
Make: an upcycled hanging tomato planter
Mar 31, 2019
Mar 31, 2019
SIM76-home-hacks-heater.jpg
Sep 27, 2018
Home hacks | Make a terracotta heater
Sep 27, 2018
Sep 27, 2018
75Herb-self-watering.png
Aug 30, 2018
Garden hacks | Make a self-watering herb garden
Aug 30, 2018
Aug 30, 2018
In Making Tags issue 82, April, makes, Make project, garden hacks, recycling
Comment
Illustration: Kavel Rafferty

Illustration: Kavel Rafferty

Home hacks | Make a terracotta heater

Lottie Storey September 27, 2018

It’s an effective use of all those Ikea tealights, and creates enough heat to keep a room toasty (and energy bills down).

You will need:
4 tealights
Metal loaf tin
Matches or a lighter 2 bricks
Cooling rack
2 terracotta flower pots: one should fit inside the other, with about 2cm of space between the two
Small piece of foil

1 Pop the tealights in the loaf tin and light. Then add a brick on either side of the tin and place the rack on top.
2 Position the smaller of the two pots upside down on the rack, right over the candles.
3 Cover the hole in the bottom of the pot with foil.
4 Then put the larger pot over the first.
5 If and when the candles go out, just slide out the tin to relight or swap in a new tealight.

Note: It heats up quickly and will be too hot to touch after about half an hour, so keep kids and pets away.


  Buy ,  download  or  subscribe   See the sample of our latest issue  here   Buy a copy of our latest anthology:  A Year of Celebrations   Buy a copy of  Flourish 2 , our wellbeing bookazine  Listen to  our podcast  - Small Ways to Live Well

Get hold of your copy of this month's The Simple Things - buy, download or subscribe

View the sampler here.


More from the October issue:

Featured
back cover 76.png
Dec 21, 2020
It's better to light a candle than curse the darkness
Dec 21, 2020
Read More →
Dec 21, 2020
SIM76.TODAY,TOMORROW,TOKEEP_Hazelnuts-Pesto-7353.jpg
May 9, 2020
Cook | hazelnut pesto and gnocchi with fennel
May 9, 2020
Read More →
May 9, 2020
the simple things gift subscription.png
Oct 23, 2018
Christmas gift subscription offer
Oct 23, 2018

Christmas gift subscription offer from The Simple Things magazine. Treat friends and family to a gift subscription this Christmas and we'll do the wrapping and sending for you. Just £44 – saving 26%* on the usual cover price.

Read More →
Oct 23, 2018

More garden hacks:

Featured
SIM82.MISCELLANY_Tomatoes.jpg
Mar 31, 2019
Make: an upcycled hanging tomato planter
Mar 31, 2019
Mar 31, 2019
SIM76-home-hacks-heater.jpg
Sep 27, 2018
Home hacks | Make a terracotta heater
Sep 27, 2018
Sep 27, 2018
75Herb-self-watering.png
Aug 30, 2018
Garden hacks | Make a self-watering herb garden
Aug 30, 2018
Aug 30, 2018
In Miscellany Tags garden hacks, issue 76, october
Comment
Illustration: Kavel Rafferty

Illustration: Kavel Rafferty

Garden hacks | Make a self-watering herb garden

Lottie Storey August 30, 2018

Gotta lotta bottle(s)? Put them to good use with this windowsill wonder

YOU WILL NEED:
Used bottle (glass* or plastic)
Mesh
Thick string
Herbs for planting
1 Cut a bottle in two, with the base longer than the top bit.
2 Turn neck part upside down into base. Cut a length of string to reach through the neck to the bottle’s base. Add water to the bottom part. 3 Cut a piece of mesh, just big enough to rest securely over the top of the bottle’s neck.

4 Make a small hole in the centre of the mesh. Thread the string through the hole, securing with a knot, then bring string through neck of bottle, so the mesh sits in place.
5 Plant up herbs into the top part and put water in the bottom. With your string dangling in the liquid, it’ll bring the water up to the herbs.
* Buy glass-cutting kits at craft stores – there are tutorials online, or if you know people with the right tools and skills, they can help you.


  Buy ,  download  or  subscribe   See the sample of our latest issue  here   Buy a copy of our latest anthology:  A Year of Celebrations   Buy a copy of  Flourish 2 , our wellbeing bookazine  Listen to  our podcast  - Small Ways to Live Well

Get hold of your copy of this month's The Simple Things - buy, download or subscribe

View the sampler here.


More from the September issue:

Featured
happy mail.png
Sep 25, 2018
Happy mail | 5 newsletters to subscribe to
Sep 25, 2018
Read More →
Sep 25, 2018
SIM75.NEST_DSC_0236.png
Sep 24, 2018
Nest | Hydrangeas
Sep 24, 2018
Read More →
Sep 24, 2018
SIM75.OUTING_E4GKJK.png
Sep 23, 2018
Old railway tracks
Sep 23, 2018
Read More →
Sep 23, 2018

More garden hacks:

Featured
SIM82.MISCELLANY_Tomatoes.jpg
Mar 31, 2019
Make: an upcycled hanging tomato planter
Mar 31, 2019
Mar 31, 2019
SIM76-home-hacks-heater.jpg
Sep 27, 2018
Home hacks | Make a terracotta heater
Sep 27, 2018
Sep 27, 2018
75Herb-self-watering.png
Aug 30, 2018
Garden hacks | Make a self-watering herb garden
Aug 30, 2018
Aug 30, 2018
In Miscellany Tags garden hacks, Growing herbs, issue 75, september
Comment
Illustration: Joe Snow

Illustration: Joe Snow

Garden hacks | Turn a shoe-hanger into a tool rack

Lottie Storey October 11, 2017

Old shoe-hangers, re-used as somewhere to hang garden tools, mean you’ll always have your tools to hand when needed.

You will need:
An old shoe-hanger or tie-hanger
Drill
Screws
Tape measure and pencil

1 Measure where you want to install your hanger. Remember to think about the length of your tools as well as the width of the hanger.
2 Line up your hanger, marking with a pencil where to drill.
3 Drill holes and insert screws.
4 Ta-da! Your new tool-holder is ready to hang.

  Buy ,  download  or  subscribe   See the sample of our latest issue  here   Buy a copy of our latest anthology:  A Year of Celebrations   Buy a copy of  Flourish 2 , our wellbeing bookazine  Listen to  our podcast  - Small Ways to Live Well

Get hold of your copy of this month's The Simple Things - buy, download or subscribe

View the sampler here.


More from the October issue:

Featured
SIM64.GATHERING_SimpleThingsNov17_Autumn Lunch_29.png
Nov 14, 2020
Recipe | Lamb hotpot and mustardy greens
Nov 14, 2020
Nov 14, 2020
freestocks-org-62592.jpg
Oct 31, 2020
Halloween | Simple spells
Oct 31, 2020
Oct 31, 2020
Dec-17-Subs-page-image3_jwretA.png
Nov 29, 2017
Christmas | Giftwrapped subscriptions to The Simple Things
Nov 29, 2017
Nov 29, 2017

More garden hacks:

Featured
SIM82.MISCELLANY_Tomatoes.jpg
Mar 31, 2019
Make: an upcycled hanging tomato planter
Mar 31, 2019
Mar 31, 2019
SIM76-home-hacks-heater.jpg
Sep 27, 2018
Home hacks | Make a terracotta heater
Sep 27, 2018
Sep 27, 2018
75Herb-self-watering.png
Aug 30, 2018
Garden hacks | Make a self-watering herb garden
Aug 30, 2018
Aug 30, 2018
In Miscellany Tags garden hacks, miscellany, issue 64, october
Comment
garden hacks succulents.png

Garden hacks | Picture frame succulents

Lottie Storey September 19, 2017

Make your plants pretty as a picture

You will need:
An old picture frame
Thin plywood
Screws and a drill
Chicken wire
Compost mixed with horticultural grit or sand
Dibber
Succulents: try a mix of hanging plants and rosettes

1 Remove any glass from the frame and replace with chicken wire.
2 Fashion a box frame to fit on the back of the frame using the plywood and attach.
3 At the bottom of the box, drill holes to allow for drainage.
4 Fill the box with compost mix.
5 Create holes between sections of the wire mesh, adding one of your plants into each hole.
6 Leave to stand for a few weeks to bed in before hanging, so that your plants don’t fall out!

  Buy ,  download  or  subscribe   See the sample of our latest issue  here   Buy a copy of our latest anthology:  A Year of Celebrations   Buy a copy of  Flourish 2 , our wellbeing bookazine  Listen to  our podcast  - Small Ways to Live Well

Get hold of your copy of this month's The Simple Things - buy, download or subscribe

View the sampler here.


More from the September issue:

Featured
Sep 25, 2017
Nest | String of hearts
Sep 25, 2017
Sep 25, 2017
coffee and walnut mini loaf cake recipe.png
Sep 23, 2017
Recipe | Coffee & walnut mini loaf cakes
Sep 23, 2017
Sep 23, 2017
SIM63.RUBBISHARTISTS_EL Ian Berry Studio  04.jpg
Sep 22, 2017
Creativity | Meet the makers using waste as a material for art
Sep 22, 2017
Sep 22, 2017

More garden hacks:

Featured
SIM82.MISCELLANY_Tomatoes.jpg
Mar 31, 2019
Make: an upcycled hanging tomato planter
Mar 31, 2019
Mar 31, 2019
SIM76-home-hacks-heater.jpg
Sep 27, 2018
Home hacks | Make a terracotta heater
Sep 27, 2018
Sep 27, 2018
75Herb-self-watering.png
Aug 30, 2018
Garden hacks | Make a self-watering herb garden
Aug 30, 2018
Aug 30, 2018
In Miscellany Tags garden hacks, succulents, issue 63, september, miscellany
Comment
Illustration: Joe Snow

Illustration: Joe Snow

Garden hacks | Reuse cooking water on your plants

Lottie Storey August 20, 2017

Don’t let water go to waste: it can add moisture and nutrition for your plants

Get around water scarcities. Re-use cooking water. Take out whatever you’ve been cooking and let the water cool to room temperature. You can also re-use dishwashing water, if your cleaner is organic and non-oil-based. 

Add nutrients. Whatever you’ve cooked will mean that the water has extra nutrition for plants. For example, calcium from hard boiled eggs, or iron from spinach. Just avoid using water that’s been salted.

Kill weeds. Or don’t let your water have time to cool after boiling, and (carefully!) tip it over areas with weeds.


  Buy ,  download  or  subscribe   See the sample of our latest issue  here   Buy a copy of our latest anthology:  A Year of Celebrations   Buy a copy of  Flourish 2 , our wellbeing bookazine  Listen to  our podcast  - Small Ways to Live Well

Get hold of your copy of this month's The Simple Things - buy, download or subscribe

View the sampler here


More from the August issue:

Featured
Aug 28, 2017
Recipe | Vegetable crisps
Aug 28, 2017
Aug 28, 2017
Aug 26, 2017
Britain's outdoor games
Aug 26, 2017
Aug 26, 2017
Aug 20, 2017
Garden hacks | Reuse cooking water on your plants
Aug 20, 2017
Aug 20, 2017

More Garden hacks:

Featured
Allotment Shed.jpg
May 14, 2024
Outdoors | Allotment Sheds
May 14, 2024
May 14, 2024
Kale 2.jpg
Jan 31, 2023
Veg | In Praise of Kale
Jan 31, 2023
Jan 31, 2023
Recipe: January dauphinoise
Jan 21, 2023
Recipe: January dauphinoise
Jan 21, 2023
Jan 21, 2023
In Growing Tags growing, garden hacks, issue 62, august
Comment
Illustration: Joe Snow

Illustration: Joe Snow

Garden hacks | Make a colander hanging basket

Lottie Storey May 27, 2017

An old colander can be turned into a nifty hanging home for dry-loving plants

YOU WILL NEED: 
Water-permeable liner
Scissors
Old metal or plastic colander
Strong ropes or chains
Hooks strong enough to hold a container of plants and water (try your garden centre) – one per hanging basket
Compost
Water-retaining crystals
Slow-release fertiliser
Container friendly plants such as herbs, ivy or succulents

1 Cut the liner to fit snugly in the colander, then attach your rope or chains.
2 Screw your hook into where you’re hanging the colander from. 
3 Combine your compost with the crystals and fertiliser.
4 A little compost goes in the bottom of the colander, before you position your plants. Then secure around the plant roots with more compost.
5 Hang it up, and make sure to keep it well watered.


More from the May issue:

Featured
May 29, 2017
Recipe | Smoked trout, cucumber and coconut salad with dosa
May 29, 2017
May 29, 2017
May 27, 2017
Garden hacks | Make a colander hanging basket
May 27, 2017
May 27, 2017
May 26, 2017
Recipe | Picnic Pies
May 26, 2017
May 26, 2017

More gardening inspiration:

Featured
SIM82.MISCELLANY_Tomatoes.jpg
Mar 31, 2019
Make: an upcycled hanging tomato planter
Mar 31, 2019
Mar 31, 2019
SIM76-home-hacks-heater.jpg
Sep 27, 2018
Home hacks | Make a terracotta heater
Sep 27, 2018
Sep 27, 2018
75Herb-self-watering.png
Aug 30, 2018
Garden hacks | Make a self-watering herb garden
Aug 30, 2018
Aug 30, 2018
  Buy ,  download  or  subscribe   See the sample of our latest issue  here   Buy a copy of our latest anthology:  A Year of Celebrations   Buy a copy of  Flourish 2 , our wellbeing bookazine  Listen to  our podcast  - Small Ways to Live Well

Get hold of your copy of this month's The Simple Things - buy, download or subscribe

View the sampler here

In gardening, Growing Tags garden hacks, issue 59, may, gardening, makes
Comment
Illustration: Joe Snow

Illustration: Joe Snow

Garden hacks: DIY seed tapes

Lottie Storey March 19, 2017

Seed tapes – biodegradable strips with the seeds spaced at regular intervals – make planting a little easier. Simply bury the tape rather than faffing with fiddly individual seeds. Make your own and put aside for planting later.

YOU WILL NEED:
biodegradable unbleached loo roll
3 tbsp unbleached flour
1.5 tbsp water
toothpick
small spoon
pen
ruler
seeds

1 Pull off a few lengths of the loo roll. 
2 Fold in half length-wise to create a fold line. Unfold.
3 Mix flour and water into a paste. 
4 Dip the toothpick into the glue paste, before dabbing onto a seed. 
5 Place the seeds into the middle of the paper on the fold, spaced per the packet instructions.
6 Once all seeds are in place, paste along the paper edge with the spoon, before refolding to seal. 
7 Roll up, then store somewhere cool and dry in a sealed container. To plant, prepare the soil, according to packet instructions, and unfurl the tape. Cover over with soil and give it a good water.


More from the March issue:

Featured
Mar 21, 2017
March issue: One day left to buy!
Mar 21, 2017
Mar 21, 2017
Mar 19, 2017
Garden hacks: DIY seed tapes
Mar 19, 2017
Mar 19, 2017
Mar 17, 2017
How to stop procrastinating
Mar 17, 2017
Mar 17, 2017

More Garden hacks:

Featured
Allotment Shed.jpg
May 14, 2024
Outdoors | Allotment Sheds
May 14, 2024
May 14, 2024
Kale 2.jpg
Jan 31, 2023
Veg | In Praise of Kale
Jan 31, 2023
Jan 31, 2023
Recipe: January dauphinoise
Jan 21, 2023
Recipe: January dauphinoise
Jan 21, 2023
Jan 21, 2023
  Buy ,  download  or  subscribe   See the sample of our latest issue  here   Buy a copy of our latest anthology:  A Year of Celebrations   Buy a copy of  Flourish 2 , our wellbeing bookazine  Listen to  our podcast  - Small Ways to Live Well

Get hold of your copy of this month's The Simple Things - buy, download or subscribe

View the sampler here

In Growing Tags issue 57, march, seeds, growing, garden hacks
Comment
Featured
  Buy ,  download  or  subscribe   See the sample of our latest issue  here   Buy a copy of our latest anthology:  A Year of Celebrations   Buy a copy of  Flourish 2 , our wellbeing bookazine  Listen to  our podcast  - Small Ways to Live Well
Feb 27, 2025
Feb 27, 2025

Buy, download or subscribe

See the sample of our latest issue here

Buy a copy of our latest anthology: A Year of Celebrations

Buy a copy of Flourish 2, our wellbeing bookazine

Listen to our podcast - Small Ways to Live Well

Feb 27, 2025
Join our Newsletter
Name
Email *

We respect your privacy and won't share your data.

email marketing by activecampaign
facebook-unauth twitter pinterest spotify instagram
  • Subscriber Login
  • Stockists
  • Advertise
  • Contact

The Simple Things is published by Iceberg Press

The Simple Things

Taking time to live well

We celebrate slowing down, enjoying what you have, making the most of where you live, enjoying the company of of friends and family, and feeding them well. We like to grow some of our own vegetables, visit local markets, rummage for vintage finds, and decorate our home with the plunder. We love being outdoors and enjoy the satisfaction that comes with a job well done.

facebook-unauth twitter pinterest spotify instagram