The Simple Things

Taking time to live well
  • Home
  • Subscribe
  • SHOP
  • Newsletter
  • About
  • Work with us
  • Home
  • Subscribe
  • SHOP
  • Newsletter
  • About
  • Work with us

Blog

Taking Time to Live Well

  • All
  • Chalkboard
  • Christmas
  • Competition
  • could do
  • Eating
  • Escape
  • Escaping
  • Fresh
  • Fun
  • gardening
  • Gathered
  • Gathering
  • Growing
  • Haikus
  • Interview
  • Living
  • Looking back
  • Magazine
  • magical creatures
  • Making
  • Miscellany
  • My Neighbourhood
  • Nature
  • Nest
  • Nesting
  • outing
  • playlist
  • Reader event
  • Reader offer
  • Shop
  • Sponsored post
  • Sunday Best
  • Think
  • Uncategorized
  • Wellbeing
  • Wisdom
Image: Unsplash

Image: Unsplash

Make: Rosemary water

Lottie Storey August 30, 2016

A delicious  flavouring for foods, and a great tonic for hair and skin

MAKES: 300ml
KEEPS: 2 years
INGREDIENTS:
150g dried rosemary (300g fresh) 
2.5 litres water

METHOD:
1 Put everything in a pressure cooker near the sink. Close lid and remove pressure regulator to expose the vent pipe.
2 Connect a hose to the vent pipe. Pass the hose beneath the water tap and then on and into a glass collecting bottle.
3 Turn the heat to high. When water boils, open tap to let cold water cool the hose.
4 The distillation process should be slow with minimum heat. Simmer on low until you have distilled 300ml of water – in a household pressure cooker, this should take around 30-45 mins.

Found in The Domestic Alchemist: 501 Herbal Recipes for Home, Health and Happiness by Pip Waller (Leaping Hare Press).


More from the September issue:

Featured
Apr 18, 2017
Think: Discover your dosha
Apr 18, 2017
Apr 18, 2017
Sep 18, 2016
Enjoy the little things, one day you'll remember they were the big things
Sep 18, 2016
Sep 18, 2016
Sep 17, 2016
Nest: The poetry of paint names
Sep 17, 2016
Sep 17, 2016

More natural remedy recipes:

Featured
chickweed aloe aftersun ice cubes.jpeg
Aug 8, 2018
Ice cube aftersun
Aug 8, 2018
Aug 8, 2018
Jelly Fish.png
Jul 6, 2018
Natural first aid | Jellyfish stings
Jul 6, 2018
Jul 6, 2018
SIM71.FORAGING_Elderflower Cleanser a1 .png
May 26, 2018
Elderflower toner
May 26, 2018
May 26, 2018
  Buy ,  download  or  subscribe   See the sample of our latest issue  here   Order  our new Celebrations Anthology   Pre-order a copy of  Flourish 4 , our new wellbeing bookazine   Listen to  our podcast  – Small Ways to Live Well  Wear our  Sl

Get hold of your copy of this month's The Simple Things - buy, download or subscribe

View the sampler here

In Making, Miscellany Tags issue 51, september, home remedies, herbs
1 Comment

Make: Exfoliating seaweed scrub

Lottie Storey August 12, 2016

Kelp's wonderfully fresh seashore scent makes this exfoliating scrub a summer shower must-have

Exfoliating seaweed scrub

MAKES: 100g
KEEPS: At least 6 months
INGREDIENTS:
1 tbsp fine sea salt
1 tbsp kelp powder
5 tsp vegetable glycerine
7 tsp sweet almond oil
5 drops juniper essential oil
5 drops lemon essential oil

METHOD:
1 Mix the sea salt and kelp together.
2 Add the glycerine and half the almond oil and mix well. If the mixture is too stiff, add more oil until it makes a thick, gloopy paste.
3 Add the essential oils and stir really well.

Note: this recipe isn’t suitable for dry skins

Courtesy of Lynn Rawlinson. Found in The Domestic Alchemist: 501 Herbal Recipes for Home, Health and Happiness by Pip Waller (Leaping Hare Press). 
 

More from the August issue:

Featured
Aug 27, 2016
Wellbeing: How to embrace idleness
Aug 27, 2016
Aug 27, 2016
Aug 18, 2016
Recipe: Raspberry, apricot and orange ice lollies
Aug 18, 2016
Aug 18, 2016
Aug 16, 2016
Competition: Win one of three natural skincare hampers from MOA worth £110
Aug 16, 2016
Aug 16, 2016


Read more homemade remedy posts:

Featured
chickweed aloe aftersun ice cubes.jpeg
Aug 8, 2018
Ice cube aftersun
Aug 8, 2018
Aug 8, 2018
Jelly Fish.png
Jul 6, 2018
Natural first aid | Jellyfish stings
Jul 6, 2018
Jul 6, 2018
SIM71.FORAGING_Elderflower Cleanser a1 .png
May 26, 2018
Elderflower toner
May 26, 2018
May 26, 2018
  Buy ,  download  or  subscribe   See the sample of our latest issue  here   Order  our new Celebrations Anthology   Pre-order a copy of  Flourish 4 , our new wellbeing bookazine   Listen to  our podcast  – Small Ways to Live Well  Wear our  Sl

Get hold of your copy of this month's The Simple Things - buy, download or subscribe

View the sampler here

In Making, Miscellany Tags seaweed, issue 50, august, home remedies, natural skincare
Comment

Make: Homemade gardener's hand scrub

Lottie Storey June 7, 2016

Give your hands some TLC. Just because you like to get your hands dirty, doesn’t mean you want them to stay dirty. This hand scrub will combat the perma-dirt that any keen gardener is familiar with.

Homemade gardener's hand scrub

Makes 300-350g scrub

60g coconut oil, melted
60ml liquid castile soap
225g sugar
10 drops rosemary essential oil
10 drops peppermint essential oil
5 drops tea tree essential oil


1 In a medium bowl, combine the coconut oil, castile soap and sugar. Let the mixture cool, then stir vigorously with a spoon. This will “whip” the oil for a pourable but creamy texture.
2 Stir in the essential oils then scrape the scrub into a clean jam jar. The hand scrub will last six months, though the scent may fade. If the scrub begins to separate, just give it a good stir.

To use: Wet hands, spoon a generous dollop of scrub into your palms. Scrub away, paying particular attention to the sides of the fingers and crease lines where dirt likes to stick. Rinse.

Extract from The Hands-On Home: A Seasonal Guide to Cooking, Preserving, and Natural Homekeeping by Erica Strauss (Sasquatch Books). Photography by Charity Burggraaf
 

Read more from the June issue:

Featured
Jun 19, 2016
Don't mind that roses have thorns, be glad that thorns have roses
Jun 19, 2016
Jun 19, 2016
Jun 13, 2016
Recipe: Lavender lemonade
Jun 13, 2016
Jun 13, 2016
Jun 8, 2016
Gardening: Make your own organic fertiliser
Jun 8, 2016
Jun 8, 2016

More homemade cosmetics: 

Featured
Dec 26, 2016
Christmas Survival Tummy Tonic
Dec 26, 2016
Dec 26, 2016
Oct 8, 2016
Make: Luxurious Body Butter
Oct 8, 2016
Oct 8, 2016
May 31, 2016
Homemade rose face cream
May 31, 2016
May 31, 2016
  Buy ,  download  or  subscribe   See the sample of our latest issue  here   Order  our new Celebrations Anthology   Pre-order a copy of  Flourish 4 , our new wellbeing bookazine   Listen to  our podcast  – Small Ways to Live Well  Wear our  Sl

Get hold of your copy of this month's The Simple Things - buy, download or subscribe

View the sampler here

In Making Tags homemade, home remedies, hand scrub, issue 48, june, gardening
Comment
Image: Unsplash

Image: Unsplash

Homemade rose face cream

Lottie Storey May 31, 2016

When the roses are in bloom all things floral become a little addictive. Make like a kid and stir up a summer potion for your dressing table 

MAKES: 175ml
KEEPS: 6–12 months

INGREDIENTS
100g coconut oil
25ml avocado oil
1 tbsp honey
5 tsps rosewater
10–15 drops rose (or rose geranium) essential oil

METHOD
1 Melt the coconut and avocado oils and honey in a bain-marie. Warm the rosewater in a separate bowl in the bain-marie.
2 Remove from heat, and whisk the oil and honey mixture, adding a drop of rosewater.
3 Keep whisking and adding rosewater until you’ve used all of it, then whisk until it starts to solidify. Add the essential oils and whisk until well blended.
4 Keep in a sterilised jar.

Courtesy of Lynn Rawlinson. Found in The Domestic Alchemist: 501 Herbal Recipes for Home, Health and Happiness by Pip Waller (Leaping Hare Press). 

Turn to page 123 of June's The Simple Things for more Miscellany wisdom. 


More Domestic Alchemist herbal recipes:

Featured
Dec 26, 2016
Christmas Survival Tummy Tonic
Dec 26, 2016
Dec 26, 2016
Oct 8, 2016
Make: Luxurious Body Butter
Oct 8, 2016
Oct 8, 2016
May 31, 2016
Homemade rose face cream
May 31, 2016
May 31, 2016

Read more from the June issue:

Featured
Jun 19, 2016
Don't mind that roses have thorns, be glad that thorns have roses
Jun 19, 2016
Jun 19, 2016
Jun 13, 2016
Recipe: Lavender lemonade
Jun 13, 2016
Jun 13, 2016
Jun 8, 2016
Gardening: Make your own organic fertiliser
Jun 8, 2016
Jun 8, 2016
  Buy ,  download  or  subscribe   See the sample of our latest issue  here   Order  our new Celebrations Anthology   Pre-order a copy of  Flourish 4 , our new wellbeing bookazine   Listen to  our podcast  – Small Ways to Live Well  Wear our  Sl

Get hold of your copy of this month's The Simple Things - buy, download or subscribe

View the sampler here

In Making, Miscellany Tags issue 48, june, home remedies, the domestic alchemist, roses, beauty
Comment
HowToGetRidMoths.png

How to get rid of moths

Lottie Storey May 4, 2016

Moth larvae are most active when the temperature creeps over 10 degrees – about the time our woolies are put away. Act now to prevent moth munchies.

Prevention
l Only put away clean clothes. For moths, dirt is the icing on a woolly cake.
l Pack clothes in vacuum storage bags. Order from lakeland.co.uk
l Larvae loves carpet. Vacuum regularly, especially edges and under furniture.
l Lift and beat rugs.
l Moths like warm, dark spaces, so consider open wardrobes and turning the heat down.
l Lavender, conkers and cinnamon sticks are all natural repellents.

In the event of infestation:
l Put your clothes in plastic bags in the freezer for 72 hours.
l For carpets, blog.labourandwait.co.uk advises dissolving a quarter-pound of rock ammonia in about a half-gallon of boiling water. Immerse a large house-cloth, wring and lay flat on the carpet. Iron with a very hot iron until dry.


Read more:

From the May issue

Home posts

Natural remedies

  Buy ,  download  or  subscribe   See the sample of our latest issue  here   Order  our new Celebrations Anthology   Pre-order a copy of  Flourish 4 , our new wellbeing bookazine   Listen to  our podcast  – Small Ways to Live Well  Wear our  Sl

Get hold of your copy of this month's The Simple Things - buy, download or subscribe

View the sampler here

In Making Tags issue 47, may, moths, home, home remedies
1 Comment

Make your own bath bombs

Lottie Storey April 11, 2016

These bath bombs are fun to make and the reward for your efforts is a long soak in a heavenly scented bath. Kids love them and if you can bear to give them away, they make great gifts.

For about eight bombs you will need:

440g baking soda (bicarbonate of soda) 
180g cornstarch (cornflour)
220g citric acid
110g Epsom salts
2 to 4 tbsp water
food colouring (optional)
20 drops essential oil* (optional)
a stiff plastic or metal mould, like a muffin tin

1 In a large bowl, mix together the dry ingredients. In a small bowl, mix 2 tbsp of the water with the food colouring and essential oils.
2 Stirring the dry mixture constantly with a whisk, drizzle in the wet mixture a drop at a time until it just holds together if you squeeze a bit in one hand. If it doesn’t hold at all, drizzle more drops of water, one or two at a time. If you start to see fizzing, that means there is too much water in one area and you should stir that area quickly to distribute the moisture. Be warned it doesn’t take much water so keep stirring and go slow.
3 Pack the mixture into moulds tightly, then smooth the surface of each bomb. Carefully unmould them onto a flat, dry surface. If any break during unmolding, just scoop up the crumbs and repack them in the mould. Let the bath bombs dry for about 24 hours, until fully dry. They should keep for up to six months.
4 Fill a tub with hot water and drop in 1 or 2 bath bombs. Relax... 

From The Hands-On Home by Erica Strauss (Sasquatch Books).
Photography by Charity Burrgraaf.

* Try matching the colour and fragrance, eg purple with lavender essential oil and a pale yellow-green with lemongrass.


Read more:

From the April issue

Homemade salt scrubs

Homemade reed diffuser


  Buy ,  download  or  subscribe   See the sample of our latest issue  here   Order  our new Celebrations Anthology   Pre-order a copy of  Flourish 4 , our new wellbeing bookazine   Listen to  our podcast  – Small Ways to Live Well  Wear our  Sl

Get hold of your copy of this month's The Simple Things - buy, download or subscribe

View the sampler here


In Making Tags homemade, home remedies, issue 46, april, bath, school holiday ideas
Comment

Home remedy: Sleep peacefully pouch

Lottie Storey March 16, 2016

If you toss and turn, are kept awake by tomorrow’s to-do list or are troubled by bad dreams, this aromatic herb pouch will help encourage a lovely, floaty, restful sleep. 

Things you’ll need
3 tsp chamomile flowers
3 tsp peppermint
3 tsp sage
3 tsp valerian
3 tsp thyme
small piece of cotton fabric piece of string
..not a single sheep!

1 Place the ingredients in the centre of your piece of fabric and fold the corners in, so the herbs sit like the stuffing inside a cushion. Secure with string and place inside your pillowcase or next to it.

2 This is the last in our series of traditional Alpine remedies. To discover more, get a copy of Vinegar Socks by Karin Berndl & Nici Hofer (Hardie Grant) 
 

Read more:

From the March issue

Alpine remedies

Mint chocolate face pack recipe


  Buy ,  download  or  subscribe   See the sample of our latest issue  here   Order  our new Celebrations Anthology   Pre-order a copy of  Flourish 4 , our new wellbeing bookazine   Listen to  our podcast  – Small Ways to Live Well  Wear our  Sl

Get hold of your copy of this month's The Simple Things - buy, download or subscribe

View the sampler here


In Making Tags issue 45, home remedies, vinegar socks, sleep, march
Comment
Illustration: Joe Snow

Illustration: Joe Snow

Natural recipe: Mint chocolate face pack

Lottie Storey February 29, 2016

This deeply cleansing face mask is a chocolate lover’s dream. It smells divine, too – almost good enough to eat...

MAKES: almost 250ml

KEEPS: up to six months in a jar 

INGREDIENTS:
11⁄2 tbsp raw cocoa powder
1 tbsp white kaolin powder
10g dried peppermint leaves
40–60ml coconut oil

METHOD
1 Mix the dry ingredients together. 
2 Gradually add the oil until you have a thick paste.
3 Apply to cleansed skin and then leave on for 15–20 mins.
4 Wash off well and moisturise.

Found in The Domestic Alchemist: 501 Herbal Recipes for Home, Health and Happiness by Pip Waller (Leaping Hare Press). Recipe courtesy of Teri Evans.


Read more:

From the March issue

Miscellany posts

Natural remedies


Plenty more delicious recipes in the March issue of The Simple Things, out now - buy, download or subscribe

In Miscellany, Making Tags issue 45, march, home remedies, face pack, natural skincare, chocolate, the domestic alchemist
Comment
Illustration: Joe Snow

Illustration: Joe Snow

Make: A nest box for small birds

Lottie Storey January 22, 2016

Why not give our feathered friends a helping hand by making them a nest box? An old boot can create a unique bird box, as well as being a good alternative to a hole found in trees.


1 Cut a length of weatherproof wood, 15mm thick and 400mm long (check your boot fits on the board with room for a roof). Don’t use CCA pressure-treated timber, as the leachates may harm birds.

2 Cut two 150mm lengths of the same wood at right angles to make the roof. Drill and nail the pieces together, then place the roof on the backboard and drill and nail into place.

3 Attach the boot to the backboard with glue, toe facing down, and tilted forward so rain falls off. Fix, two to four metres up a tree, or a wall. Try to face the boot north-east to avoid strong sunlight and wet winds. There should be a clear flight path to the nest.

4 Different species will be attracted to different sizes of hole. Tie the laces tightly, to 25mm for blue, coal and marsh tits; 28mm for great tits, tree sparrows and pied flycatchers; 32mm for house sparrows and nuthatches and 45mm for starlings.

5 Clean the boot with boiling water in August once the birds have stopped using it to get rid of any parasites.
 

Read more:

From the January issue

Making projects

Miscellany posts


January's The Simple Things is out now - buy, download or subscribe.

In Miscellany, Making Tags issue 43, january, miscellany, making, Make project, garden, birds
Comment

Make: A macrame planter

Lottie Storey January 20, 2016


Projects to perk up the plant life in every corner of your home

Creative gardening need not be restricted to outdoors. Or, indeed, to off-the-shelf plant pots. Making a hanging plant holder is a craftier way to display greenery, and a great project for anyone finding themselves low on either time or space. 

The ancient craft of macramé was a hit with the Victorians, although it’s most associated with 1970s homespun style. Plant hangers are back, given a colourful – and, dare we say, tasteful – makeover. You can, of course, buy one (see page 8 of February’s The Simple Things), if all that knotting brings back painful memories. 


Hanging plant holder

 
You will need: 
textile yarn* 
scissors
2 plant pots, ideally already containing a plant


1 Cut five pieces of the textile yarn, each of about 4m long, and one more of about 40cm (you can adjust the measurements to your desired length).
2 Fold each of the longer pieces of yarn in half. Group all the folds together, then create a loop by wrapping the smaller piece of yarn around the grouped threads several times and tying firmly (A). 
3 Divide the 10 pieces of hanging yarn into five pairs (B). 
4 About 20cm below the top loop, take the first two threads and knot them together. Repeat for each of the pairs (C). 
5 Then, take the right hand thread from the first pair and, further down, knot it with the left hand thread from the second pair. Repeat for each thread until each piece of thread is tied to another (D). 
6 Repeat the process down the length of the yarn. The bigger you make the gap between the knots, the more space you’ll have for the pot, but you’ll need to make the knots closer together to hold the bottom of the pot. 
7 Test for size with your plant pot, before tying a secure knot underneath the pot with the threads. 
8 To add a second pot, repeat under the bottom knot using exactly the same knotting system. 
9 Finish with a large knot containing all the yarn and neaten the ends with scissors.

Project by Laetitia Lazerges, a Paris-based pattern designer who blogs at www.vertcerise.com and www.doityvette.fr. She has also written several DIY books and sells bright and fun paper goods on Etsy at www.vertceriseshop.etsy.com.


Read more:

From the February issue

Think posts

Mindfulness posts

In Making Tags make, project, issue 44, february, craft, planters, House plants
1 Comment
Photography and project: Catherine Frawley, Styling: Michael Frawley

Photography and project: Catherine Frawley, Styling: Michael Frawley

Christmas gifts: Homemade tea bags

Lottie Storey December 8, 2015

Gather together friends for a ‘crafternoon’ of festive food while you create bespoke handmade gifts

A truly personalised gift, you can make these rustic bags with your friend’s name on and their favourite tea.

Handmade tea bags

Makes 18–24 tea bags – six per gift

unbleached cheesecloth
fabric for the label, string, twine, linen ribbon, silver ribbon
a needle and thread
loose leaf tea
small brown Kraft bags seasonal foliage
black ink stamp
alphabet stamps

1 Cut the cheesecloth into 13 x 13cm squares.
2 Cut the string (that attaches the tea bag to the tag) into 15cm lengths.
3 Cut your fabric into a long 2.5cm strip and then cut that into 6cm pieces.
4 Fold down one short end of a fabric piece with the right side of the fabric facing away from you, then place one end of the string in the centre and sew into place.
5 Fold the fabric in half so the ends meet, and sew the sides together. Repeat until your required amount of tags are done.
6 Place around 2 tbsp of tea into the centre of the cheesecloth square. Gather the corners to make a pouch.
7 Tie the string from your tag to the pouch very securely, sealing the tea within.
8 Trim the excess cheesecloth and any excess string. Repeat.
9 Add 6 tea bags to each brown bag. Fold down the top twice, make a hole centrally with a hole punch and thread through and wrap around string, twine or ribbon. Add some seasonal foliage.
10 To create the name tag, cut a strip of wide linen ribbon, use a hole punch to create a hole at the top end, and use an ink pad and stamp kit to stamp the name. Attach to your bag with the ribbon.


Turn to page 30 of December's The Simple Things for three more makes - Stollen muffins, Peppermint creams, and Lemon, olive oil & rosemary body scrub - plus a menu fit for a crafternoon, including Chicken & bacon pie, and Eggnog with cognac.


Read more:

From the December issue

Christmas posts

Homemade gifts

December's The Simple Things is full of festive makes and bakes, wreaths of hawthorn and bay, and twinkly lights a-plenty. Buy, download or subscribe now.

In Christmas, Making Tags tea, handmade, gift idea, christmas, issue 42, gathering
Comment

Make: A hedgehog box

Lottie Storey October 15, 2015

With an old wooden box and a few bricks you can host your own winter holiday home for hedgehogs

If you think you’ve got hedgehogs in your garden, encourage them to stay throughout the winter with a home of their own.

All you need to do is provide a wooden box (a wine crate is ideal) and bury it under some old leaves.

Before you bury it, make a small entrance hole in the box using a saw and, once it’s in place, build a covered tunnel (using bricks and a wooden plank as cover) leading up to the entrance hole to help prevent foxes, badgers and other predators from raiding the nest.

You can then watch the prickly visitors come and go. 

A finished hedgehog box

A finished hedgehog box

Read more:

From the October issue

Makes

Gardening posts 


October's The Simple Things is on sale - buy, download or subscribe now.

In Making Tags making, gardening, makes, issue 40, october, hedgehog
Comment

October's The Simple Things PLUS pressed leaves craft ideas

Lottie Storey September 29, 2015

On sale now, October's The Simple Things is all about the FORAGE. With such a beautiful cover, we've been inspired to get outside, hunt for colourful leaves and put them to crafty use. 

Try one of the ideas from our pressed leaves Pinterest board and let us know how you get on - share your pictures with us on Twitter, Instagram or Facebook.

Follow The Simple Things's board Pressed leaves on Pinterest.

Read more:

From the October issue

Make a homemade reed diffuser

Pinterest ideas


October's The Simple Things is on sale - buy, download or subscribe now.

In Magazine, Making Tags cover reveal, october, issue 40, pinterest, autumn leaves, autumn, craft
Comment

Chalkboard art PLUS win one of five tote bags (closed)

Lottie Storey September 23, 2015

From signage to prints to The Simple Things’ own back cover, chalkboard art is enjoying a bit of a revival. Requiring only chalk, a blackboard surface and a spot of creativity, it’s easy to understand its appeal. In the October issue of The Simple Things we share the step-by-step instructions for creating a chalkboard party invite, taken from Valerie McKeehan’s The Complete Book of Chalk Lettering.

The book is filled with helpful tips for aspiring chalkers, and projects ranging from birthday greetings to vintage-style store signs. If you enjoy that, we recommend you also taking a look at the incredible 1909 Blackboard Sketching book by Frederick Whitney (discovered through The Public Domain Review).

Bulrushes and baskets, cosy fireside scenes and glimpses of the great outdoors all come to life through Whitney’s mastery of chalk. With the whole book available to read online, it may help equip you with the skills to sketch up a quick igloo. At the very least, it should give you a few “wow” moments.


As Whitney describes, “Such drawing is a language which never fails to hold attention and awaken delighted interest”.


Competition

We’ve got five tote bags celebrating The Complete Book of Chalk Lettering to give away. Enter below


Read more:

From the October issue

More chalkboard back covers

More competitions 

In Making Tags issue 40, october, makes, chalkboard, giveaway
Comment
4b79da0d0a18d20735f3ba571b7c9d11.jpg

Learn something new: Origami

Lottie Storey September 2, 2015

Master how to fold a flapping bird (or ‘crane’ as it’s correctly known) and you will always have a dinner party trick up your sleeve. A paper napkin can, with a bit of dextrous folding, be transformed into a thing of wonder. Your fellow diners’ jaws will drop as you crease and sculpt and then reveal a creature whose wings flap when they tug its tail.

One of the marvels of this Japanese art is that all it needs is one piece of square paper. Pre-cut squares, some bi-coloured, some patterned, can be bought at Paperchase, £8.29 for 49 squares, which is not too crippling an expense when you consider that no glue, scissors or tape are necessary. Ingenuity is all that’s needed, that and some good, clear instructions.

Back in the Seventies, the king of origami was Robert Harbin who introduced the word* to the British public via TV programmes and a series of books. His books are still as good a place as any to learn but there is plenty of advice on YouTube and on dedicated websites such as origami-instructions.com and origami.me. The trick is to master a few basic folds (inside and outside reverse, the petal fold, the valley and mountain fold) and a couple of bases (bird base, diamond base, kite base, waterbomb base) and then a world of paper folding will, well, unfold for you. Soon you will be surrounded by ninja stars, hopping frogs and lotus flowers and a circle of slack-jawed friends.

* The word ‘origami’ comes from the Japanese ‘ori’ meaning folding and ‘kami’ which means paper.

Words: Clare Gogerty


Want to try more? Head over to Pinterest where you'll find paper ideas galore.

Follow The Simple Things's board Origami on Pinterest.

Read more:

From the September issue

Learn something new

More from The Simple Things' Pinterest boards


September's The Simple Things is on sale - buy, download or subscribe now.

In Making Tags issue 39, september, origami, pinterest, learn something new
2 Comments

Event: Thornback & Peel screen printing workshop (closed)

Lottie Storey August 26, 2015


Want to get into print? Come and learn screen printing at a special workshop hosted by Thornback & Peel at their London shop. You'll print your own mixed box of Christmas-themed hankies.

If you’ve ever fancied giving screen printing a go, here’s your chance. The people at Thornback & Peel are offering the chance to print your own mixed box of festive hankies, at a special workshop evening.

You can take your efforts home, so you’ll be ahead of the game when it comes to getting organised for Christmas. It’s an intimate event with just 12 places, so hurry to book yours.

About Thornback & Peel

Thornback & Peel was established in 2007 by Juliet Thornback and Delia Peel (Delia’s home is featured on the previous pages). They celebrate the quirkiness of British humour and design by borrowing imagery and combining modernist geometric patterns with 19th-century wood engravings. Their work is inspired by an eclectic mix of Victoriana, Mrs Beeton’s household management, Mr McGregor’s garden, 17th-century microscope imagery of the natural world, and Norfolk and Devon.

The Simple Things screen printing workshop

All equipment will be provided, just bring your enthusiasm. Enjoy a glass of fizz to get you into the festive mood, then pop on a pinny ready to screen print your very own Christmas- themed hankies.

Date: Thursday 12 November 2015, 6.30–8.30pm
Location: Thornback & Peel shop, 7 Rugby Street, London WC1N 3QT
Price: £25 per person
To book: Contact Emma on emma@thornbackandpeel.co.uk
Find out more thornbackandpeel.co.uk 


Read more:

Enter our competitions

Another reader event

Ready for Christmas?!

September's The Simple Things is on sale today - buy, download or subscribe now.

In Making, Magazine Tags reader event, event, christmas, issue 39, september, london, 2015
Comment

Make: Build an outdoor oven

Lottie Storey July 19, 2015

Who says outdoor cooking is restricted to the barbecue? Take your pizza and bread baking al fresco as well with a DIY clay oven.  

In August's issue of The Simple Things, we're all about eating in the garden. This isn't a particularly tricky or expensive project, but does require a bit of space, a fair amount of planning and a full three days. That said, when the job’s done, it’ll give you summers of baked goodness. 

Download the instructions for making your own outdoor oven.

August's The Simple Things is on sale 29 July. Get your issues early by becoming a subscriber - you'll save money, too.

Read more

  • Bread recipes
  • More DIY projects
  • More from the August issue
In Making Tags issue 38, august, Make project, al fresco, outdoors
1 Comment
Photography by Catherine Gratwicke.

Photography by Catherine Gratwicke.

Make: Homemade reed diffuser

Lottie Storey June 4, 2015

The roots of homespun alchemy lie in the play of childhood – sneaking bits and pieces from the garden and mixing them in jam jars, hoping for a magical scent. This kind of experimentation is no less fun as an adult, but with these recipes from Rachelle Blondel, author of Forgotten Ways for Modern Days, you’ll get far more satisfying results. Harnessing the natural power of the likes of beeswax, nuts, seeds and rosewater, these are great weekend projects that will reward you – or, in the case of the perfume, perhaps someone else – with some gentle, natural pampering throughout the working week.


To make a reed diffuser you will need:
5-6 thin bamboo skewers
50ml surgical spirit
50ml light oil (grapeseed, sweet almond or light olive oil) 
Narrow-necked vase or bottle 
30-40 drops of your favourite essential oil or blend

1 Remove the pointed ends of the wooden skewers with a pair of sharp scissors and put them to one side.
2 Place the surgical spirit and oil into the vase or bottle and swirl around to mix the two.
3 Add the essential oils and swirl again.
4 Place as many skewers into the bottle as will fit, but don’t over-fill as the skewers will need space to release the fragrance.
5 Leave for several hours, swirling the liquid every now and again, then flip the skewers so that the dry ends are in the liquid.
6 You can repeat the previous step until the wood is completely saturated with the oil and then flip the skewers every couple of days to keep the fragrance wafting. The volume of oil and surgical spirit can be increased according to the size of your vase or bottle, but keep the ratio 1:1. Essential oils can be added at 10 drops to 100ml of base oil: experiment with this volume for a stronger or weaker fragrance.

Taken from Forgotten ways for Modern Days: Kitchen cures and household lore for a natural home and garden by Rachelle Blondel (Kyle Books, £14.99). Photography by Catherine Gratwicke.


There are more homemade projects in June’s The Simple Things, available from all good newsagents, supermarkets and our official online store. Sold out? Download it from Apple Newsstand or subscribe now.

In Living, Making Tags make, homemade, home remedies, june, issue 36
1 Comment

Make: Terrarium PLUS introducing the Urban Jungle Bloggers

David Parker May 18, 2015

Creative gardening need not be restricted to outdoors. Or, indeed, to off-the-shelf plant pots. Making a terrarium is a craftier way to display greenery and is a great project for anyone finding themselves low on either time or space. Building terraria is a revival of a past craze, which - hopefully much like your plants - has refused to die. Turn to page 106 of May's The Simple Things to find out how to make your own.


Got a taste for the green stuff? You're a born Urban Jungle Blogger.

Urban Jungle Bloggers is a mutual project initiated by Igor of Happy Interior Blog and Judith of JOELIX.com. They share a passion for plants and living with plants and decided to kick off a monthly blog series about living with plants, which soon turned into a thriving green community with almost 600 international bloggers joining in.

The Urban Jungle Bloggers team announces a monthly topic around styling with plants and informs the community through a monthly newsletter. Everyone who wants to can then join in and interpret the given theme according to their own style and home. There is no obligation to join in every month, so Urban Jungle Bloggers can pick whatever topic they like and share their green inspiration. Every blogger's efforts are then shared with the community on www.urbanjunglebloggers.com and on social media.

Don't have a blog? You can still join in. The team uses the hashtag #urbanjunglebloggers on Instagram which allows everyone to share and tag their green pics, with the images then shown in an interactive gallery on the Urban Jungle Bloggers website.

To join in, sign up for the monthly newsletter here. 


Find the terrarium make in May's The Simple Things. Buy, download or subscribe now.

In Making, Nest Tags make, issue 35, may, urban jungle bloggers, plants, House plants
Comment

Craftier and Craftier: White Rabbit & Cheshire Cat Masks

David Parker March 18, 2015

Celebrate the birthday of curious classic Alice in Wonderland with this easy make.

This year is the 150th anniversary of the publication of Lewis Carroll’s Alice’s Adventures in Wonderland. The world would be a considerably less curious place without the likes of the Mad Hatter and the Queen of Hearts. From 2 May to 1 November, the V&A Museum of Childhood in east London will be hosting a free display called ‘The Alice Look’, exploring how Alice has been a trendsetter over the years, or to mark the anniversary you could simply curl up with one of the beautiful editions of the book (see page 115 of April’s The Simple Things) and transport yourself to Wonderland.

You could also try your hand at a make or two, taken from Everything Alice, a whole book of Wonderland-inspired craft projects. The masks are perfect for parties and festivals, and should put a smile on your face worthy of the Cheshire Cat.


White Rabbit & Cheshire Cat Masks

You will need:
Templates - download cat or rabbit templates
PVA glue
White mosaic grout
Tile clippers
Hot glue gun

For the White Rabbit:
1 sheet of white A2 mount board 
10mm square mosaic tiles: approx 230 white, 100 cream, 90 pink
35cm length of 5mm dowelling rod, for the handle
White acrylic paint

For the Cheshire Cat:
1 sheet of black A3 mount board 
10mm square mosaic tiles: approx 120 black, 50 grey
35cm length of 5mm dowelling rod, for the handle
Black acrylic paint

1 Print out the templates and cut your selected mask shape from the mount board (or you could cut them out from sturdy card and decorate with crayons for an ultra-speedy make).
2 Paint your dowelling the corresponding mask colour – white for the rabbit and black for the cat – and allow to dry.
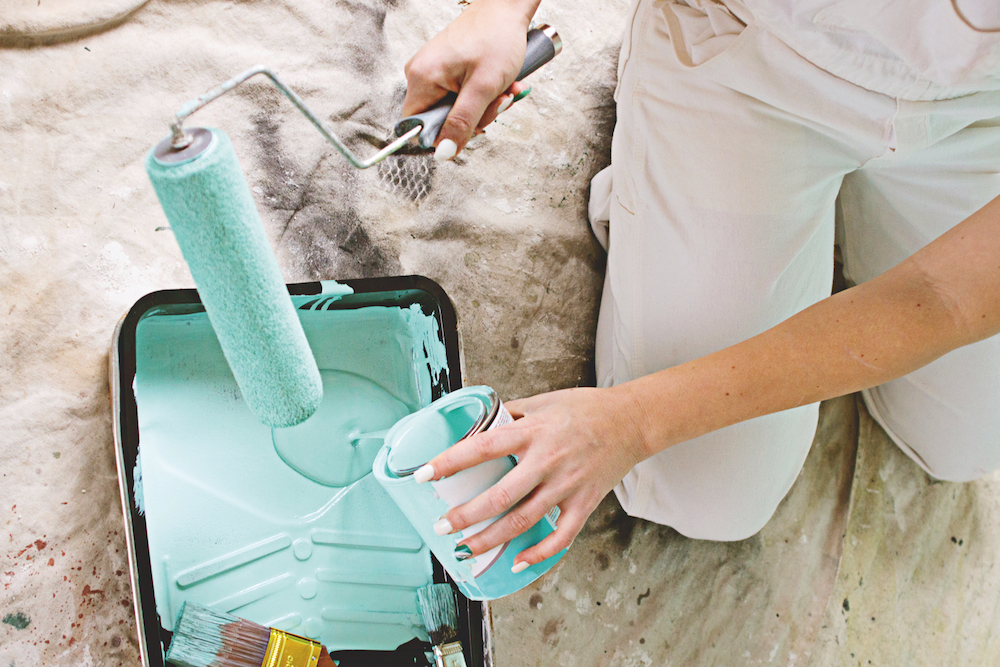
3 Cover your work surface with a protective sheet – mosaic work can be messy! Apply a small blob of PVA glue to the back of each mosaic tile and adhere to the first mask shape, leaving a 2mm space between each tile. Get creative and make up your own pattern. Trim away any overhanging tiles with the clippers. Allow to dry thoroughly for at least two hours. 
4 As an alternative to readymade 10mm mosaic tiles, you could make your own tiles from old pots and crockery. Wrap the crockery in sheets of newspaper, then place into a thick plastic bag. Put the bag on a durable surface before smashing the crockery with a hammer. Remove the pieces carefully – they’ll be sharp!
5 Mix the white mosaic grout to the manufacturer’s instructions in a jam jar or plastic container. Keep a bowl of water and a sponge nearby. Use your hand to spread the grout over the mosaic, working it into the spaces between each tile. Try to keep the surface of the grout as smooth as possible. Leave the mask on a flat surface and allow the grout to dry fully. It’s best to leave it overnight.
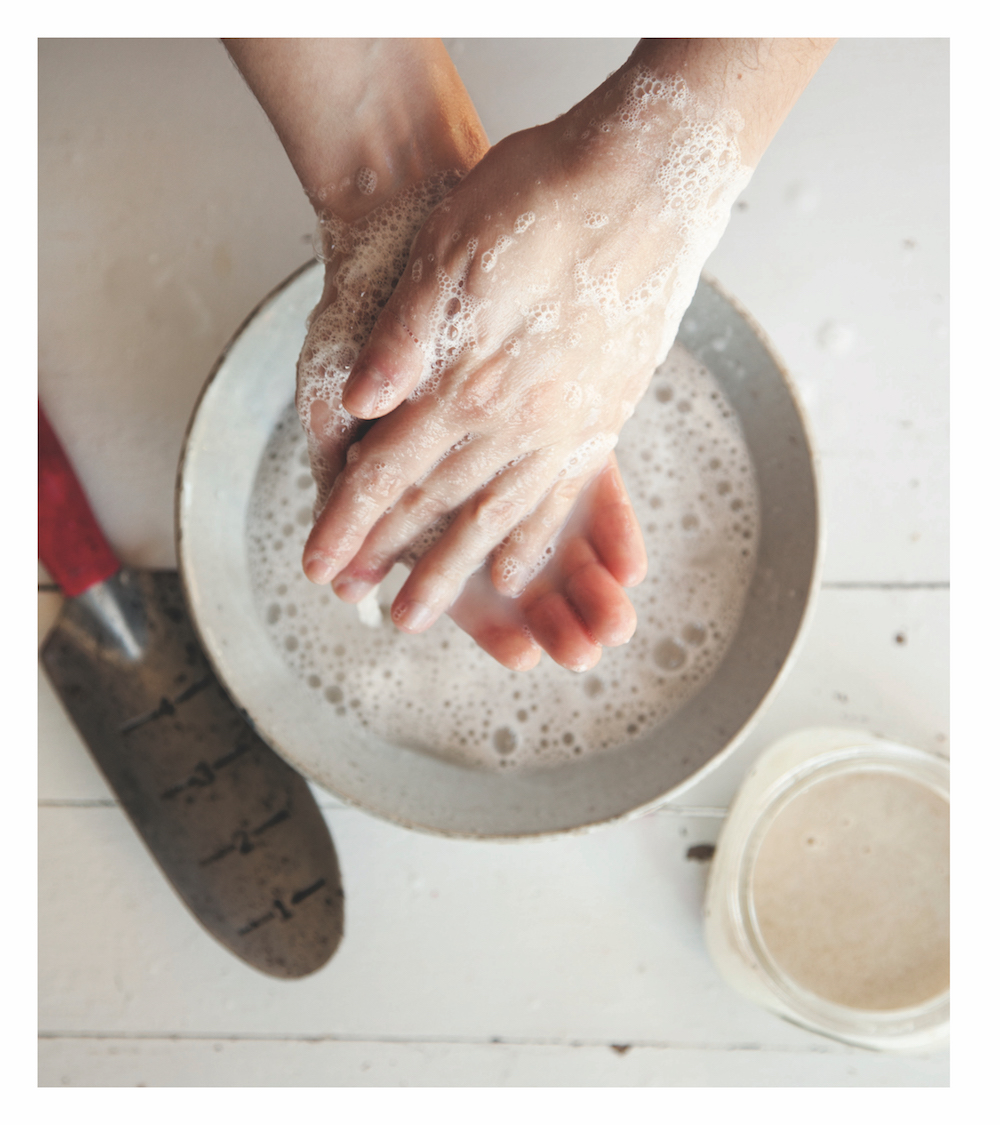
6 Once dry, wipe down the mosaic with a damp cloth to remove any excess grout. Allow to dry for a further few hours, then give it a final polish with a soft cloth.
7 With a hot-glue gun, stick the second mask shape onto the back of the tiled one, with the dowelling in the middle.

In Making Tags issue 34, makes, project, alice in wonderland, april
Comment
  • Blog
  • Older
  • Newer
Featured
  Buy ,  download  or  subscribe   See the sample of our latest issue  here   Order  our new Celebrations Anthology   Pre-order a copy of  Flourish 4 , our new wellbeing bookazine   Listen to  our podcast  – Small Ways to Live Well  Wear our  Sl
Aug 29, 2025
Aug 29, 2025

Buy, download or subscribe

See the sample of our latest issue here

Order our new Celebrations Anthology

Pre-order a copy of Flourish 4, our new wellbeing bookazine 

Listen to our podcast – Small Ways to Live Well

Wear our Slapdash Patches and show your support for ‘good enough’

Aug 29, 2025
Join our Newsletter
Name
Email *

We respect your privacy and won't share your data.

email marketing by activecampaign
facebook-unauth twitter pinterest spotify instagram
  • Subscriber Login
  • Stockists
  • Advertise
  • Contact

The Simple Things is published by Iceberg Press

The Simple Things

Taking time to live well

We celebrate slowing down, enjoying what you have, making the most of where you live, enjoying the company of of friends and family, and feeding them well. We like to grow some of our own vegetables, visit local markets, rummage for vintage finds, and decorate our home with the plunder. We love being outdoors and enjoy the satisfaction that comes with a job well done.

facebook-unauth twitter pinterest spotify instagram