
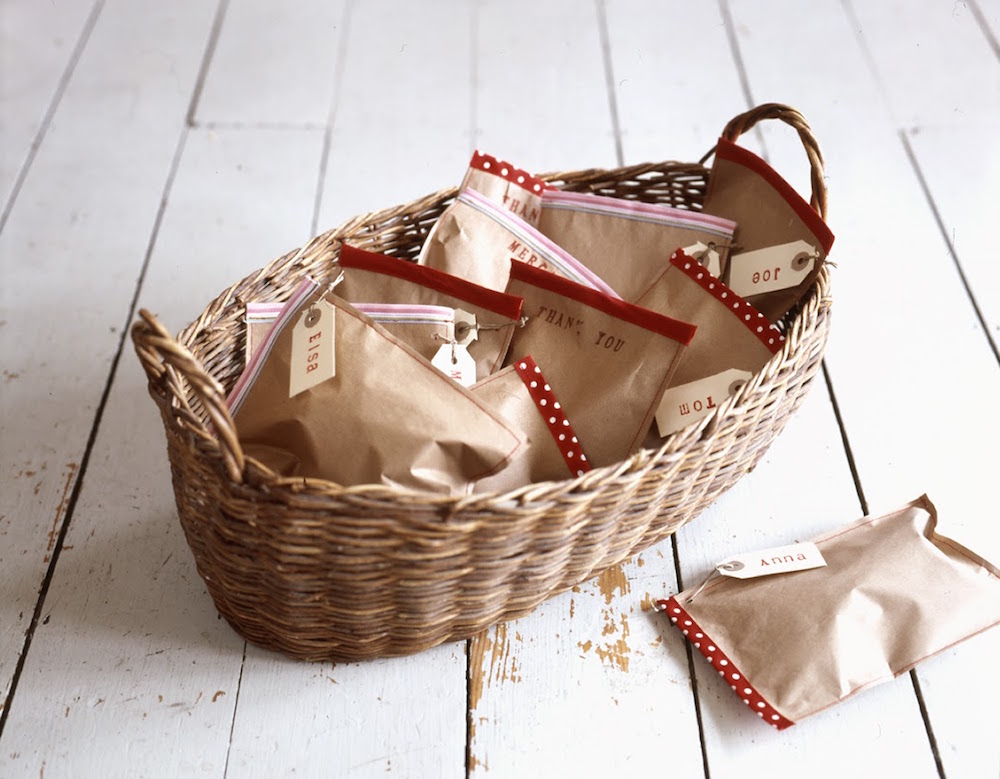
A terrific festive papercrafting project by Ros Badger and Elspeth Thompson that's sure to make an impression on your party guests – why not fill them with homemade treats?
Read More
Recipe: Stollen with dark rum and lemon marzipan
Stollen is the German Christmas cake. Dip it in coffee or eat with a piece of Hafod cheese.
The original German Christmas cake was from Dresden. It was a moist heavy bread filled with fruit, and the first recorded mention of it was in 1474. This official stollen is produced by only 150 bakers in the city, is still sold at the local Christmas market and has a special seal. All very interesting, but we bet it doesn’t taste any better than this one.
Stollen with dark rum and lemon marzipan
50g dark rum
75g raisins
75g sour cherries or cranberries
Vanilla butter:
100g butter
Seeds of 1 vanilla pod (or 1 tsp vanilla extract)
Marzipan (or buy ready-made):
100g ground almonds
35g icing sugar
10ml lemon juice
15ml dark rum
Seeds of 1 vanilla pod (or 1 tsp vanilla extract)
1 large egg
Cake:
50g milk (room temperature)
250g strong white flour
5g quick yeast (7g fresh yeast)
25g caster sugar
5g fine sea salt
2 large eggs (room temperature)
Chopped zest of 2 oranges and
2 lemons
5g ground spice – 50/50 cardamom/ cinnamon
100g butter, diced
Icing sugar to finish
1. Warm the rum and mix it with the dried fruit, cover and leave at room temp for 24 hours. To make vanilla butter, melt 100g butter and sprinkle with vanilla pod seeds; leave to infuse.
2. The next day, make marzipan. Mix all the ingredients together in a bowl, cover tightly and place in the fridge.
3. Warm the milk, add 25g of the flour and all the yeast. Mix well with fingers and cover tightly. Leave for 45 mins.
4. Add the rest of the flour, sugar, salt and eggs and mix it with the foaming yeast. When all flour is incorporated, turn dough onto the table and knead for 4 mins, cover tightly and rest for 30 mins.
5. Uncover dough and press out into an oblong. Put zest and spice on top of the dough, along with the butter. With your fingers, massage it all together. It’s very loose at this stage – almost a batter. Massage until the dough becomes a consistent colour. Scrape together into a ball, cover well and leave to rest for 30 mins. Use a very small amount of flour on your hands and work surface while shaping if you need to.
6. Add soaked fruit and massage into dough to combine. Sprinkle some flour on the table, scrape up dough, place on the flour and top with another sprinkling of flour. Stretch dough to create four corners and fold them in on themselves. 7 Turn dough over, bottom side up, shape into a ball and put back in the bowl. Cover tightly and leave for 2.5 hours.
8. Scrape dough out onto a well floured surface. Halve dough and gently press down to create 2 oblongs, arranged with one of the longer sides towards you.
9. Divide marzipan into 2 and roll each half into a sausage shape. Place each in the middle of a dough oblong, leaving a 2cm gap at either end. Fold the side nearest you over the top of the marzipan and tuck in on the far side. Then fold the side farthest away over the top of the marzipan and gently press the seam in. Make sure the seam is totally sealed by pinching with your fingers if necessary.
10. Lift stollen carefully onto a baking tray covered with baking parchment. Bend it slightly so you’re left with a semi circular shape. Leave for 90 mins.
11. Preheat oven to 200C/Fan 180C/400F. Bake stollen for 25–28 mins, then remove from oven and leave to cool on tray for 30 mins.
12. Melt vanilla butter and pour evenly over the stollen. This will help to lock the moisture in when it cools down. Leave the stollen on the tray for 1 hour.
13. Cover stollen all over with a thick layer of icing sugar. Ideally place the stollen in a tin and leave until the next day to eat so the flavour can develop.
The stollen should last two weeks kept in a tin.
Turn to page 24 of December's The Simple Things for our baker, Alex Gooch's other Christmas recipes, including potato and onion bread with pickled chilli and Hafod cheese, and toasted hazelnut, apple and prune loaf.
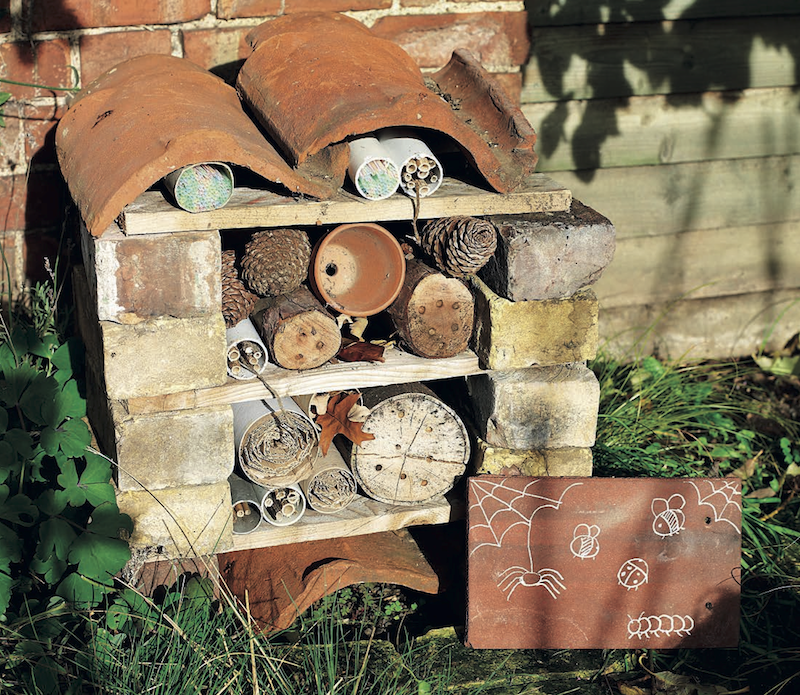
Image: Loupe Images/Emma Mitchell
Make: Bug hotel
Build a bug hotel for your garden. This multi-storey insect hotel will soon fill up with guests, from ladybirds to lacewings.
You will need:
24 old bricks
Some old curved roof tiles
10 short pieces of wood
Corrugated cardboard, bamboo canes, drinking straws, old pots, logs, egg boxes, pine cones, and dry leaves
A selection of hollow tubes, such as empty cardboard tubes, loo rolls, plastic pipes and bottles
1 Find a quiet, sheltered spot in the garden and make sure that the ground is flat. Lay two rows of bricks, two bricks long and two bricks high, so that they are the same width apart as the length of your pieces of wood.
2 Put a curved roof tile between the two rows as a shelter for toads and frogs.
3 Lay three pieces of wood, spaced evenly, across the lines of bricks. Add another one or two courses of bricks and some more wood to build up the storeys.
4 On the top layer, add an extra piece of wood at the back of the stack to make the tiles sit at an angle, so the rain runs off.
5 Roll up pieces of corrugated cardboard, slide them inside the cardboard tubes then put these inside the hotel. Fill the other tubes and plastic pipes with a selection of hollow stems like bamboo and drinking straws. These make perfect winter ‘rooms’ for small insects.
6 You could also drill holes in the ends of logs or add other materials such as egg boxes, pine cones, and dry leaves.
7 Place more tiles on top of the final layer to form the roof of the hotel.
8 Find a flat tile or piece of slate and write the name of your hotel on it with chalk.
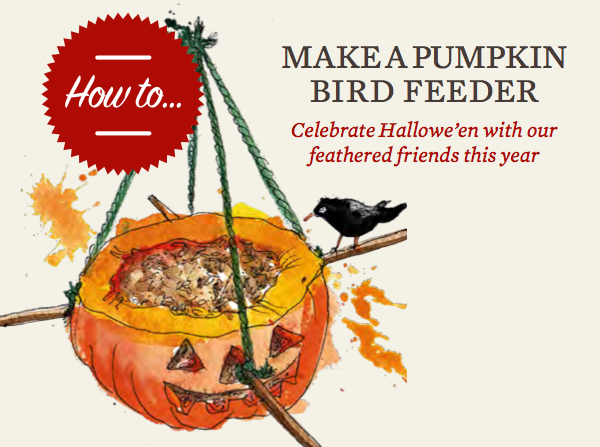
How to make a pumpkin bird feeder
Don't ditch the Halloween pumpkin just yet... Give it a new lease of life in the garden as a pumpkin bird feeder. Pumpkins spend all summer ballooning into huge, majestic,super-squash, then come autumn, most are either made into soup or carved into a lantern at Hallowe’en. These heavyweights of the fruit world – they often reach 35kg – have a rigid shell that’s great for hacking into. This year, why not carve out a new purpose for your pumpkin, as a bird feeder?
Here’s how:
1. Cut a 2kg pumpkin in half across its equator, scoop out the seeds but leave behind a wall of pumpkin flesh, around 2cm thick.
2. Cut a 1.5cm deep groove in the rim, then push the pumpkin seeds into the rim, making an attractive and edible border.
3. Create perches for robins, blackbirds and sparrows, which like to sit and eat, rather than hang, off a feeder. Poke holes into the pumpkin skin using a skewer or sharp knife and push twigs and sticks into them for perches.
4. Knot two lengths of twine or string together in the centre, then tack the knot of both lengths to the bottom of the pumpkin feeder, using a drawing pin. This creates a hanging basket effect.
5. Fill with seed and watch your birdie friends tuck in.
Want more Halloween reads? Take our Wicca quiz and find out which witch you are, or preserve your pumpkins with pride.
Food on the face: natural skincare recipes
Our gardens and fridges provide skincare that’s healthier, cheaper and more natural than anything we could buy. Try these natural skincare recipes.
The beauty business is all about selling us “hope in a jar”, as Charles Revson, founder of Revlon once put it. If you’ve ever searched the cosmetic and beauty aisles of a department store, you’ll have noticed how expensive the promise of beauty, youth and freshness can be. Face masks from reputable skincare manufacturers cost up to £50 for a tiny jar; add in the price of cleansers, exfoliators, oils, serums and creams and you could spend upwards of several hundred pounds just for the privilege of plumping, de-stressing and adding some glow. Small wonder, really, that the global skin care industry is worth a staggering £25 billion per annum.
But there are plenty of natural skincare ingredients lurking in your kitchen. Try these homemade beauty recipes out for size.
Lavender Lemongrass Body Wash

Oats, rosemary and coconut oil make this body wash a culinary delight.
Oat and Lavender Bath Soak

Pick lavender flowers from the garden for this relaxing bath soak.
Recipe by Always Order Dessert.
Vanilla Sugar Body Scrub


Recipe: Brazilian cake - Broa de Fuba
Tonight's the night! Let's celebrate the FIFA World Cup Final in a very British way. Tea and cake, anyone? Brazilian cake, of course! In a nod to the ubiquitous workshop of all things Brazilian, we’ve found a polenta sponge that’s a winner in our book.
Moreish, moist and not too sweet, this Brazilian take on polenta cake is a highly loveable sponge.
BROA DE FUBA (CORN BREAD) 250g butter, softened 230g caster sugar 4 large eggs, separated 150g polenta 190ml milk 150g self-raising flour Icing sugar, to serve
1. Preheat the oven to 180C/Fan 160C/350F. Lightly grease a round 20cm springform cake tin and line with baking parchment. 2. Using an electric mixer, beat the butter and sugar until pale and creamy. Add the egg yolks, one at a time, beating well after each addition. Add half the polenta, then half the milk, beating after each addition to combine; repeat. Sift in the flour and mix to combine. 3. In a separate bowl, whisk the egg whites until stiff peaks form. Stir one large spoonful of the egg whites into the batter to loosen it. Using a metal spoon, gently fold in the remaining egg whites. 4. Spoon the batter into the lined tin, smoothing the top. Bake for 50-55 minutes, or until a skewer inserted in the bread comes out clean. Leave the bread in the tin for 10 minutes, then turn out onto a rack. Serve warm or at room temperature, dusted with icing sugar.
Recipe taken from This is Brazil by Fernanda de Paula and Shelley Hepworth (Hardie Grant, £16.99)

Want more Brazil? This month, Andy Martin shows us round his home town, the hip Brazilian city, Sao Paulo. Turn to page 60 of July’s The Simple Things for food, football and (very) late nights from the Brazilian metropolis.
Not got July’s The Simple Things yet? Buy or download your copy now.

Making: Upcycled jeans runner
Give an al fresco meal the stylish setting it deserves. Turn a picnic into an occasion with our upcycled jeans runner project. Ditch the saccharine sweeness of picnic pastels, and add a contemporary edge to your outdoor table instead. Just rummage for old jeans and begin. Make the denim runner to whatever size your table dictates.
Supplies
Old pair of jeans Fabric scissors Sewing machine Thread
1. Cut the legs off a pair of jeans (as far up towards the crotch as possible) using fabric scissors.

2. Cut down the inside-leg seam to open each leg out and then iron them.
3. Now hem each edge using your sewing machine.

4. Hem the cut edge at the end of one of the jean pieces, then hand-sew or machine-sew it on top of the other piece.
Project by interiors journalist, Heather Young, who blogs about her enviably stylish and crafty life at Growing Spaces.
For two more midsummer table makes, turn to page 40 of June's The Simple Things. Buy or download your copy now.

Recipe: Elderflower champagne
Read our feature on ‘posh squash’ on page 35 of June’s The Simple Things? Get picking elderflowers before the season’s out, and use them to make this simple elderflower ‘champagne’ from blogger, Emma Bradshaw. With elderflowers in full bloom, it seems a waste not to use them in the kitchen. Have a go at this recipe from blogger Emma Bradshaw, who says: 'I've tried lots of different ways to make elderflower champagne, but this is my favourite most tried and tested method.'

You will need:
About 30 elderflower heads, in full bloom (pick on a sunny day away from the roadside, making sure you don't strip a tree of all its flowers!) 2kg natural sugar 4 litres hot water + 2 litres cold Juice and zest of four lemons 1-2 tablespoons white wine vinegar A pinch of dried yeast (although you may not need this)
Method:
1. Put the hot water and sugar into a large container (a preserving pan or spotlessly clean bucket is good) and stir until the sugar dissolves, then top up with cold water to 6 litres. 2. Add the lemon juice and zest, the vinegar and the flower heads and stir gently. 3. Cover with a clean muslin and leave to ferment in a cool, airy place for a couple of days. Take a look at the brew at this point, and if it’s not becoming a little foamy and obviously beginning to ferment, add a pinch of yeast. 4. Leave the mixture to ferment, again covered with muslin, for a further four to five days. Strain the liquid through a sieve lined with muslin and decant into sterilised glass bottles. 5. Seal and leave to ferment in the bottles for a further eight days before serving, chilled.
Makes around 20 bottles.
Recipe and images by Emma Bradshaw. Visit Emma's blog for more wild food recipes and outdoor adventures.
Not got June's The Simple Things yet? Buy or download your copy now.

National Flower Arranging Day
Today is National Flower Arranging Day, not that we need an excuse to make up a beautiful bouquet of our favourite spring flowers
National Flower Arranging Day
If you fancy arranging a posy of blooms, why not make a second and join in with the Lonely Bouquet? Today, the National Association of Flower Arrangement Societies will distribute 60,000 lonely bouquets - beautiful little bunches of flowers left in surprise locations for strangers to find and take home on National Flower Arranging Day.
What is the Lonely Bouquet?
The random act of kindness initiative dubbed the Lonely Bouquet was the brainchild of a young florist in Belgium named Emily Avenso, who blogged about the idea after leaving flowers for strangers two years ago. The idea went viral and Lonely Bouquets have been distributed across the globe ever since.
If you make or spot a Lonely Bouquet, take a picture and share with us on Facebook or Twitter.

A project for the weekend
Peg out proudly with this burlap peg bag - made by you!

If you manage to even find your peg bag again after the winter, the chances are it's probably grown a bit of mould or acquired a rather unpleasant damp smell. Before you go out and buy another one we've got the perfect project to get you ready for spring and that uplifting moment when you hang your washing outside for the first time. To make this stylish peg bag all you need is a coffee or peanut sack or rectangular section of a sack, some scissors, a ruler and sewing machine with a universal needle. Coffee sacks are available for rescue at most local roasteries, alternatively you could try garden centres or pet shops for peanut sacks. The result? A peg pag to be proud of and the great sense of satisfaction that comes from making something lovely (and useful!) from rescued material.
For full step-by-step instructions see Issue 21 of The Simple Things. For more similar projects check out Reinvention, Sewing with rescued materials by Maya Donefeld (Wiley).

3 tips for small business success
You'll never guess number 3… Nick Cooper, the creative force behind successful small business Stamp Shoes, shares the top 3 things he's learned from setting up his own bespoke shoe workshop.

NICK COOPER, founder of Stamp Shoes, lives in Northampton and creates beautiful bespoke footwear from his own designs.
After my religious studies degree I tried admin at a charity in London but didn’t last long! I ended up moving back to my parents in Shropshire and shelf filling at a supermarket. At this point I asked myself, “What do I really want to do?” I arrived at ‘craft’. I ended up moving to the 'shoe capital' of Britain, Northampton, to learn about shoes. I wanted to create my own set-up as soon as I could, make the designs that I wanted to make and then work out how to generate money from it! Nothing happened for about a year, but then I found a workshop space at the Innovation Centre in Northampton University. I bought a little bit of machinery and some materials and started experimenting. It's all taken off from there.
3 THINGS SETTING UP STAMP SHOES HAS TAUGHT ME
1. Don’t give up your day job until you’re established. Go part-time if you can and develop your passion alongside your other work, or at the weekends. Start your business gradually and slowly scale back your hours of employment when you know you can.
2. I never set a goal of making even a single penny. It was daunting setting up a business so I set my goals fairly low. I just wanted to have a complete shoemaking workshop and create a collection of shoes I was happy with, with designs that I’d wear myself.
3. If you’ve never done it, go and stay in a monastery for at least a week, even if you’re sceptical of religious belief. Every summer I go and stay with some monks in the Burgundy countryside. It’s perhaps the only time when I feel completely safe and fully myself. The monks do ‘simple’ on a daily basis and in a way that enables people to experience a complete and lasting joy.
Read more about Nick in our regular series, Beyond The Nine-to-Five in issue 20 of The Simple Things.

Make your own simple spit
 In the new issue (on sale 30 January), our adventurous River Cottage chef Gill Meller wraps up warm and prepares fire-roast leg of lamb. But first you need your fire – and something to roast it on. Gill used an old estate railing he found but for those of us not so lucky, click here for instructions to make your own. And if that's too much trouble, you can buy one here. How to light the fire? You're on your own there.

Etsy Christmas table
//

Interview: Cassandra Ellis quiltmaker
CASSANDRA ELLIS doesn’t just wake up under a quilt, she spends her days making them, or teaching others how to. It’s not about art, it’s about memories…

Do you wake up under one of your own creations? Yes, I have too many. They’re the essence of what a home is (that and a roast chicken). We all have one on our beds, I made quilts for both my stepchildren, and they’re also on the sofas. It’s very cute when the kids are watching TV the quilt comes off the sofa and on the laps. We have a chocolate lab called Mr Darcy, because he’s so good looking, and Lily, an Australian terrier – they have their own too. In fact there’s a quilt that didn’t start off as a dog quilt but has become one because Mr Darcy lay on it all the time.
Is the rest of the house as cosy? We live in Peckham Rye in London. People might assume I’m going to be wearing velvet and jangly bells and have a purple streak in my hair and every wall’s going to be a different colour. It’s nothing like that. There’s no built-in furniture, everything is very simple, along the lines of Barbara Hepworth’s house in Cornwall. Clean, not fussy. The whole house is one colour, pale grey, with wooden floors. We had new friends round for dinner and they described our house as “soporific”, as in they didn’t want to leave!
What is it like, teaching workshops in your own home? I’m quite fanatical about having everything prepped. I get up at 5am and bake. It’s not just about learning to quilt but about creating a homely feel. I have a huge studio up in the roof. By the time they get to floor five people go “Oh my God!” You can see across the city of London. I really enjoy the whole community thing. People share fabric and tell stories. That’s where it all started – doing your day’s work, getting the children to bed, and doing craft was the only chance people got to sit and talk. It’s lovely.
Tell us about the memory quilts you make for people When I make a commission for someone, or teach someone, when they hand over their bags of children’s clothes and wedding dresses and husband’s shirts, in some way they all tie together because it’s their story. When it’s finished, they don’t see the quilt first – they see their lives. It’s incredibly emotional.
Can you suggest a good project for beginners? The only thing you’ve got to learn is cutting fabric and sewing it back together again. It’s about building blocks – that piece of fabric can be sewn to that piece of fabric. Try a little memory piece. These came about from someone I know who, when someone died, cleared out all the clothes then realised, ‘Oh God, we should have kept those’. You can use any cottons, anything from shirts to kids’ clothes, mixing up with Liberty or Indian block prints. You can use wool but not very heavy wool – you’d struggle to put silk next to wool, they’d have a little fight and the wool would win. If you want to incorporate silk or lace, back it with something. Ties are perfect for binding edges.
In the November issue of The Simple Things we have an extract from Cassandra's latest book, Cloth (Kyle Books £25), which explores the history and significance of natural fabrics and contains more than 30 beautiful projects for wool, linen cotton, silk and hide.

The Simple Things Etsy Pages
Discovering and curating our favourite things through NEW Etsy Pages.
//
//
//

Love to Craft? Try Gathered by Mollie Makes
Gathered by Mollie Makes is your weekly fix of quick craft ideas to make and enjoy available on the iPad - and now the iPhone too!
 Each week inside the magazine you can expect:
• Two exclusive craft projects • Interviews with designer-makers • A roundup of our favourite things, including vintage treats, our book of the week, buyers’ guides, plus more • Videos to inspire you and your work • A free, downloadable wallpaper for iPhone and iPad
Gathered by Mollie Makes costs £1.49 an issue, or you can subscribe for a 1-month (£2.99) or 1-year (£19.99) and, if you subscribe to a 1-month or more you get 5 FREE issues!
Try Gathered by Mollie Makes now and get crafting over the weekend!

The perfect summer lunch: Gazpacho
Honour the tomato with this cold Spanish soup. Top with croutons and Serrano ham for a perfect lunch.

Serves 6 6 large tomatoes 2 red peppers, deseeded and chopped 2 yellow peppers, deseeded and chopped 1 small cucumber, peeled and chopped 3 spring onions, chopped 1 large garlic clove 1 tbsp sherry vinegar, or a splash to suit your taste A splash garlic olive oil 1 tbsp good olive oil 1 tsp sugar 1/2 tsp smoked paprika
1. Put the tomatoes into a bowl of boiling water with small crosses cut into them to help the skins to peel off. Remove the skins, wait until the tomatoes are cool and chop finely. 2. Chop everything up, removing the green part of the spring onion and deseeding the cucumber. If you have a blender or food processor, add all of the vegetables and blitz. Otherwise just carry on chopping until a paste-like consistency is reached. 3. Add the oils, sugar, sherry and paprika and taste. Add additional seasoning if it needs it. Serve toppings in separate bowls so people can help themselves.

Sponsored post: Learn a new skill for free with The Amazings
Have you heard of The Amazings? It’s an online platform for skill-sharing, where older teachers (over 50s, AKA ‘Amazings’) teach the younger generation skills for life. Whether that’s carpentry, crochet or jewellery making.Classes have been running in London for over a year now but the exciting news is The Amazings has recently launched online craft classes, meaning you can take part from anywhere in the world.

There are currently 8 online classes available , and you can choose from: Make Your Own Natural Beauty Products Retro Hair Dos Make A Mosaic Flower Pot Make an Heirloom Patchwork Quilt How to Make an Altered Book Upcycle a Man’s Shirt into a Summer Dress Make a Butterfly Pendant From Silver Metal Clay Loom Knit Your Own Beanie and Bobble Hat
Normally classes start from £8 but for a limited time you can get your first class for free if you sign up using this link.
New classes will be added every week and a little birdy told us there’s going to be a Big Knitting class, Wet Felting class and Millinery class coming up soon, so be sure to keep an eye out!

Strawberry, pineapple and mint frozen yoghurt
We've arguably found the most summery recipe for frozen yoghurt in existence, so if the weather lets us down we can always enjoy summer in a bowl.
")
Serves: 4 (makes 1 litre) Preparation time: 20 minutes Cooking time: 5 minutes
You’ll need: 450g strawberries 1 tbsp lemon juice 130g caster sugar 250g whole milk, unset yoghurt 2 tbsps of freshly chopped mint and four extra sprigs for decoration 1 fresh pineapple
What to do: Slice the strawberries into small pieces and place them with the lemon juice and sugar in a saucepan and warm gently, mixing well with a wooden spoon.
Mash the strawberries with the back of a wooden spoon as the sugar dissolves and the mixture warms.
Set the cooked strawberries aside to cool, covered.
Mix together the yoghurt and mint in a bowl and then add the strawberries.
Spoon the yoghurt mixture into four individual serving glasses, moulds or plastic ice-lolly moulds and freeze for at least three hours, or overnight.
When ready to serve, take the serving glasses or moulds out of the freezer. Dip into warm water to unmould the yoghurt on a plate. Serve with finely chopped fresh pineapple and decorate with fresh mint.
*This recipe was taken from Sweet Eve, visit their website for more recipes.
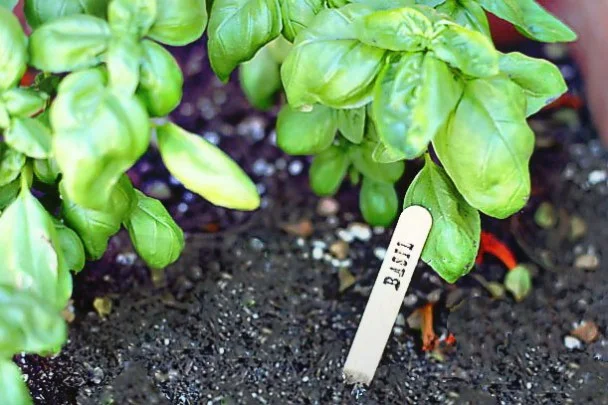
Lolly stick plant labels
 If you tried Monday's strawberry lolly recipe, you'll probably have a little pile of used lolly sticks by now. In the spirit of upcycling, we'll be trying out this cute DIY idea from Lil Blue Boo, and turning ours into plant labels.
Blogger Ashley's used transfer paper to achieve a typewriter effect for the lettering (and provided a free printout if you'd like to do the same), but we'll be going for a stencil and permanent marker for a similar old-school vibe.