The Simple Things

Taking time to live well
  • Home
  • Subscribe
  • SHOP
  • Newsletter
  • About
  • Work with us
  • Home
  • Subscribe
  • SHOP
  • Newsletter
  • About
  • Work with us

Blog

Taking Time to Live Well

  • All
  • Chalkboard
  • Christmas
  • Competition
  • could do
  • Eating
  • Escape
  • Escaping
  • Fresh
  • Fun
  • gardening
  • Gathered
  • Gathering
  • Growing
  • Haikus
  • Interview
  • Living
  • Looking back
  • Magazine
  • magical creatures
  • Making
  • Miscellany
  • My Neighbourhood
  • Nature
  • Nest
  • Nesting
  • outing
  • playlist
  • Reader event
  • Reader offer
  • Shop
  • Sponsored post
  • Sunday Best
  • Think
  • Uncategorized
  • Wellbeing
  • Wisdom

Project | Satin Stitch Patching

David Parker March 20, 2025

Learn a clever stitching technique that will give old clothes a new lease of life

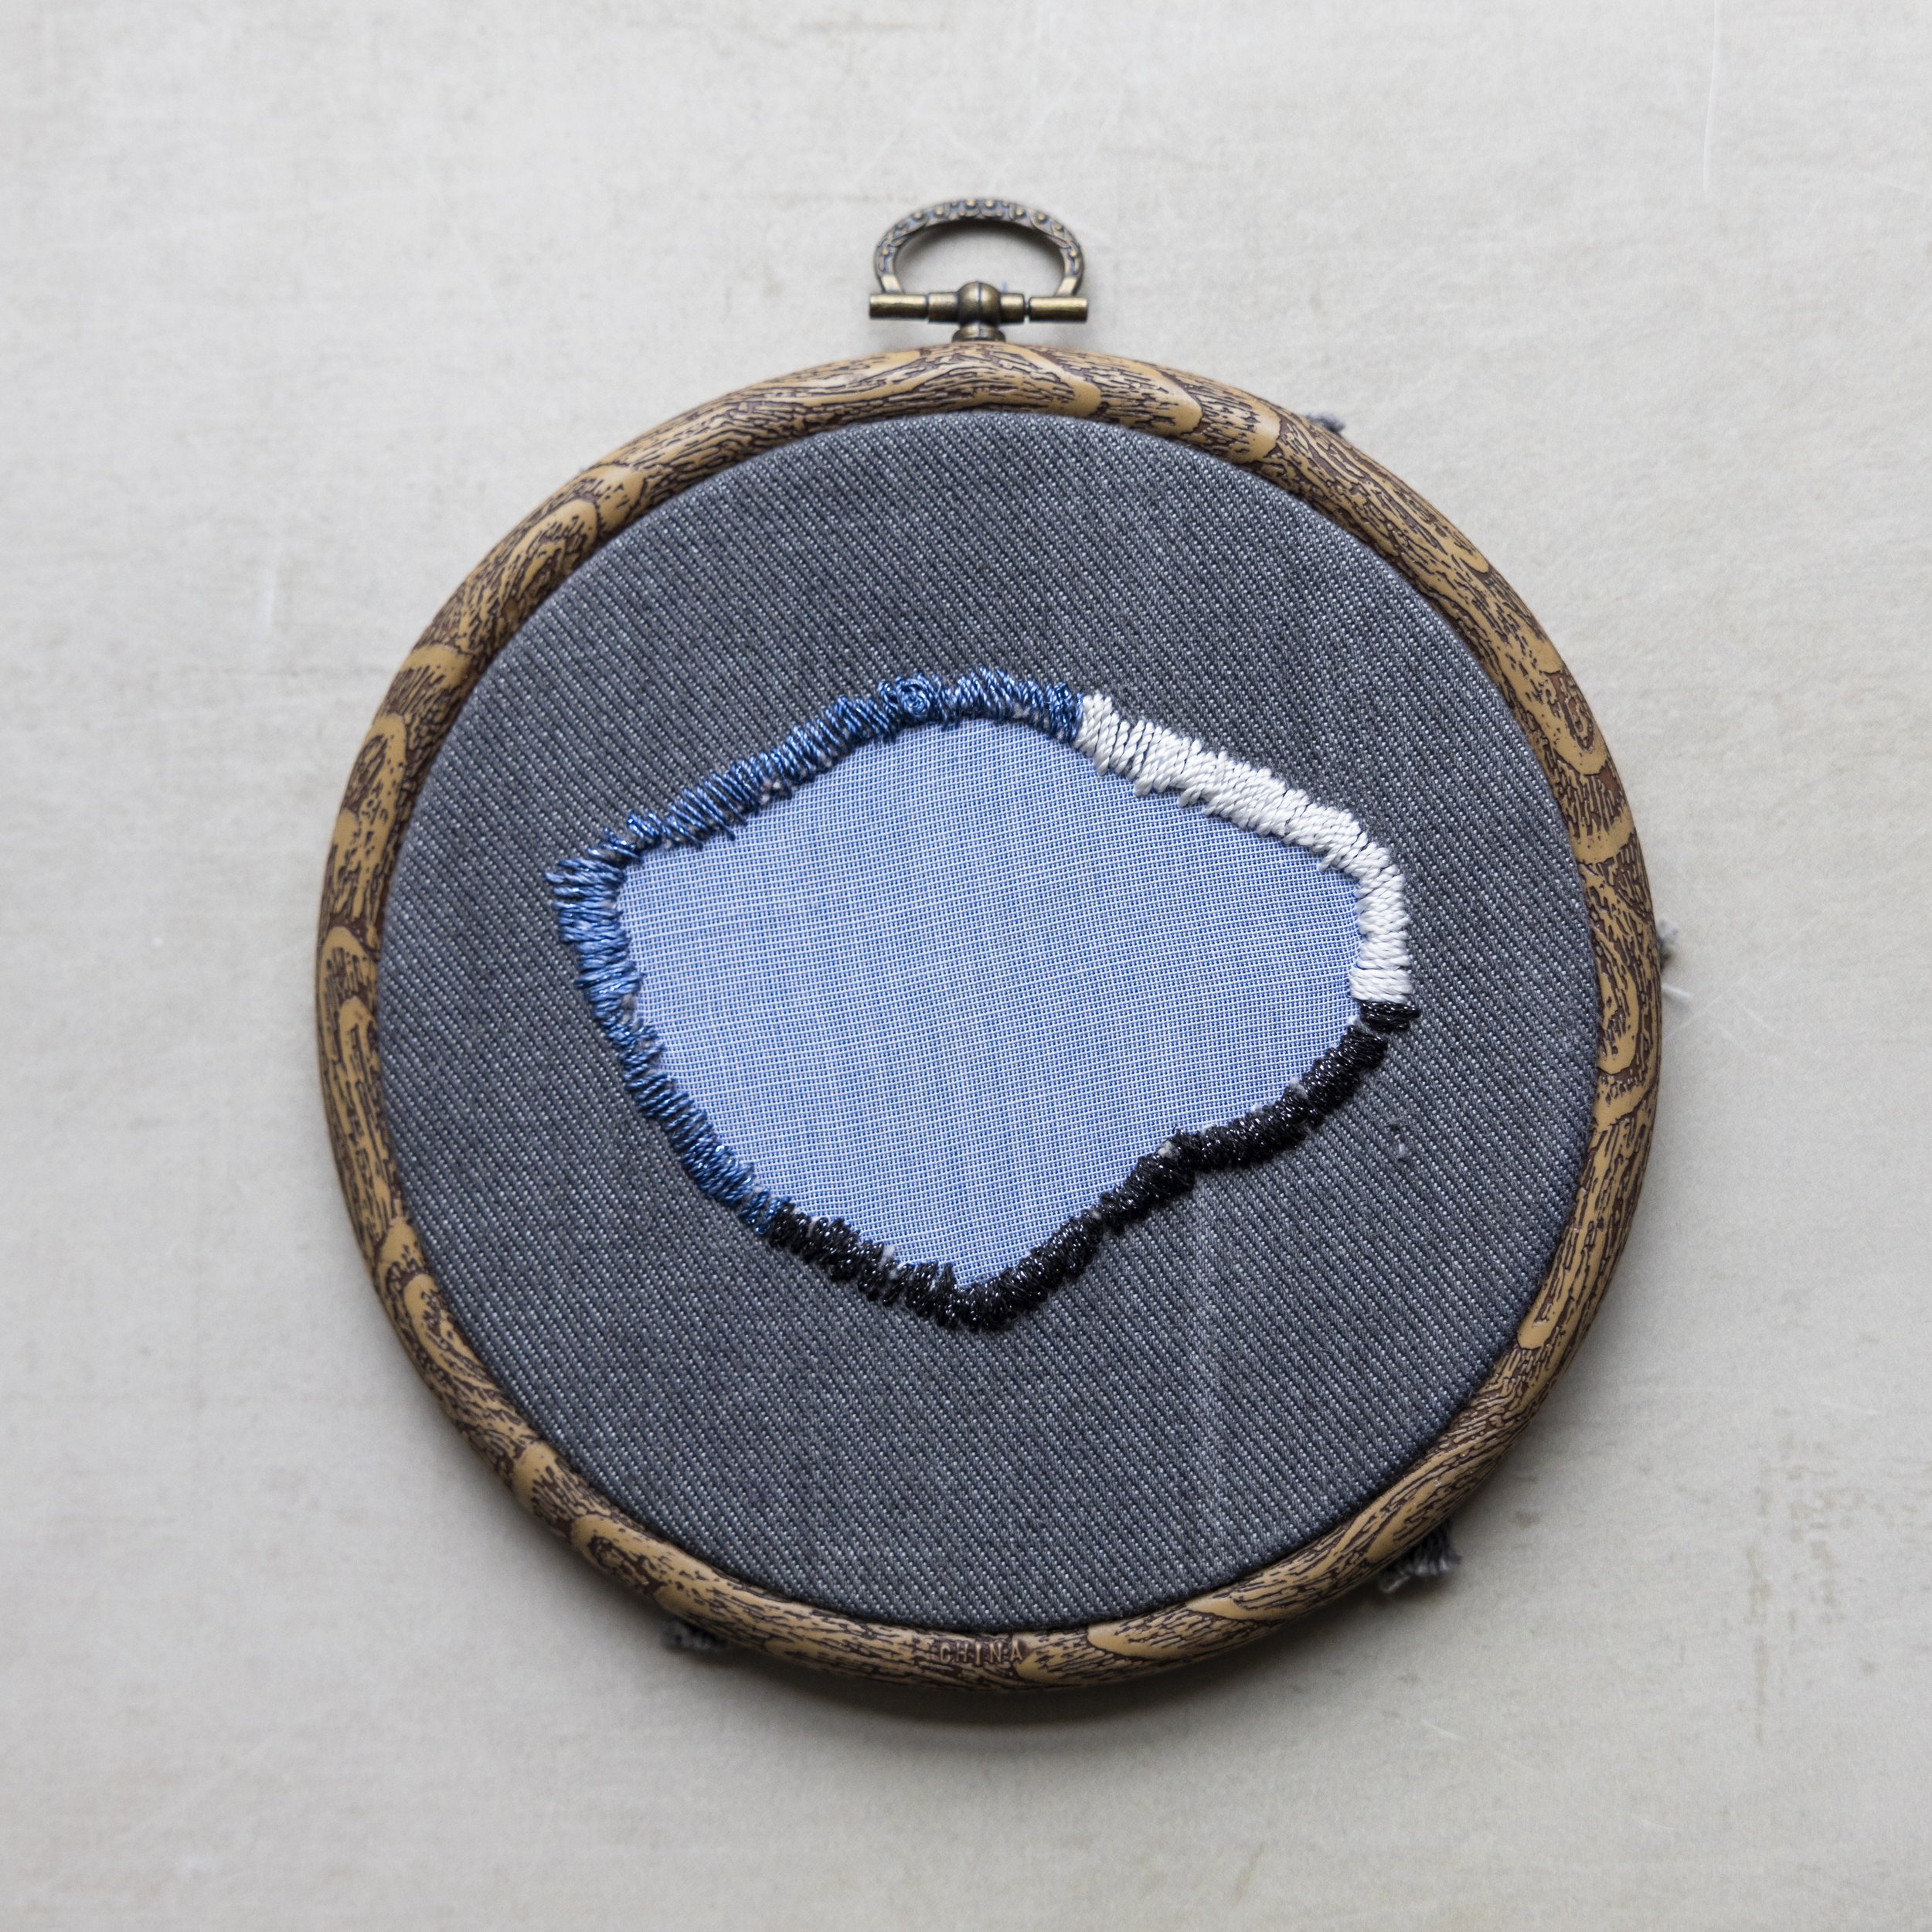
Mending is officially good for you. Not only does it make you feel useful and give you the warm glow of knowing you’ve saved something from landfill, but it also lets you make an item of clothing unique with visible mending that brings character to everyday items. A mended item becomes even more beautiful and loved than before it had flaws.

Satin stitch patching

Satin stitch is a great way to make a feature out of a mend and this works particularly well on fabrics like denim It’s used to patch the fabric hole to reinforce the mend and stop it getting any bigger. Traditionally, cotton threads are used, but it can also work nicely with silk threads.

1 Select a piece of scrap fabric large enough to patch the hole in the garment – you can always trim it later. Any woven fabric will work, just make sure it has the same density as the garment you want to repair. Next, you may want to make the hole a bit more interesting – take a fabric pen and draw a shape around the hole and trim to the new shape you’ve drawn.

2 Pin your patch to the inside of the garment so the hole is covered. Be generous with pinning – you don’t want the fabric patch to move about while you’re stitching. Pin around 0.5cm from the edge of the hole.

3 Thread your needle (use an arm’s length), leaving a tail by the eye end so the thread doesn’t come out. Then tie a couple of knots at the opposite end of the thread.

4 To start your satin stitch, come through the back of the fabric at the very edge of where the hole is in the garment. Bring your needle all the way through until the knot meets the fabric. You’ll then put the needle back into the fabric from the front, positioning your needle about 5mm directly below where you brought the needle out. Next, bring the needle through the back again (almost back through the first hole in the first stitch, so the stitches are super close to one another), and then through the front, again super close to the previous stitch. Continue in this way until you come to the end of your thread and are ready to thread the needle again.

5 When tying off your thread, you’ll need to leave at least 10cm of thread to make it secure. Bring your needle through to the back, through the stitch that’s closest to where the needle is coming from. Pull the needle through about 1 cm and wrap the thread around a couple of times and pull through. This creates the knot. I like to then weave the needle under the next two stitches and repeat this process one more time to make sure the thread won’t come loose when washed. You can then take your scissors and snip really close to the garment.

6 Continue with a new piece of thread ensuring that your stitches are super compact – much like satin fabric – going all the way around the hole until you meet your starting point. Tie off your work, and give it a press to make sure the fabric is laying flat. You’re now ready to wear.

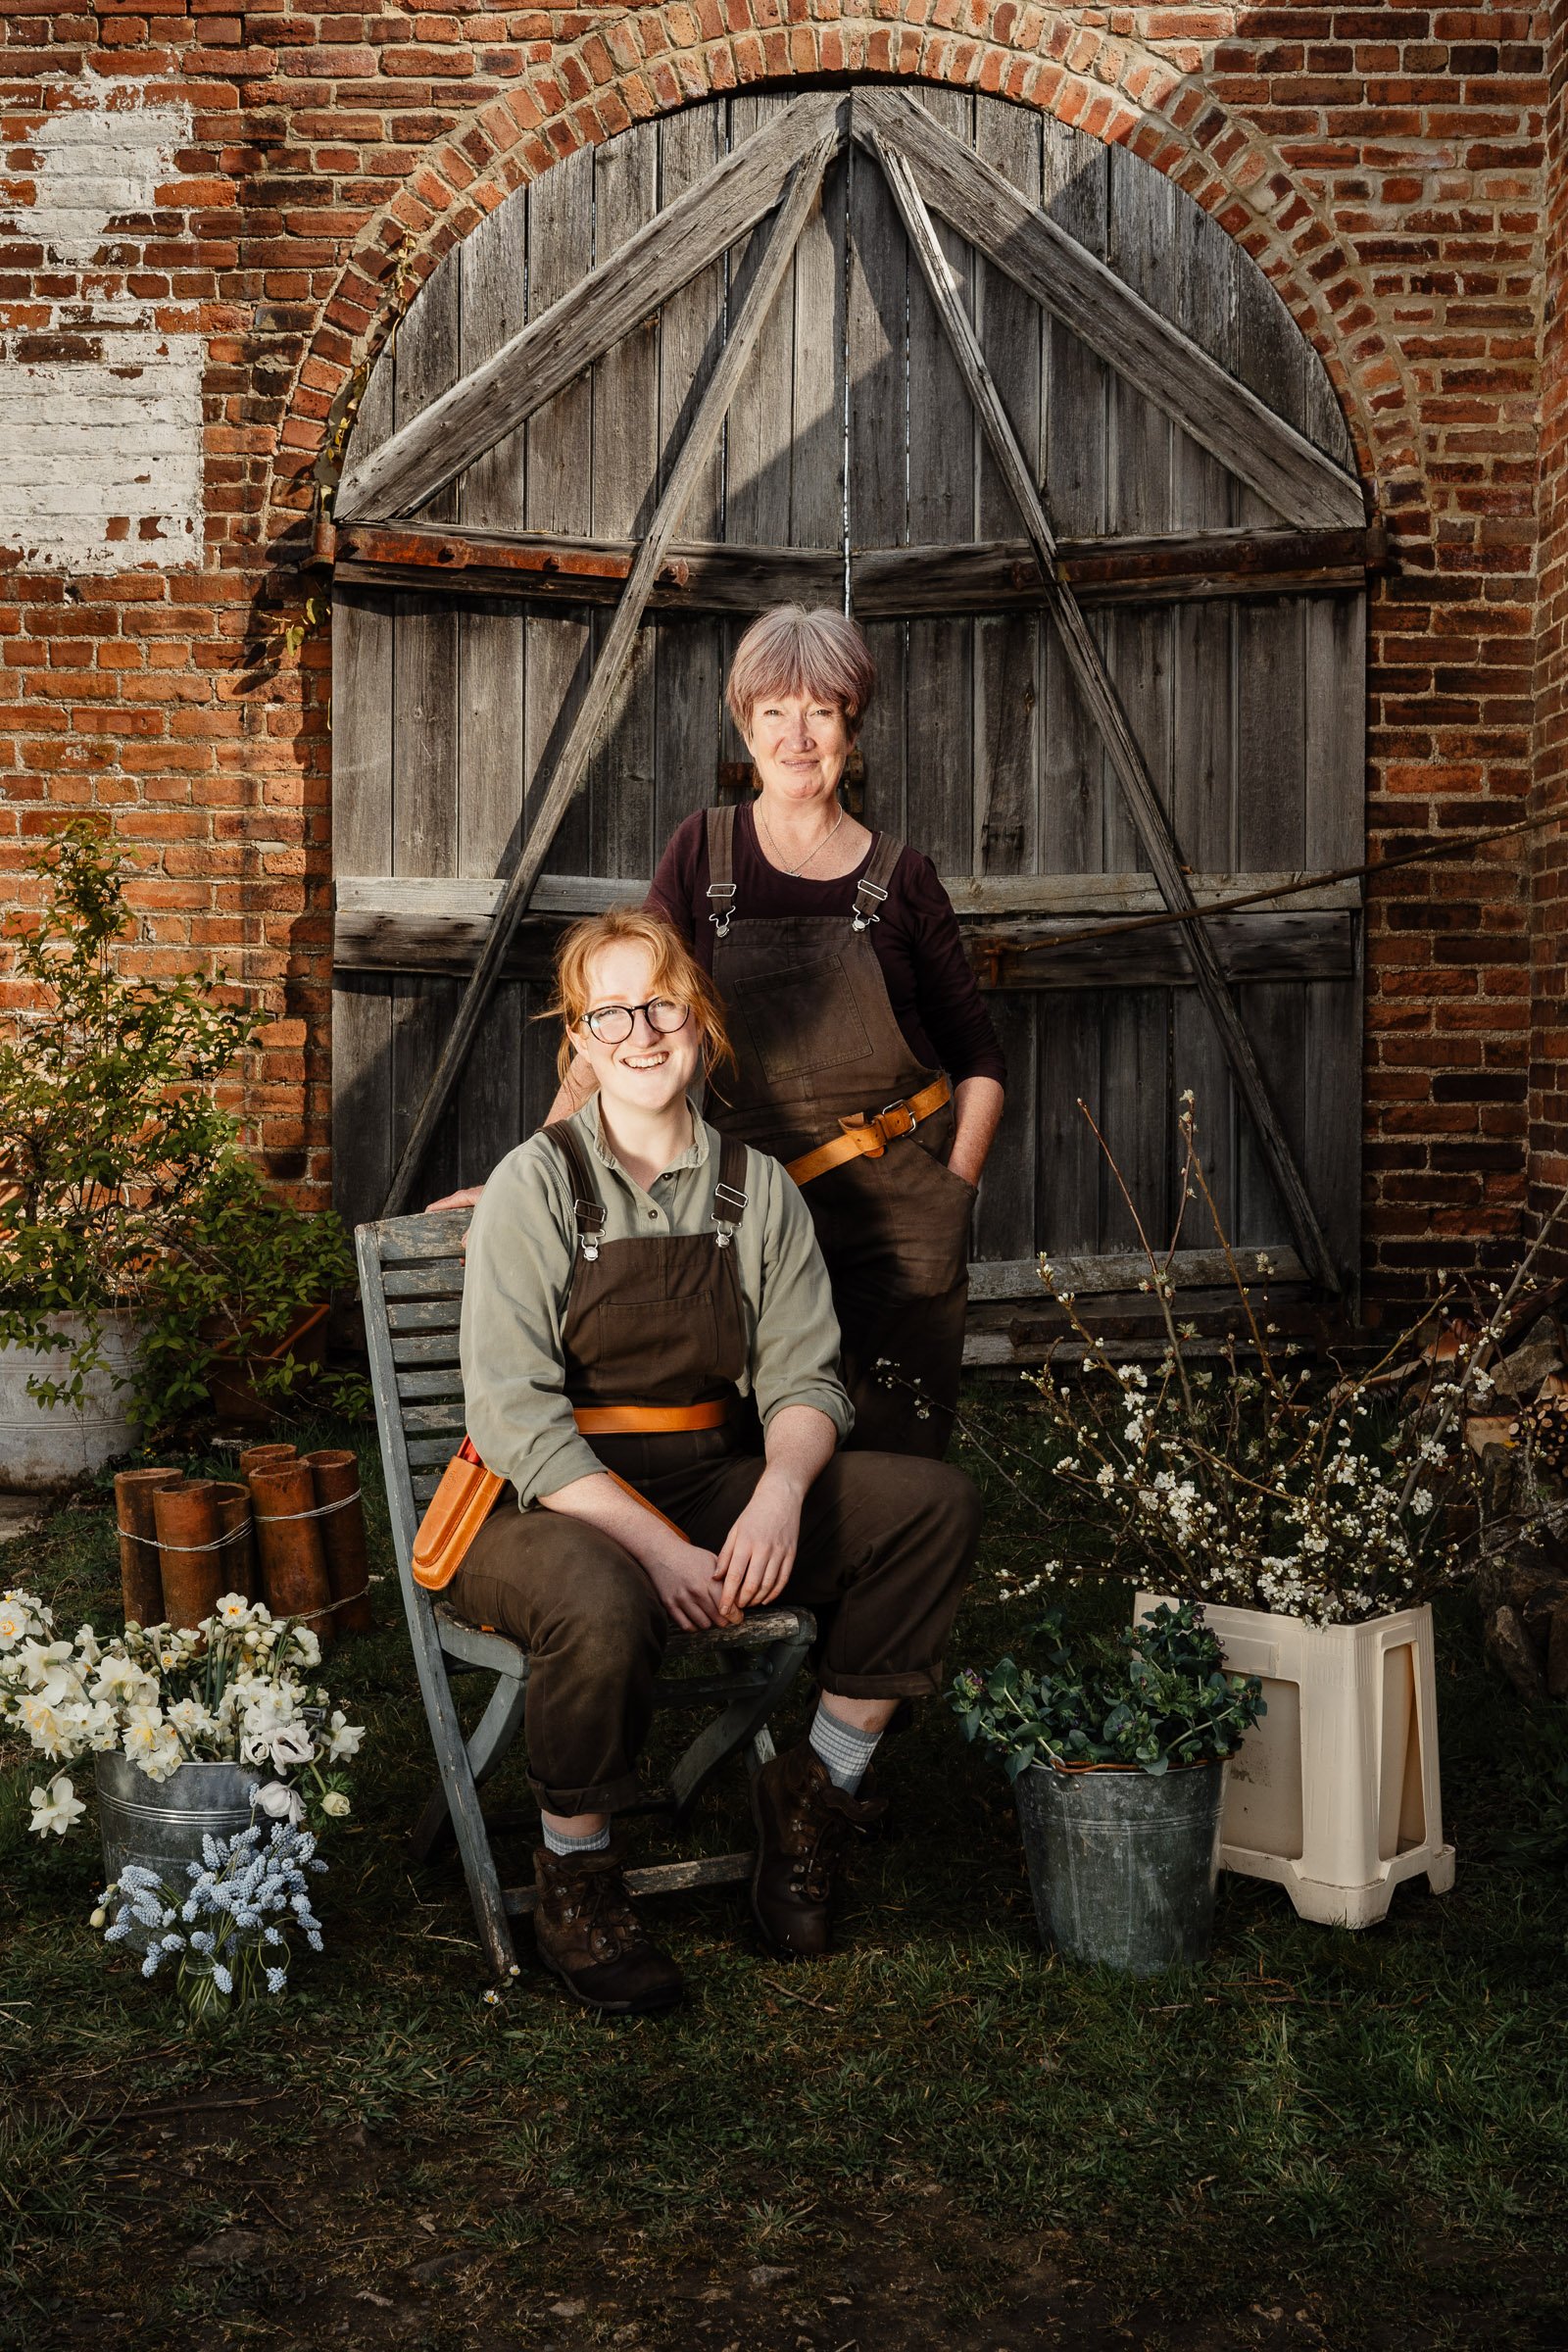
This is just one of the projects from mending expert Hannah Porter who put together our March issue’s Home Economics pages. To find out more about Hannah’s work, workshops and kits visit: restorationldn.com.

Buy this month's The Simple Things - buy, download or subscribe

More from our March issue…

Featured
Mothers Wisdom.jpeg
Mar 27, 2025
Wisdom | Mother Knows Best
Mar 27, 2025
Mar 27, 2025
@the.narrows.project 2.jpeg
Mar 22, 2025
Outing | Music Rooms
Mar 22, 2025
Mar 22, 2025
Nettle crisps.jpg
Mar 15, 2025
Recipe | Salt & Vinegar Nettle Crisps
Mar 15, 2025
Mar 15, 2025

More sewing solutions…

Featured
Mending.jpeg
Mar 20, 2025
Project | Satin Stitch Patching
Mar 20, 2025
Mar 20, 2025
Screenshot 2025-02-14 at 11.15.57.png
Feb 18, 2025
Playlist | All apologies
Feb 18, 2025
Feb 18, 2025
Lavender eye pillow.jpg
Jul 22, 2023
Make | A Soothing Lavender Eye Pillow
Jul 22, 2023
Jul 22, 2023
In Making Tags mending, sewing, patch
Comment

Photography and make by Louise Gorrod

Make | A Soothing Lavender Eye Pillow

Iona Bower July 22, 2023

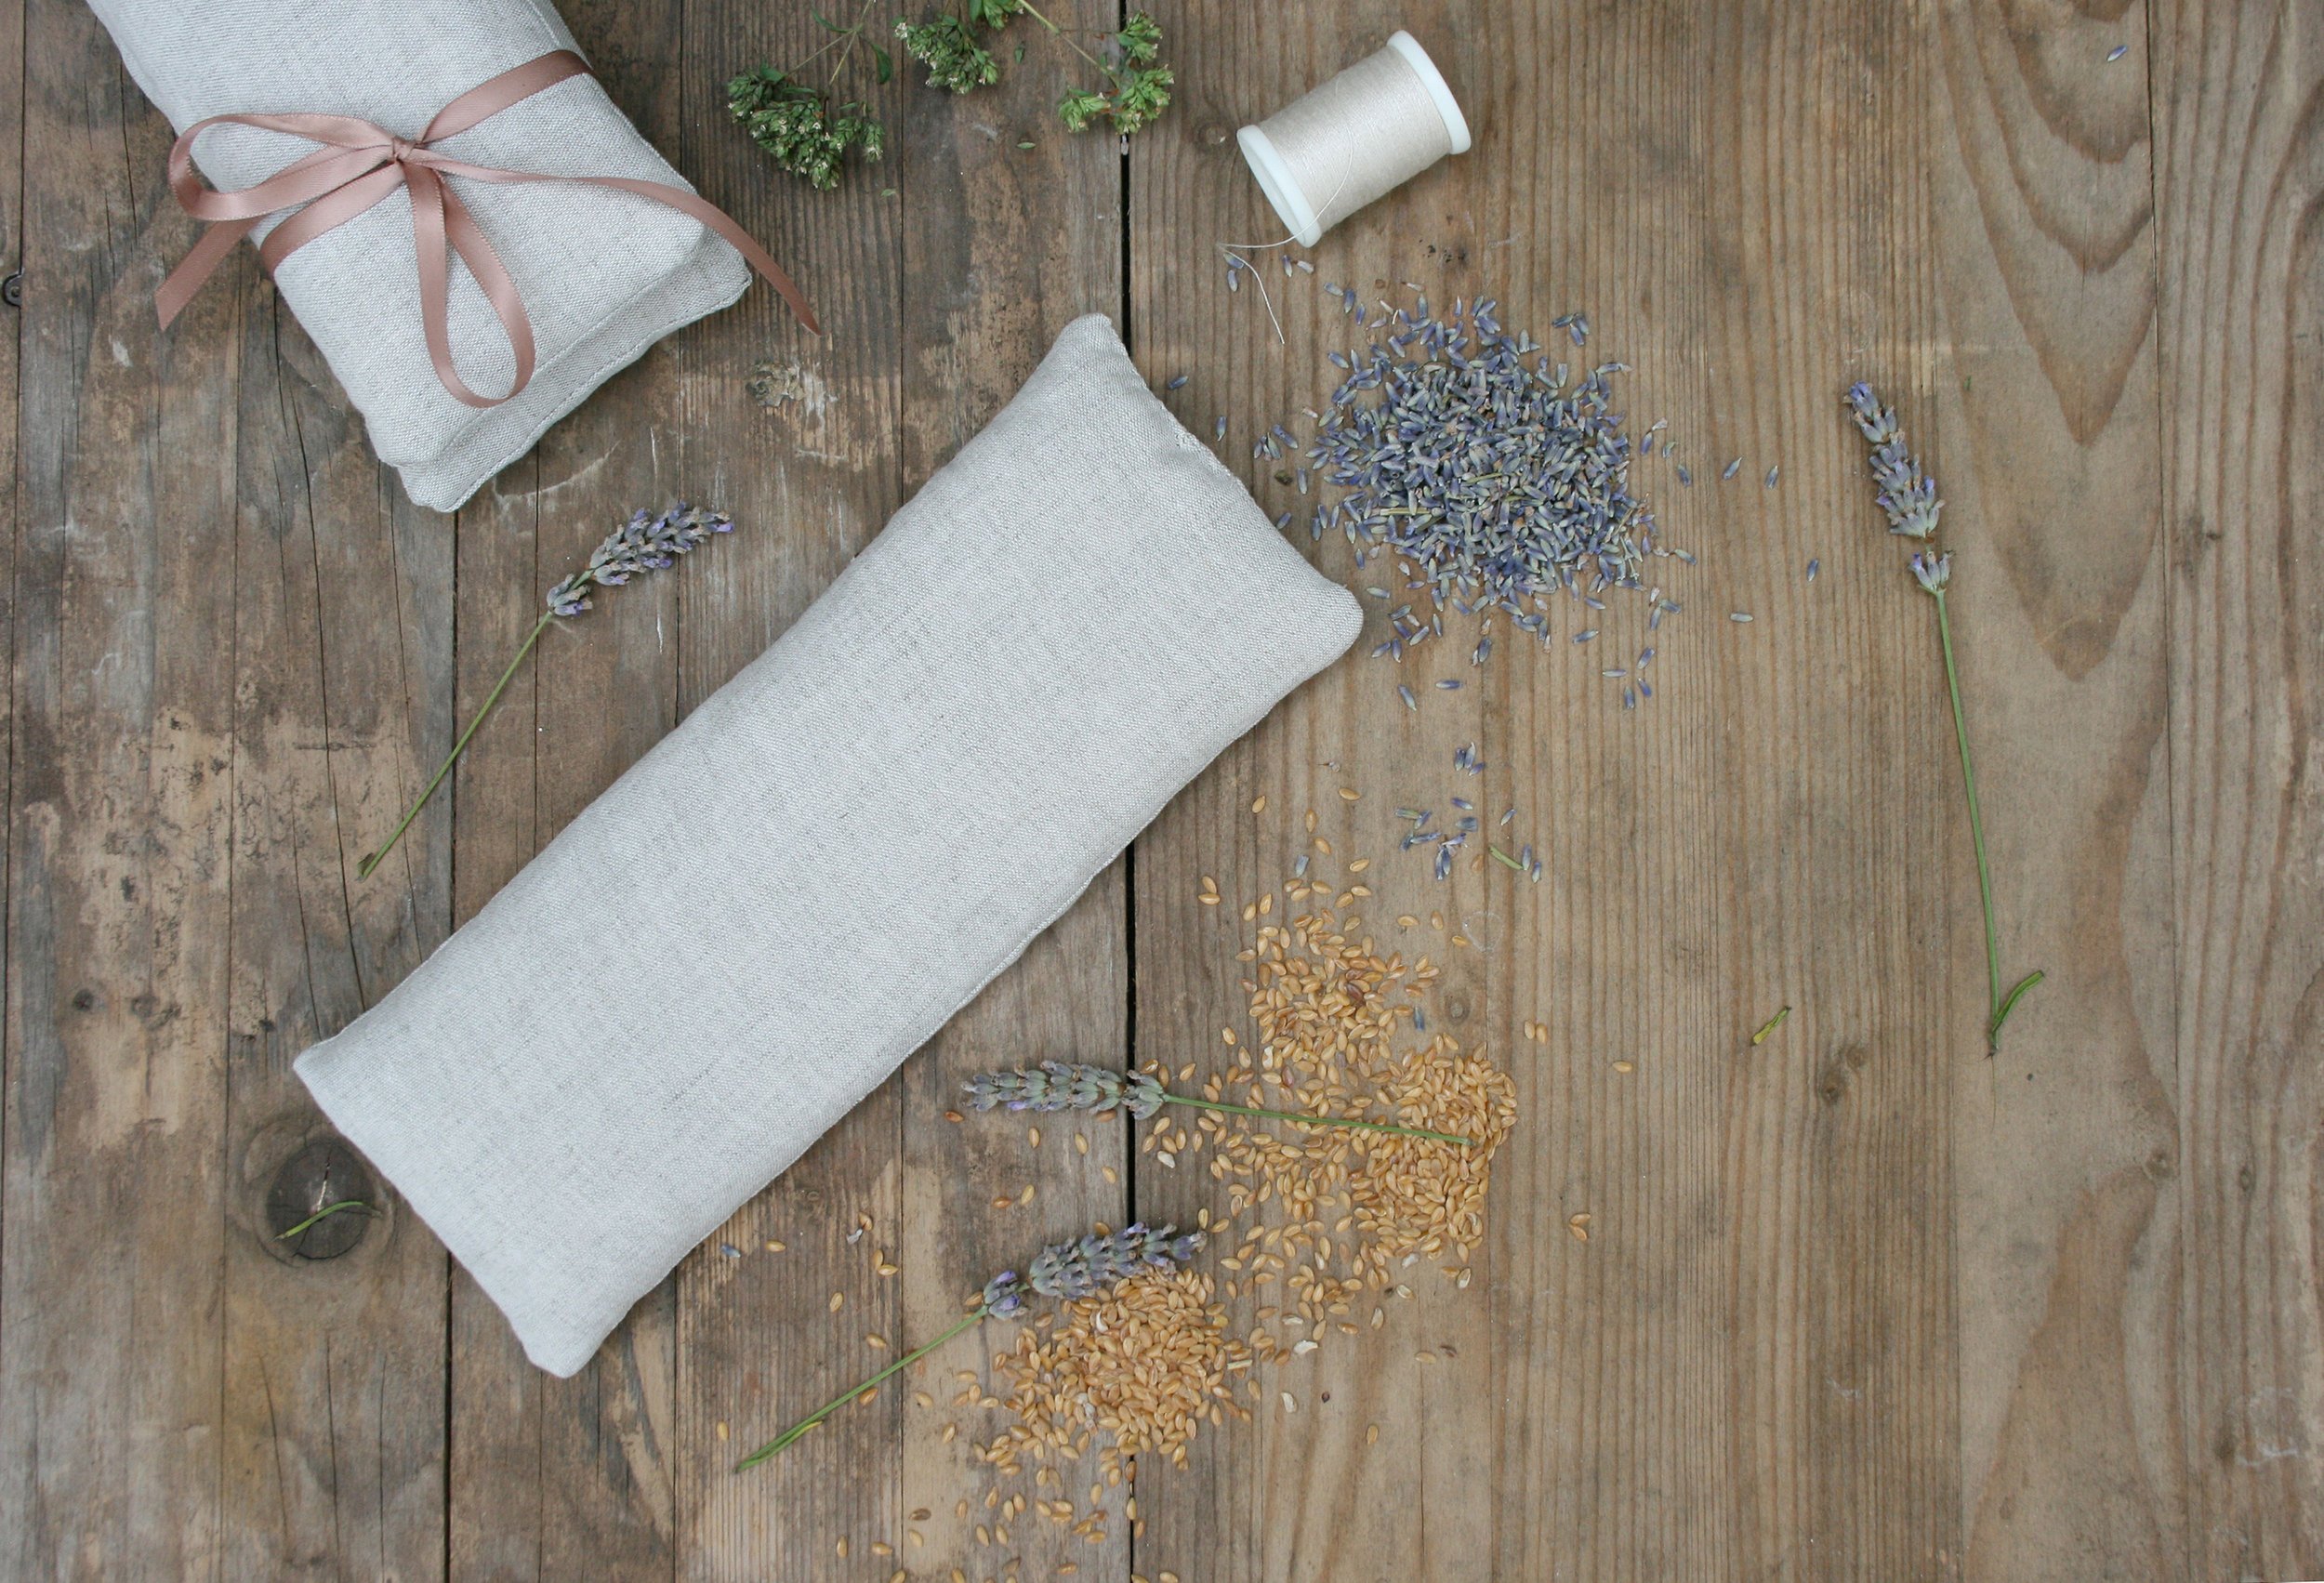
Lavender can ease headaches and help with insomnia, so lie down, pop on your eye pillow… and relax.

You will need

1/2m linen (you will have extra)
170g flax seed
30g lavender buds
Lavender essential oil (optional)

How to make

1 Make sure your linen is washed and dried before you begin. For each pillow, cut 2 layers of fabric measuring 12cm x 27cm.

2 With right sides together, sew 3 of the 4 sides, with a 5mm seam allowance. Turn the pillow the right way out and press.

3 In a bowl, mix the lavender buds, flax seed and a few drops of lavender oil. Add to the bag until mostly full, before folding in the seam allowance of the open edge and sewing it closed

For more ideas for projects to make with lavender, including wands and bath soak, turn to page 52 of the July issue of The Simple Things, in which Louise Gorrod talks us through the projects and teaches us a little bit about lavender on the way.

Buy this month's The Simple Things - buy, download or subscribe

More things to love about lavender…

Featured
raspberrylavendercocktails.jpg
Jun 15, 2024
Tipple | Lavender & Raspberry Cocktails
Jun 15, 2024
Jun 15, 2024
Lavender eye pillow.jpg
Jul 22, 2023
Make | A Soothing Lavender Eye Pillow
Jul 22, 2023
Jul 22, 2023
Greengages on toast2.JPG
Jul 11, 2020
Recipe | Greengages on toast with lavender and fennel flowers
Jul 11, 2020
Jul 11, 2020

More from our July issue…

Featured
gentleprotestfull Gracie Dahl.jpg
Jul 24, 2023
Learn | The Art of Gentle Activism
Jul 24, 2023
Jul 24, 2023
Lavender eye pillow.jpg
Jul 22, 2023
Make | A Soothing Lavender Eye Pillow
Jul 22, 2023
Jul 22, 2023
Topiary for cloud pruninng.jpg
Jul 20, 2023
Try Out | Cloud Pruning
Jul 20, 2023
Jul 20, 2023
In Making Tags issue 133, lavender, makes, weekend project, sewing
Comment
SIM65.MAKES_Step 7 Finished 3.png

Make | Craft your own countdown

Lottie Storey November 21, 2017

Channel your excitement about the festive season into making this simple and pretty project

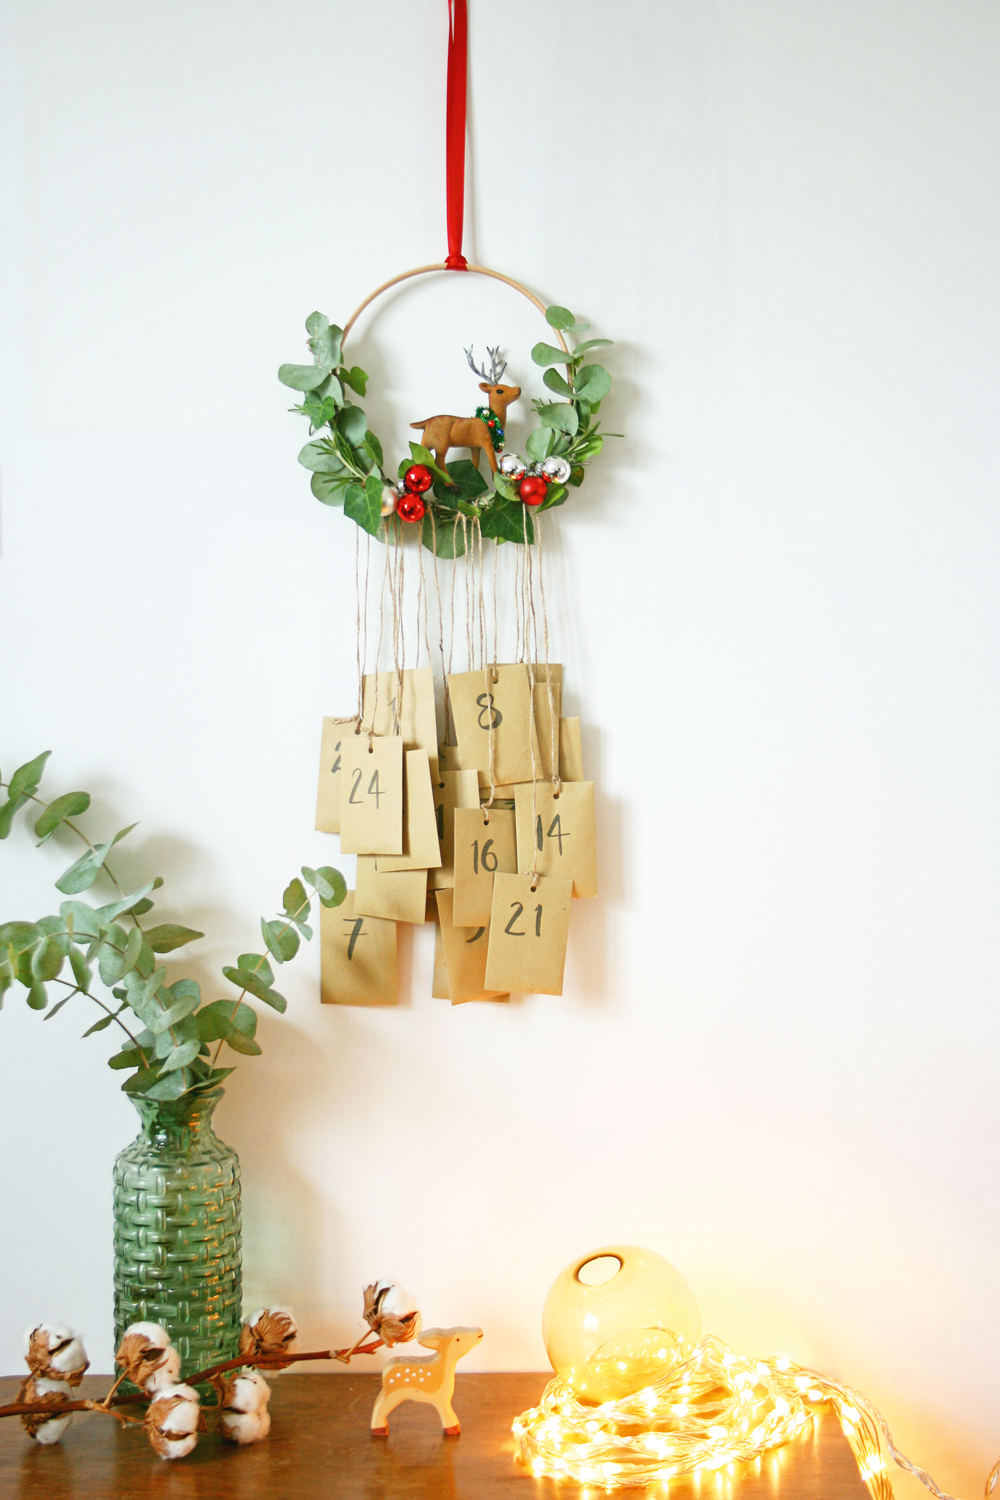
Not that we need bribery, but the pleasure of opening an advent calendar each day is an extra reason to look forward to getting out of bed in December. The first commercially produced advent calendar dates to 1903 but our project harks back to the very first, 18th-century versions, which were handmade. This easy-to-make design combines natural foliage, a bit of festive sparkle and a little treat in each envelope to be opened in the countdown to Christmas. Who could resist? And, on that note, it’s as easy to adapt for grown-ups as children.

Envelope advent calendar

SIM65.MAKES_Step 1 Materials 2.png
 1 Gather two near-identical bunches of foliage and bind them together with wire. Attach the foliage bunches to the wooden hoop, securing at intervals with wire. Allow the two bunches to overlap slightly at the base of the hoop to hide the join. Any

1 Gather two near-identical bunches of foliage and bind them together with wire. Attach the foliage bunches to the wooden hoop, securing at intervals with wire. Allow the two bunches to overlap slightly at the base of the hoop to hide the join. Any visible wire can be hidden with the addition of a leaf or two.

 2 Take three of the mini baubles and string onto a piece of wire, twisting to secure and form a cluster. Repeat with the remaining three. Secure each cluster along the base of the hoop on opposite sides.

2 Take three of the mini baubles and string onto a piece of wire, twisting to secure and form a cluster. Repeat with the remaining three. Secure each cluster along the base of the hoop on opposite sides.

 3 Remove any hanging loops from your tree decoration, then glue it securely to the centre of the hoop base using a glue gun. Leave the whole hoop piece aside to dry.

3 Remove any hanging loops from your tree decoration, then glue it securely to the
centre of the hoop base using a glue gun. Leave the whole hoop piece aside to dry.

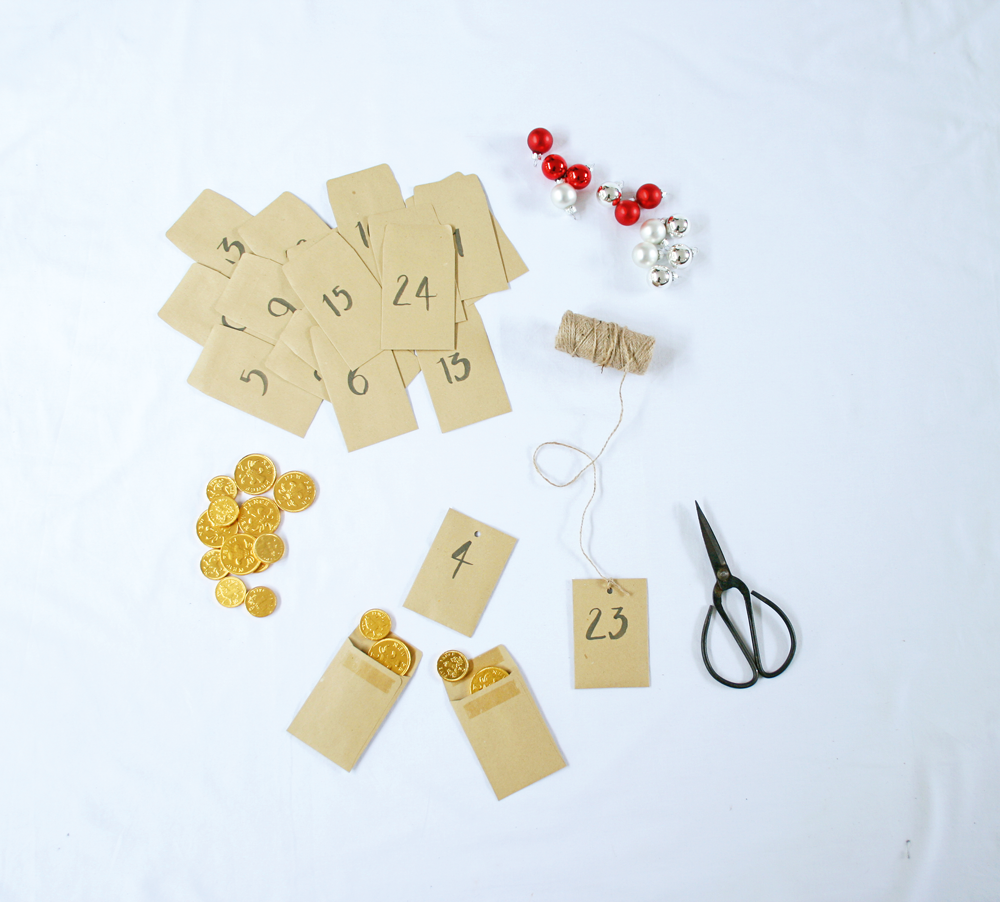
 4 Paint the numbers 1 to 24 on the front of the envelopes. Once dried, fill with miniature gifts and treats (see opposite for inspiration) and seal the envelopes. Using a hole punch, create a hole in the top of each envelope.

4 Paint the numbers 1 to 24 on the front of the envelopes. Once dried, fill with miniature gifts and treats (see opposite for inspiration) and seal the envelopes. Using a hole punch, create a hole in the top of each envelope.

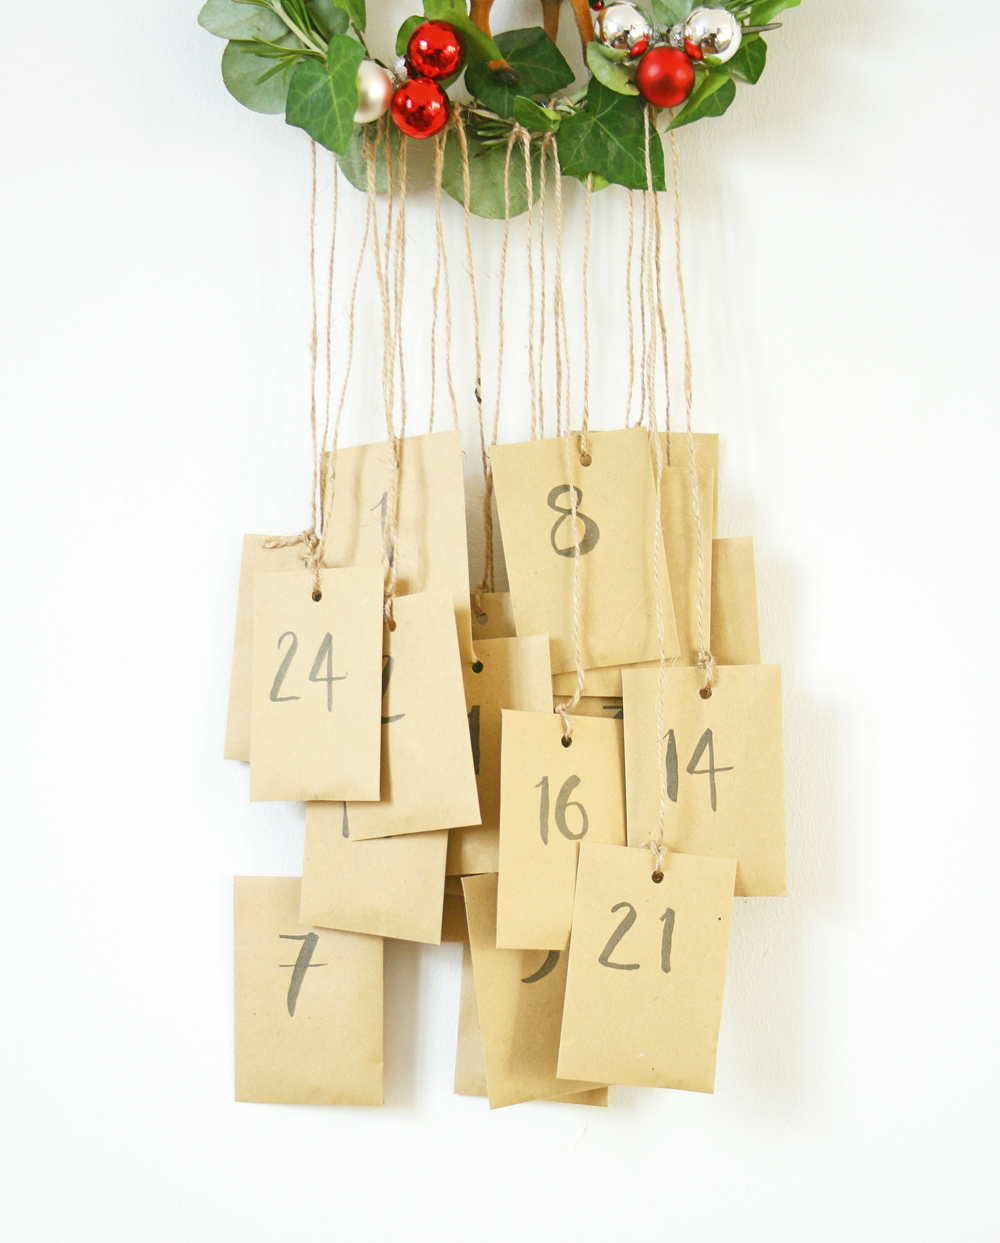
 5 Thread a length of twine through each envelope hole and secure with a double knot. Secure the other end to the decorated hoop. It’s best to hang your hoop (using the length of satin ribbon) before attaching the envelopes to avoid tangles. Vary the

5 Thread a length of twine through each envelope hole and secure with a double knot. Secure the other end to the decorated hoop. It’s best to hang your hoop (using
the length of satin ribbon) before attaching the envelopes to avoid tangles. Vary the lengths of twine a little, so that the envelopes don’t all hang at the same length. 

 Carefully hang your advent calendar in its final position and let the countdown begin.

Carefully hang your advent calendar in its final position and let the countdown begin.

Makes 24 days of festive cheer
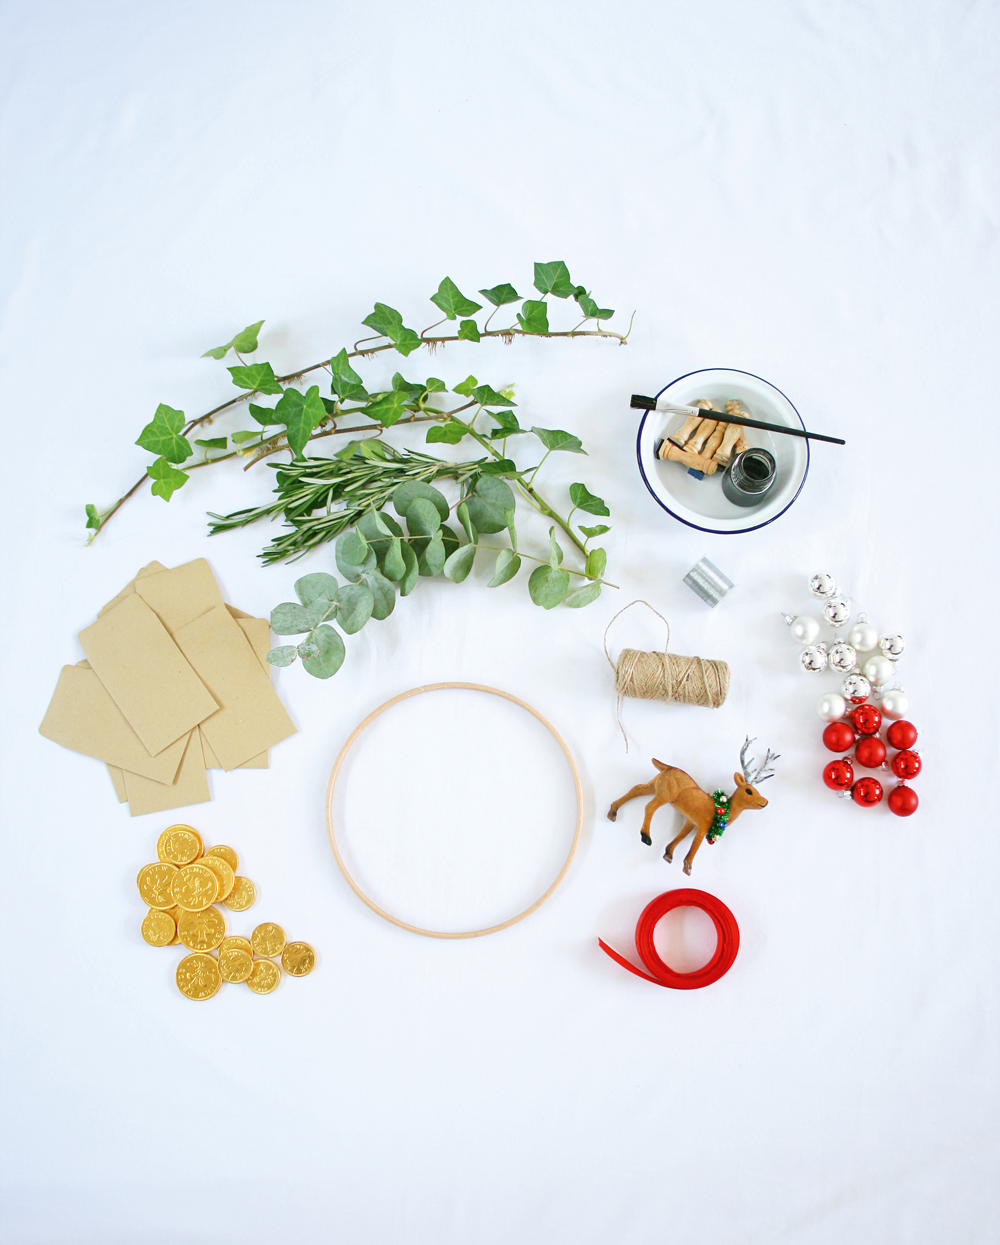
Wooden embroidery hoop 20cm (inner ring); try hobbycraft.co.uk
Beading/thin jewellery wire (hobbycraft.co.uk)
Foliage – long-lasting and fragrant, such as ivy, eucalyptus and rosemary
6 mini baubles (these are from dobbies.com)
Christmas character tree decoration (search eBay for vintage options)
Twine
24 small brown envelopes approx 6x9cm
60cm satin ribbon for hanging (uk.flyingtiger.com)
24 mini treats (see below for ideas)
Scissors
Ink and brush
Hole punch
Glue gun

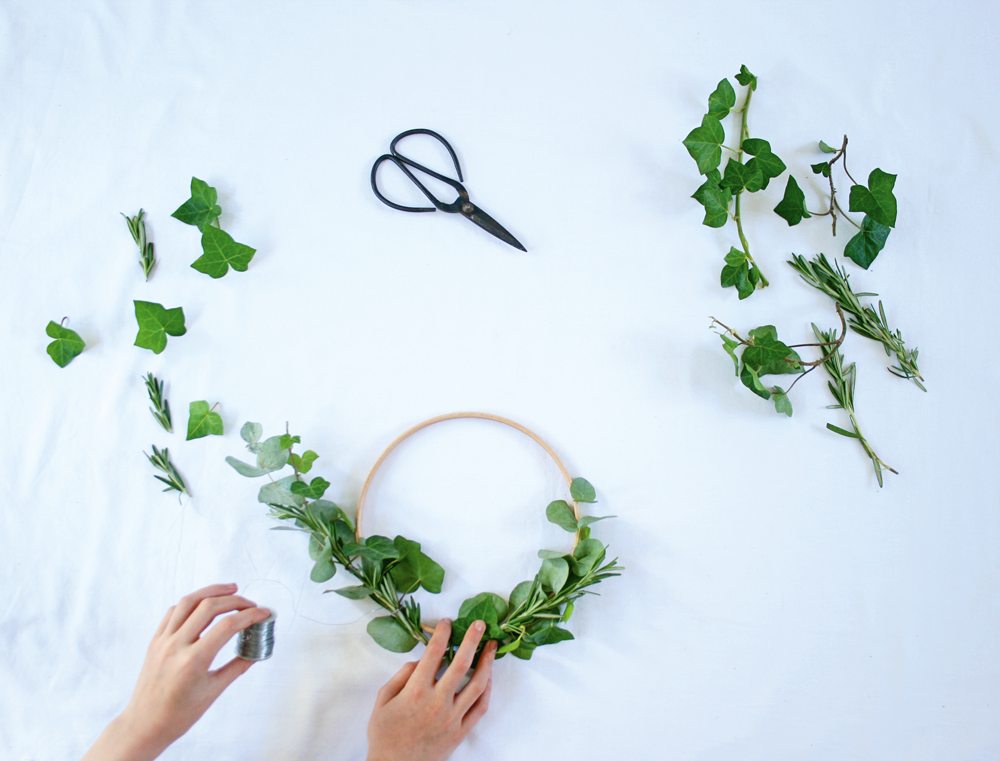
1 Gather two near-identical bunches of foliage and bind them together with wire. Attach the foliage bunches to the wooden hoop, securing at intervals with wire. Allow the two bunches to overlap slightly at the base of the hoop to hide the join. Any visible wire can be hidden with the addition of a leaf or two.
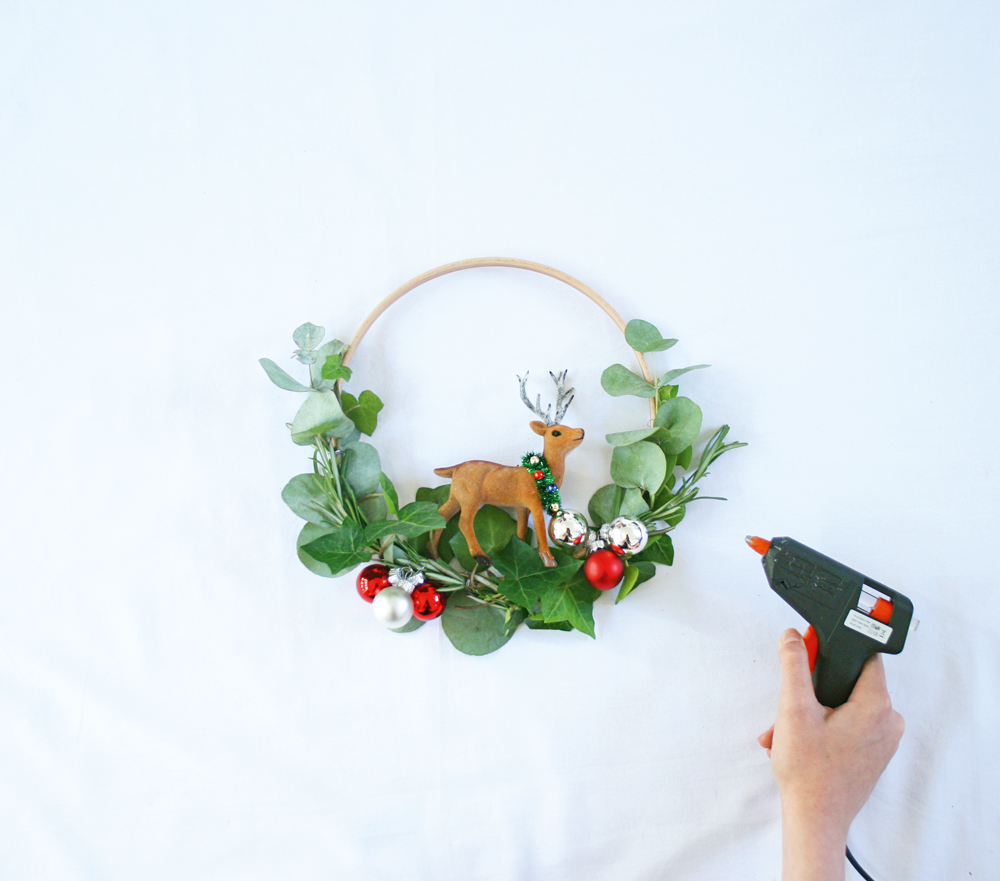
2 Take three of the mini baubles and string onto a piece of wire, twisting to secure and form a cluster. Repeat with the remaining three. Secure each cluster along the base of the hoop on opposite sides.
3 Remove any hanging loops from your tree decoration, then glue it securely to the
centre of the hoop base using a glue gun. Leave the whole hoop piece aside to dry.
4 Paint the numbers 1 to 24 on the front of the envelopes. Once dried, fill with miniature gifts and treats (see below for inspiration) and seal the envelopes. Using a hole punch, create a hole in the top of each envelope.
5 Thread a length of twine through each envelope hole and secure with a double knot. Secure the other end to the decorated hoop. It’s best to hang your hoop (using the length of satin ribbon) before attaching the envelopes to avoid tangles. Vary the lengths of twine a little, so that the envelopes don’t all hang at the same length. Carefully hang your advent calendar in its final position and let the countdown begin.

l Chocolate coins l Mini playing cards l Lip balm l Hair slides l Cinema tickets l Badges or patches l Bookmarks l Temporary tattoo l Teabags

  Buy ,  download  or  subscribe   See the sample of our latest issue  here   Buy a copy of our latest anthology:  A Year of Celebrations   Buy a copy of  Flourish 2 , our wellbeing bookazine  Listen to  our podcast  - Small Ways to Live Well

Get hold of your copy of this month's The Simple Things - buy, download or subscribe
View the sampler here


More from the November issue:

Featured
SIM65.MAKES_Step 7 Finished 3.png
Nov 21, 2017
Make | Craft your own countdown
Nov 21, 2017
Nov 21, 2017
SIM65.CAKE_parsnipcake_2.png
Nov 20, 2017
Recipe | Parsnip and maple syrup cake with parsnip crisps
Nov 20, 2017
Nov 20, 2017
nov 65 back cover.png
Nov 19, 2017
You can do anything but not everything
Nov 19, 2017
Nov 19, 2017

More weekend projects to make:

Featured
TEA COSY JUMPER.jpg
Jan 25, 2025
How to | Make a Tea Cosy from an Old Jumper
Jan 25, 2025
Jan 25, 2025
Wellbeing.jpg
Feb 11, 2024
Make | Kitchen Face Masks
Feb 11, 2024
Feb 11, 2024
AdobeStock_276831672_Preview.jpg
Oct 23, 2023
Project | Make Seed Bombs
Oct 23, 2023
Oct 23, 2023
In Making, Christmas Tags make, weekend project, Make project, sewing, issue 65, november, christmas
Comment
SIM65.JOBWELLDONE__MG_5848 The Stitch Society props.JPG

Competition | Win a denim Susie pinafore apron from The Stitch Society

Lottie Storey October 18, 2017

In November’s issue of The Simple Things, we meet Charlotte Meek of The Stitch Society in our Job Well Done feature, who tells us about how her passion for vintage fabrics inspired her to create a business making aprons celebrating Yorkshire’s textile heritage.

All The Stitch Society aprons come with a 10-year guarantee and are all made in Yorkshire from UK sourced fabrics. We’re giving away a denim Susie pinafore apron, worth £49.

SIM65.JOBWELLDONE__MG_5849 The Stitch Society studio.JPG

How to enter

For your chance to win a denim Susie pinafore apron from The Stitch Society, enter below before the closing date, 29 November 2017. The winner will be chosen at random and notified after this date. You can find full terms and conditions on page 129 of November’s The Simple Things and at  icebergpress.co.uk/comprules.

Enter now
Detail of the Denim Susie Pianfore Apron from The Stitch Society.JPG
The Stitch Society Logo.jpg
Denim Susie Pianfire Apron from The Stitch Society.JPG
The Stitch Society Denim Susie Pinafore Apron back.JPG
  Buy ,  download  or  subscribe   See the sample of our latest issue  here   Buy a copy of our latest anthology:  A Year of Celebrations   Buy a copy of  Flourish 2 , our wellbeing bookazine  Listen to  our podcast  - Small Ways to Live Well

Get hold of your copy of this month's The Simple Things - buy, download or subscribe

View the sampler here


More from the November issue:

Featured
SIM65.MAKES_Step 7 Finished 3.png
Nov 21, 2017
Make | Craft your own countdown
Nov 21, 2017
Nov 21, 2017
SIM65.CAKE_parsnipcake_2.png
Nov 20, 2017
Recipe | Parsnip and maple syrup cake with parsnip crisps
Nov 20, 2017
Nov 20, 2017
nov 65 back cover.png
Nov 19, 2017
You can do anything but not everything
Nov 19, 2017
Nov 19, 2017

More competitions:

Featured
gtc competition.png
Sep 19, 2018
Competition | Win £500 to spend at Garden Trading
Sep 19, 2018
Sep 19, 2018
In Competition Tags competition, issue 65, november, sewing
3 Comments
Photography: LINDSAY ZIER-VOGEL

Photography: LINDSAY ZIER-VOGEL

Make | I love my city tote bag

Lottie Storey August 15, 2017

Make and decorate totes that celebrate what you love about where you live

You will need

For the bag:
38 x 46cm cotton twill (outer fabric) 
38 x 46cm cotton fabric (liner fabric)
1 spool thread, to match twill
2 pieces of cotton webbing (50 x 4cm), for tote handles
OR, a ready-made blank tote bag

For the decoration:
2 skeins embroidery floss
Size 4 embroidery needle
18cm wooden embroidery hoop (or smaller)
Scissors
Pencil and white eraser
Ruler and straight pins
Iron

Embroider your love letter:
1 Think of something that you love about where you live. Maybe it’s a flower seller or the view from the waterfront, a skyline, or a certain stretch of road.
2 Pre-wash and dry fabric.
3 In pencil, write the letter in the centre of the twill fabric, leaving at least 6cm at the top and at least 10cm at the bottom. If using an existing tote bag, centre text.
4 Using all six strands of embroidery floss, chain stitch around pencilled text. To chain stitch: make a small stitch on your fabric. Bring the needle back up through the fabric a short distance below your stitch. Loop your thread through the first stitch, pull through before re-inserting your needle into the same hole you came up through. Repeat, by passing the needle through the last loop you made.
5 Trim loose threads and iron out any crease marks from the hoop. If you’re using an existing tote, you’re done! If sewing your own tote bag, proceed to the next step.

Make your bag:
1 Start by making the lining: pin together two pieces of liner material with right sides facing. Using a sewing machine with a 1cm seam allowance, stitch along one side, turn onto bag bottom, and turn again, sewing up the other side.
2 Pinch corner and line up the side seams so that corner fabric makes a triangle. Measure 7.5cm from corner and draw a perpendicular line with pencil. Sew along that line, keeping side seams open. Complete both liner corners and cut off extra fabric. Keep tote inside out and pin 4cm seam from open edge of bag.
3 Then make the outer bag: pin together two pieces of twill with right sides facing. Using a sewing machine with a 1cm seam allowance, stitch both sides of the bag and the bottom.
4 Pinch corner and line up side seams so that the corner fabric makes a triangle. Measure 8cm from the corner and draw a perpendicular line with pencil. Sew along that line, keeping the side seams open. Complete both corners and cut off any extra fabric.
5 Flip fabric right-side out and pin a 4cm seam from the open edge of bag.
6 Slide lining inside outer shell and pin corners together. Pin handle fabric to twill 10cm from the edge of the bag, with 10cm between each end of the handles. Pin outer fabric to inner fabric. Be careful to tuck handle tops down into bag. Sew through all layers at the top of the bag, keeping the handles sandwiched between the lining and the outside twill. Trim any loose threads to neaten it up.

Project by Lindsay Zier-Vogel, reprinted with permission from Strange Material: Storytelling through Textiles edited by Leanne Prain (Arsenal Pulp Press).


  Buy ,  download  or  subscribe   See the sample of our latest issue  here   Buy a copy of our latest anthology:  A Year of Celebrations   Buy a copy of  Flourish 2 , our wellbeing bookazine  Listen to  our podcast  - Small Ways to Live Well

Get hold of your copy of this month's The Simple Things - buy, download or subscribe

View the sampler here


More from the August issue:

Featured
Aug 28, 2017
Recipe | Vegetable crisps
Aug 28, 2017
Aug 28, 2017
Aug 26, 2017
Britain's outdoor games
Aug 26, 2017
Aug 26, 2017
Aug 20, 2017
Garden hacks | Reuse cooking water on your plants
Aug 20, 2017
Aug 20, 2017

More weekend projects to make:

Featured
TEA COSY JUMPER.jpg
Jan 25, 2025
How to | Make a Tea Cosy from an Old Jumper
Jan 25, 2025
Jan 25, 2025
Wellbeing.jpg
Feb 11, 2024
Make | Kitchen Face Masks
Feb 11, 2024
Feb 11, 2024
AdobeStock_276831672_Preview.jpg
Oct 23, 2023
Project | Make Seed Bombs
Oct 23, 2023
Oct 23, 2023
In Making Tags make, issue 62, august, weekend project, Make project, tote bag, sewing
Comment

Weekend project: Woven wall hanging

Lottie Storey November 3, 2016

Weave your way to create unique home accessories

As with macramé, weaving is a skill that’s being hauled out of the 1970s and back into your home. And, also like macramé, it’s a pleasing way of adding homespun cosiness to your space. The techniques are as simple as they were back then, although the colour palette and styling may have shifted. The materials are easy to come by, too. You will need a loom though – follow the instructions below to make your own, or try eBay and Amazon for beginners’ lap looms. 

To make this wall hanging, you will need:

A simple lap loom
Various shades and thicknesses of wool
Doweling
String
Scissors
Wool shuttle or embroidery needle

1 Using the string, tie a knot around the top of the loom. Making sure it’s tight, start to warp up your loom. To do this you will need to feed the string up and down, looping around the notches on either end of the loom. Make sure your tension is tight as this will be the base of your weave.

2 To create tassels for your weave, cut your wool to a length of roughly 20cm. You will need to cut quite a few of these. Taking 3–6 strands of wool (depending on the thickness of your wool), lay the strands over the top of two warp threads. Twist the threads under the warp and pull down. Carry along the length of the loom.

3 To start weaving, take the wool and wrap around the weaving shuttle or an embroidery needle. To weave, take the wool up and over alternative warp threads all the way across the width of the frame. Do the same for the next row, but weave the opposite way – taking the wool under the warp threads it went over in the previous row.

4 To create knotted tassels, follow step two again but, before you thread the wool under the warp, knot all the pieces of wool together.

5 Carry on weaving using different thicknesses of wool to create texture. 6 Once you are happy with your weave it’s time to take it off the loom. To do this, cut the top warp threads but leave the bottom warp threads (under the tassels) as they are. This will just lift off the loom. Tie the top warp threads, and then tie around a piece of doweling all ready to hang. Don’t forget to tie a piece of string so you can hang your weave up on the wall.

Turn to page 110 of November's The Simple Things for another weaving make.

Project by Lucy Davidson. Lucy Davidson runs regular weaving workshops around southern England. Check her blog peasandneedles.co.uk for details and more woven inspiration.


More from the November issue:

Featured
Nov 29, 2016
Escape: Island Adventure
Nov 29, 2016
Nov 29, 2016
Nov 21, 2016
Escape: British road movies
Nov 21, 2016
Nov 21, 2016
Nov 20, 2016
Fall asleep with a dream and wake up with a purpose
Nov 20, 2016
Nov 20, 2016

More making projects:

Featured
Mending.jpeg
Mar 20, 2025
Project | Satin Stitch Patching
Mar 20, 2025
Mar 20, 2025
Lavender eye pillow.jpg
Jul 22, 2023
Make | A Soothing Lavender Eye Pillow
Jul 22, 2023
Jul 22, 2023
SIM65.MAKES_Step 7 Finished 3.png
Nov 21, 2017
Make | Craft your own countdown
Nov 21, 2017
Nov 21, 2017
  Buy ,  download  or  subscribe   See the sample of our latest issue  here   Buy a copy of our latest anthology:  A Year of Celebrations   Buy a copy of  Flourish 2 , our wellbeing bookazine  Listen to  our podcast  - Small Ways to Live Well

Get hold of your copy of this month's The Simple Things - buy, download or subscribe

View the sampler here


In Making, Nest Tags sewing, issue 53, november, making, make, school holiday ideas
Comment
Image: Cico Books

Image: Cico Books

Chef’s brights: DIY oven gloves and apron

David Parker January 22, 2015

Colourful kitchen kit you can create at home and wear proudly while you cook.

It’s a tough one to call: is it more gratifying to whip up something new on your sewing machine or in the kitchen? Well, no need to choose, because we’ve cracked the dilemma with these crafty projects: you can create something in the kitchen while modelling the new apron and oven gloves you’ve made for yourself.

These two colourful sewing projects by Chloë Owens are a reminder that even the most useful of items will benefit from a dash of pattern and fun. Don’t be put off by the number of steps – they both use straightforward sewing (and a bit of sticking), rather than anything too challenging.

Turn to page 106 for the project instructions and download the project templates.

Projects by Chloë Owens. Taken from the book All Sewn Up (Cico Books, £14.99). 

In Making Tags sewing, templates, issue 32, february
Comment
merchant.jpg

Why sewing matters

Future Admin December 19, 2013

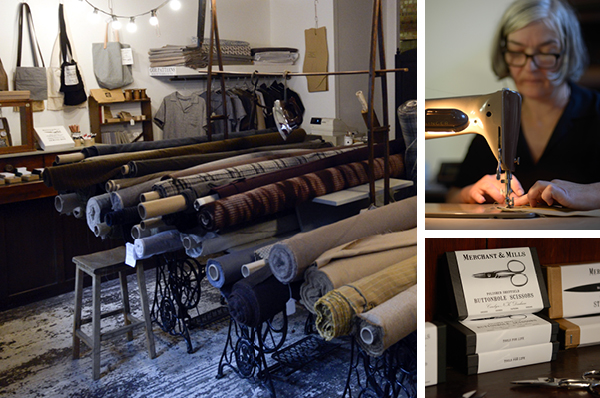
We predict Father Christmas will be bringing a record number of sewing machines this year. If sewing is on your to-do list for 2014, be inspired by the beautiful fabrics and oh-so-simple patterns from Merchant and Mills. Enjoy this mini-film of their work by weareshuffle. Click here to view You can read the interview with seamstress Carolyn Denham in our Christmas holiday issue (no 18 - on sale now).

Here's a taste of what she has to say on the subject of sewing:

'What really gets Carolyn worked up is how little regarded sewing is as a craft. She believes that because women do it is seen as domestic, like housework. “Seamstresses were never looked up to like tailors, who were mainly men. But all 'haute couture' means is high sewing, there's no difference in terms of craftsmanship in these professions.” And don't even get her started when it comes to revered woodworking skills such as joinery and carpentry and cabinetmaking. “Think how much more difficult sewing is – wood stays still, while material wobbles, frays and slips but because everyone – every woman did it at home it was devalued.” Where cabinetmakers and blokes generally have got it right is that they are more happy to spend money on kit while women tend to be naturally thrifty. There's a certain pleasure in that but it is a false economy. My motto would always be, buy one and buy well.'


In Interview Tags dressmaking, sewing
Comment
Featured
  Buy ,  download  or  subscribe   See the sample of our latest issue  here   Buy a copy of our latest anthology:  A Year of Celebrations   Buy a copy of  Flourish 2 , our wellbeing bookazine  Listen to  our podcast  - Small Ways to Live Well
Feb 27, 2025
Feb 27, 2025

Buy, download or subscribe

See the sample of our latest issue here

Buy a copy of our latest anthology: A Year of Celebrations

Buy a copy of Flourish 2, our wellbeing bookazine

Listen to our podcast - Small Ways to Live Well

Feb 27, 2025
Join our Newsletter
Name
Email *

We respect your privacy and won't share your data.

email marketing by activecampaign
facebook-unauth twitter pinterest spotify instagram
  • Subscriber Login
  • Stockists
  • Advertise
  • Contact

The Simple Things is published by Iceberg Press

The Simple Things

Taking time to live well

We celebrate slowing down, enjoying what you have, making the most of where you live, enjoying the company of of friends and family, and feeding them well. We like to grow some of our own vegetables, visit local markets, rummage for vintage finds, and decorate our home with the plunder. We love being outdoors and enjoy the satisfaction that comes with a job well done.

facebook-unauth twitter pinterest spotify instagram